If you own a vintage Rubik's Cube from the 1980s or an early 2000s speed cube, there is a high probability the original stickers are faded, peeling, or simply worn smooth from years of twisting. In 2026, the world of cube customization has exploded, giving enthusiasts the tools to create professional-grade DIY sticker sets from their own homes. Whether you are restoring an heirloom puzzle for your collection or building a completely unique picture cube, learning to make your own stickers is the definitive skill for any serious cuber.
This comprehensive guide walks you through everything you need to know—from measuring the exact dimensions of a vintage cube face to printing, cutting, and applying your custom designs. We have incorporated the latest techniques from top puzzle modders, speed cubing retailers, and the global DIY community to ensure your stickers look flawless and last for years.
Why Make Your Own Stickers for a Vintage Cube in 2026?
The aftermarket for vintage cube replacement parts has become significantly more sophisticated. While you can still buy generic sticker sets from major retailers, DIY customization offers a level of personalization that mass-produced options simply cannot match.
- Perfect Fit: Vintage cubes (especially pre-1982 models) have slightly different sticker dimensions than modern speed cubes. DIY allows you to cut precisely for your specific model.
- Material Choice: Standard replacement stickers are often basic vinyl. As a DIY creator, you can choose matte finish, glossy laminate, holographic foil, or even textured anti-glare materials.
- Color Accuracy: You can dial in exact hex values for the perfect classic color scheme or invent a completely new palette for an artistic build.
- Cost Efficiency: Once you own the tools (a Cricut or Silhouette machine and printable vinyl), a single sheet of material can produce multiple sets, bringing the cost per cube down to pennies.
⚠️ Important Distinction: This guide is for replacement stickers, not tiles or plastic caps. If you own a vintage cube with plastic tiles (common on late 80s/early 90s models), the application method is different, but the design principles remain the same.
Prerequisites: Tools and Materials Checklist
Before you begin, assemble the following essential tools for a successful DIY sticker project. The quality of your final product depends heavily on your preparation.
| Tool / Material | Purpose | Recommended Specs |
|---|---|---|
| Vintage Rubik’s Cube | The canvas for your work | Any 3×3 model (original Ideal Toy, Rubik’s Brand, or custom DIY kit) |
| Digital Calipers | Measuring exact sticker recess dimensions | Accuracy to 0.01mm |
| Design Software | Creating the sticker grid | Adobe Illustrator, Inkscape (free), or Cricut Design Space |
| Printable Vinyl | The sticker material itself | Waterproof inkjet or laser vinyl (Avery, Oracal, or Silhouette brand) |
| Laminating Sheets | Protecting the printed design | Clear gloss or matte laminate |
| Cutting Machine | Precision cutting of sticker squares | Cricut Maker 3 / Joy, Silhouette Cameo, or X-Acto knife + metal ruler |
| Transfer Tape | Lifting and applying the grid | Low-tack paper transfer tape |
| Squeegee Tool | Removing air bubbles | Plastic card wrapped in soft cloth |
| Cleaning Solution | Preparing the cube surface | 70%+ isopropyl alcohol, cotton swabs, microfibre cloth |
| Tweezers | Handling individual small stickers | Fine-point precision tweezers |
✅ Verification: Before moving to step one, ensure your cube is completely disassembled or that you can access each face individually. A fully assembled cube makes sticker application prone to smudging.
Step-by-Step Guide: Creating Your DIY Sticker Set
Step 1: Measure Your Vintage Cube Accurately
Vintage cubes are not uniform. An 1980 Ideal Toy Rubik’s Cube has a different sticker recess size than a 1990s Rubik’s Brand or a modern DIY kit. Using general dimensions is the most common cause of a DIY sticker failure.
- Using your digital calipers, measure the width and height of one complete sticker recess on the cube face.
- Measure the gap between the recess edge and the cube’s center. Most vintage cubes have a sticker area of roughly 15.5mm to 16.5mm.
- Record your measurements. Create a square in your design software with these exact numbers.
Critical Note: Do not assume stickers are perfectly square. Some vintage molds were slightly off. Measure every face to find the smallest dimension, then use that size for all stickers to ensure uniform borders.
Step 2: Design the Sticker Grid in Software
Open your chosen design software and create a new document sized to your vinyl sheet (usually A4 or Letter).
- Create a 3×3 grid using your recorded measurements.
- Add a 0.5 mm bleed around each square if you are cutting manually. If using a Cricut Print Then Cut feature, you can set the cut lines to the exact size.
- Fill each square with your chosen color. For a standard WCA-competition scheme, use these approximate hex codes:White: #FFFFFFYellow: #FFD500Red: #B71234Orange: #FF5800Blue: #0046ADGreen: #009E60
- White: #FFFFFF
- Yellow: #FFD500
- Red: #B71234
- Orange: #FF5800
- Blue: #0046AD
- Green: #009E60
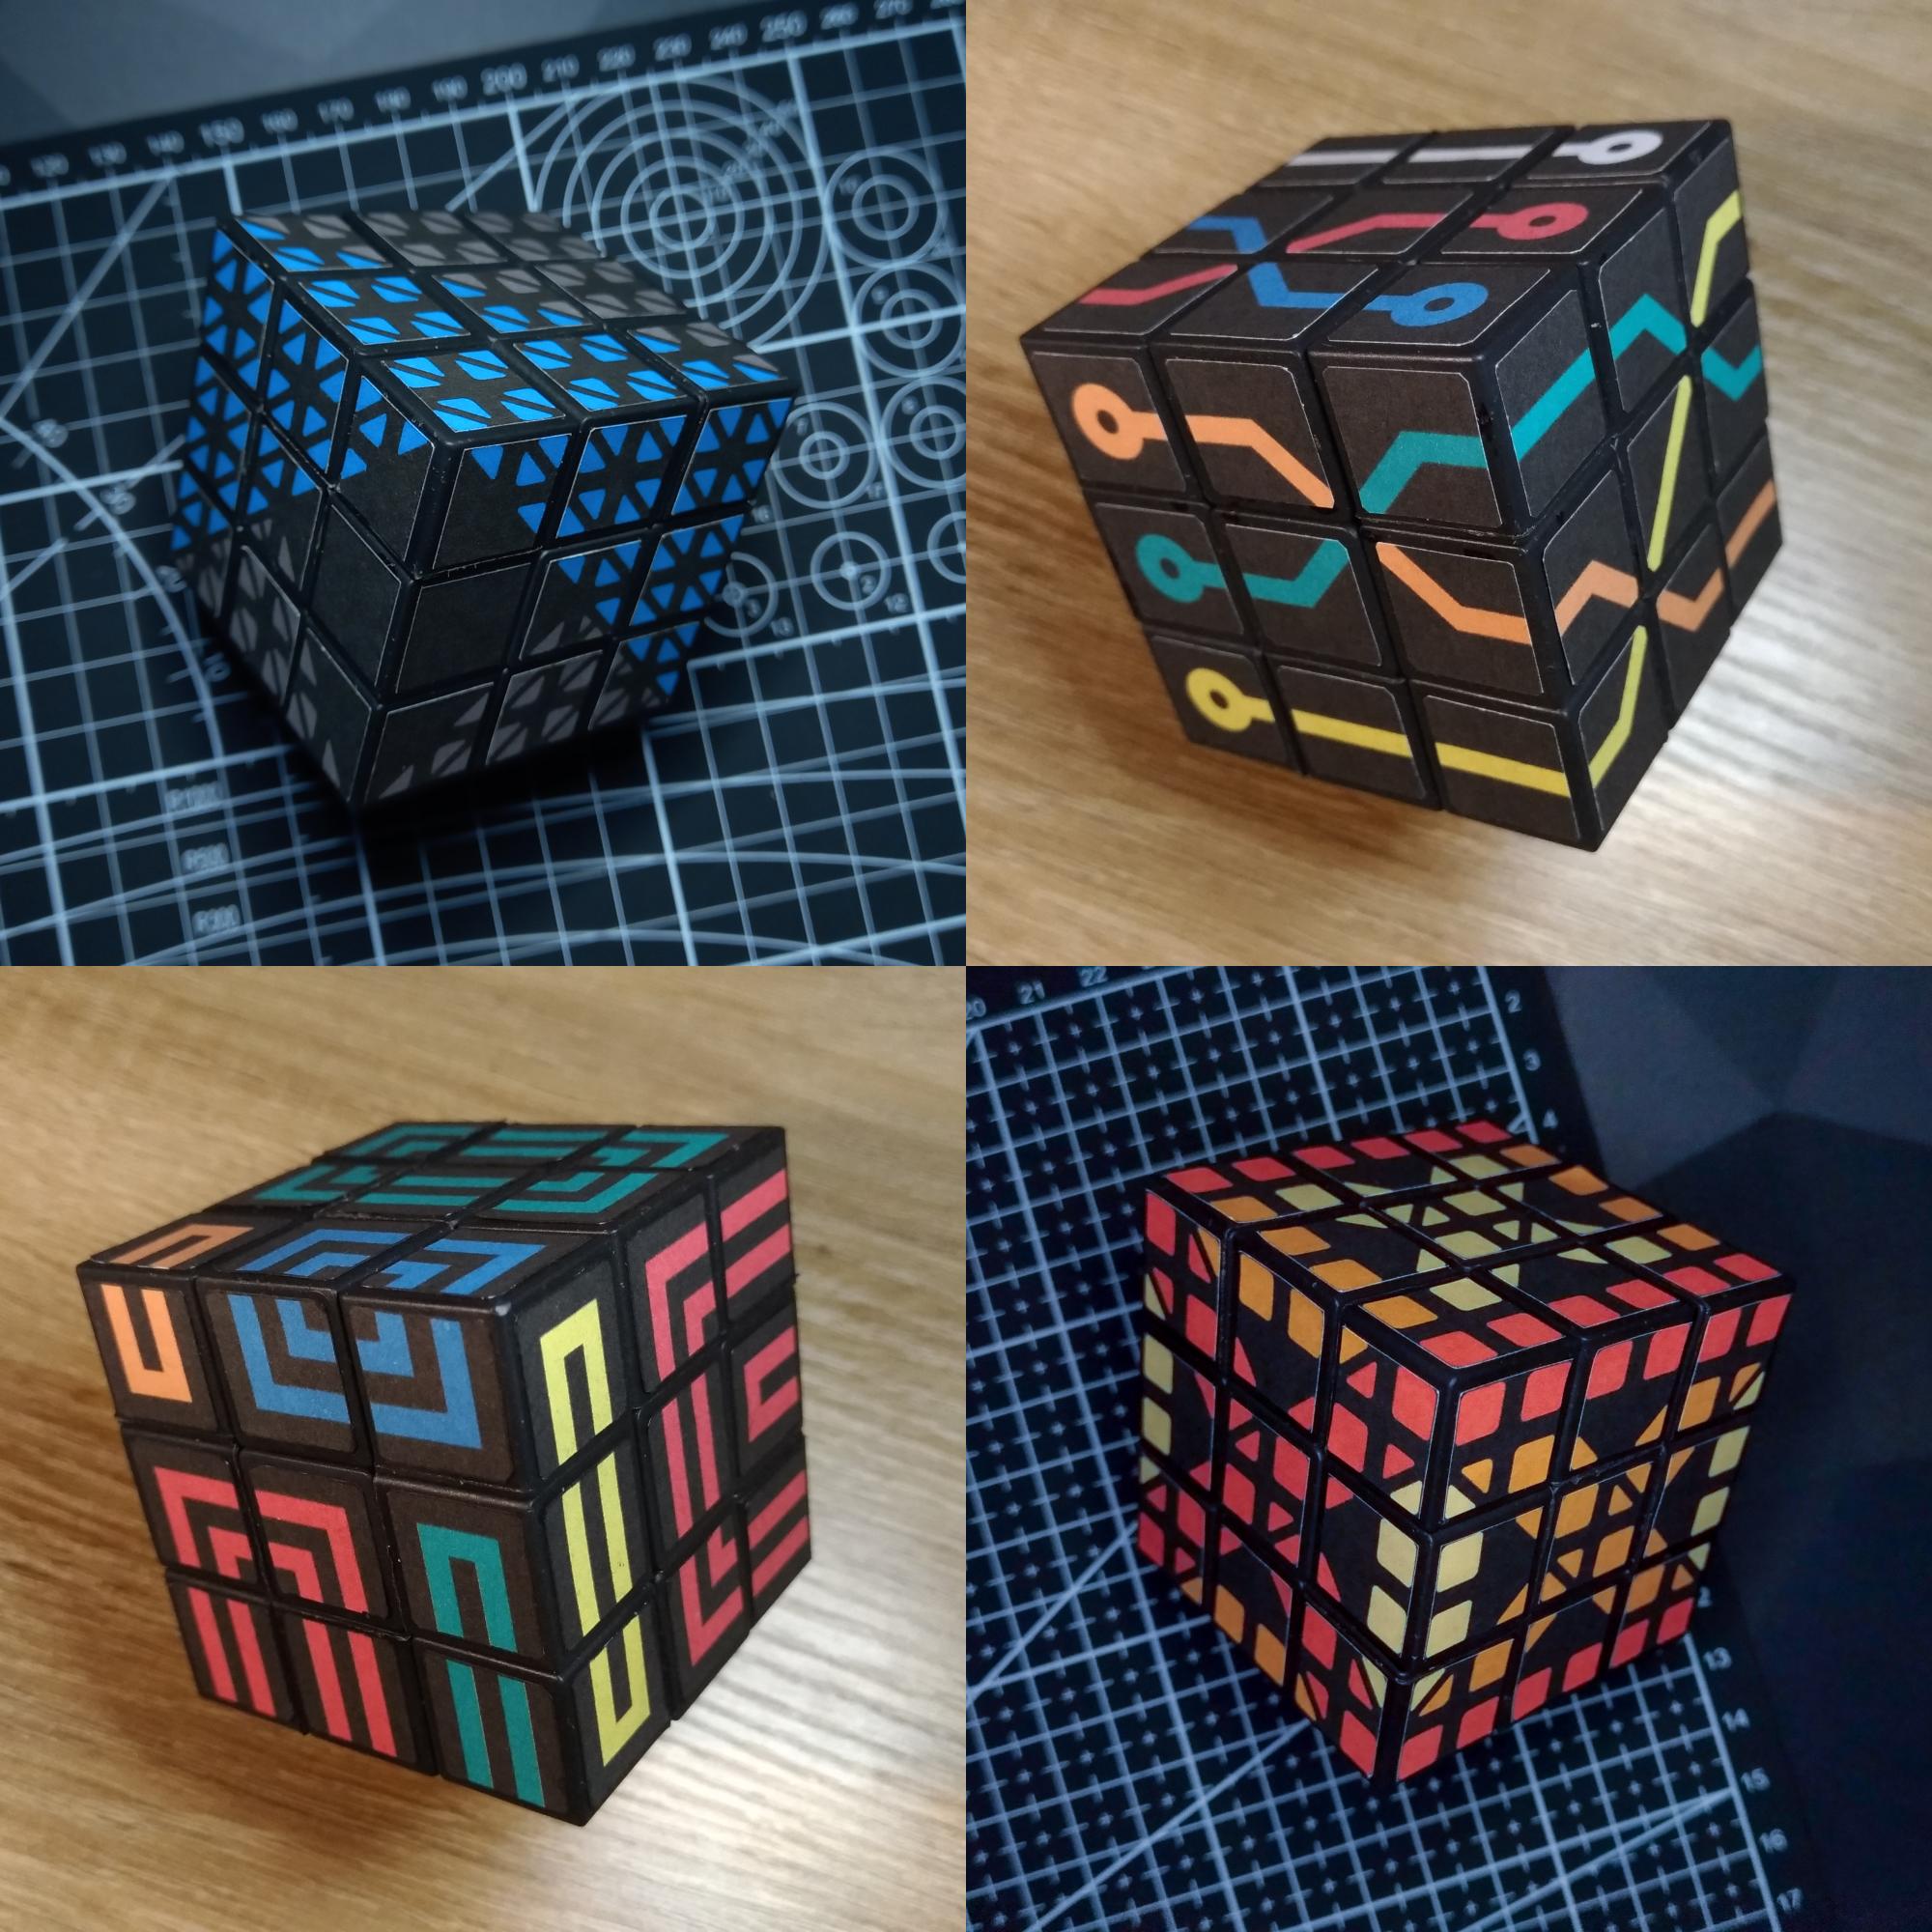
- If you are creating a custom art cube or calendar cube, import your images or logos directly into the squares.
Example of a pre-designed DIY sticker sheet. Creating your own template follows the same layout principles.
LSI Keyword Integration: When designing, remember you can create faded vintage effects, gradient blends, or metallic decals. The 2026 trend in cube customization is heavily leaning toward holographic and iridescent finishes, which are easily achieved with specialty printable vinyl.
Step 3: Print and Laminate
Print your design onto the printable vinyl sheet using the highest quality setting on your inkjet or laser printer.
- Inkjet Printers: Require a setting to allow the ink to dry completely (usually 1–2 hours). Apply a clear laminate sheet over the entire printed page to protect the ink from smudging and UV fading.
- Laser Printers: The toner is baked onto the vinyl, making it instantly water-resistant. You can skip the laminate step if you want a thinner sticker, but laminate adds durability against friction.
⚠️ Warning: If your printer feeder misaligns the sheet, your cut lines will be offset from your printed design. Always perform a registration test before cutting your final sheet.
Step 4: Cut the Stickers
Option A: Cricut / Silhouette (Recommended for Precision)
- Load the laminated sheet onto your cutting mat.
- In your software, designate the cut lines as “Vinyl” setting with a cut pressure of 10-12 (depending on material thickness).
- The machine will cut precisely around each sticker square.
Option B: Manual Cutting with X-Acto Knife
- Print your design on sticker paper without laminate.
- Place a metal ruler along your grid lines and make several shallow passes with a sharp #11 blade.
- Cut from the back of the sticker sheet to avoid tearing the printed face.
Properly cut sticker sheets ready for application. Notice the alignment grid maintained on the transfer tape.
Step 5: Prepare the Cube Surface
This step cannot be rushed. A dirty or oily surface will cause stickers to peel within days.
- Remove old stickers: Use a hairdryer on low heat to soften the adhesive, then peel carefully. Stubborn residue can be rolled off with your fingers.
- Clean residue: Apply isopropyl alcohol to a microfibre cloth and wipe each face thoroughly. For heavy glue buildup, Goo Gone is effective, but wash the face with soapy water afterward.
- Final wipe: Use a dry lint-free cloth to remove any dust or fibers.
✅ Verification: Hold the cube face under a bright light. You should see no sticky residue, dust, or fingerprint oil. If the surface feels tacky, repeat the alcohol wipe.
Step 6: Apply the Stickers Using Transfer Tape
This is where the magic happens. Proper application turns a DIY project into a professional restoration.
- Cut a piece of transfer tape slightly larger than your sticker grid (3×3 squares).
- Peel the backing off the transfer tape and apply it firmly over the entire sticker grid, rubbing with a squeegee.
- Peel the original vinyl backing away. The stickers should now be attached to the transfer tape in perfect alignment.
- Align the transfer tape grid with the cube face. The hinge method works best:Tape one edge of the transfer tape to the cube face.Lift the tape, remove the backing from the stickers, then lay the tape down slowly from the hinge.
- Tape one edge of the transfer tape to the cube face.
- Lift the tape, remove the backing from the stickers, then lay the tape down slowly from the hinge.
- Rub the entire face with your squeegee to ensure complete adhesion.
- Slowly peel away the transfer tape at a sharp angle.
⚠️ Warning: If a sticker lifts with the transfer tape, it means you did not squeegee hard enough. Lay the tape back down and rub again vigorously.
Step 7: Final Press and Curing
After all stickers are applied, reassemble the cube.
- Place the cube in a sticker press or simply wrap it tightly with a rubber band to apply even pressure across all faces.
- Let the cube sit untouched for 24 hours to allow the vinyl to fully cure to the plastic.

A completed custom cube featuring vibrant holographic stickers. The 2026 trend pushes boundaries on color and texture.
Troubleshooting Common DIY Sticker Problems
Even experienced modders hit snags. Here are the most common issues and their solutions based on community forums.
| Problem | Cause | Solution |
|---|---|---|
| Air bubbles under sticker | Insufficient squeegee action or dusty surface | Use a needle to prick the bubble, then press flat. |
| Stickers peeling after 1 week | Oily residue or weak transfer tape | Re-clean cube with alcohol and apply new sticker. |
| Color mismatch between faces | Different printer passes or ink drying | Print all faces on the same page in one batch. |
| Sticker edges catching on fingers | Sticker is too thick (double laminated) | Use single laminate or thinner vinyl. |
| Grid misaligned | Printer offset or manual cutting error | Use Cricut Print Then Cut for perfect alignment. |
Frequently Asked Questions
Q1: Can I compete in WCA tournaments with DIY stickers?
The World Cube Association (WCA) regulations allow any stickers that are colored and made of a similar material. As long as your colors are clearly distinguishable and the stickers do not provide a tactile advantage (e.g., raised edges), they are perfectly legal. A single logo on one center piece is also permitted.
Q2: What is the best way to remove old adhesive from a 1980s cube?
The safest method is isopropyl alcohol (90%) applied with a cotton swab. Avoid acetone or nail polish remover, as these can melt the vintage ABS or polystyrene plastic commonly used in older cubes. For stubborn glue, use Goo Gone followed by a soapy water wash.
Q3: Do I need a Cricut machine to make decent DIY stickers?
Absolutely not. While a Cricut or Silhouette dramatically improves precision and speed, many top-quality custom cubes are hand-cut with an X-Acto knife. The key is a sharp blade, a metal ruler, and a steady hand. See any 2024-2026 YouTube tutorial for proof of manual cutting excellence.
Q4: Can I create a custom logo for the center piece?
Yes, and it is one of the most popular modifications. The Instructables tutorial on this topic demonstrates printing a logo on a sticker-backed transparency or thin vinyl and applying it directly over a pre-existing white or black sticker. Ensure the logo is small enough not to interfere with grip.
Q5: My stickers arrived already printed from an Etsy shop. Can I still apply them myself?
Yes. Most Etsy sellers ship custom sets with transfer tape already applied. Follow the same cleaning and hinge method described in Step 6 of this guide to ensure perfect alignment and bubble-free application.
Conclusion
Restoring a vintage Rubik's Cube with a custom DIY sticker set is one of the most rewarding projects in the puzzling community. In 2026, the gap between professional manufacturing and home crafting has dissolved. With a digital caliper, a Cricut machine, and high-quality printable vinyl, you can create competition-grade stickers that rival anything available from major retailers.
Whether you are restoring an original 1980s Ideal Toy cube to its former glory or building a unique custom art piece for your shelf, the process is precise, creative, and deeply satisfying. Take your time, measure twice, cut once, and enjoy the satisfaction of twisting a cube that is truly yours.
References
- Puzzle Trickery (YouTube) — “How to Make Rubik's Cube Stickers for ANY Puzzle!”, 2024
- Ruwix Puzzle Community — “Rubik's Cube and Puzzle Stickers: Material Guide and WCA Regulations”, 2023
- Instructables — “Rubik's Custom Logo Sticker EASY!”, Laser Printing Technique, 2024
- TheCubicle — “Speed Cubing Sticker Sets for Vintage and Modern Puzzles”, Product Catalog, 2025
- Reddit r/Cubers — Community Discussion: “How to make a DIY Rubik's cube sticker mod (EASY!)”, 2023
- Etsy Marketplace — “Custom Rubik Cube Stickers”, Artisan Handmade Set Reviews, 2024–2026