Solving a 3×3 Rubik's Cube has long been the gold standard for brain training, yet for decades, it remained a mysterious barrier to entry for millions of people. You might have seen someone twist and turn that colorful puzzle in seconds and thought, "I could never do that." But here is the exciting truth for 2026: you absolutely can. Whether you are a student in downtown Chicago, a retiree in suburban Phoenix, or anyone looking for a mental workout at home, mastering the cube is now more accessible than ever before.
This guide is designed specifically for the complete novice. We are ditching the confusing jargon and complex speedcubing methods that require years of practice. Instead, we are focusing on the easy 3×3 rubiks cube solution no experience needed. By breaking the process down into just seven intuitive steps, this method guarantees success without requiring you to memorize hundreds of algorithms. In fact, with the right approach, you can solve your first cube in under an hour.
The satisfaction of clicking that final piece into place is unmatched. It builds patience, improves spatial reasoning, and offers a tangible sense of achievement. So, grab a cube, clear your schedule, and let's embark on this journey together. By the end of this article, you won't just know how to solve it; you'll understand why it works, giving you the confidence to tackle any scramble.
Why the Beginner Layer-by-Layer Method is Still King in 2026
In the world of twisty puzzles, trends come and go. Speedcubing competitions feature advanced methods like CFOP or Roux that allow solvers to finish in under ten seconds. However, for the average person seeking a hobby or a challenge, these advanced techniques are often overkill. They require extensive memorization and muscle memory that simply isn't necessary for the joy of solving.
The Beginner's Layer-by-Layer (LBL) method remains the undisputed champion for newcomers. It is logical, linear, and forgiving. This approach treats the cube as three distinct layers: the bottom, the middle, and the top. You solve them one by one, securing each layer before moving to the next. If you make a mistake, it is rarely catastrophic; you can usually undo a step without losing your entire progress.
Research into cognitive learning suggests that breaking complex tasks into smaller, manageable chunks significantly increases retention and reduces anxiety. This is exactly what the LBL method does. It transforms a seemingly impossible 43 quintillion combinations problem into a series of simple, repeatable actions. For 2026, where mental wellness and stress relief are top priorities, this gentle introduction to cubing is more relevant than ever.
Furthermore, the resources available today are superior to anything from a decade ago. Interactive 3D simulators, video tutorials with real-time commentary, and community forums provide instant feedback. You don't need to be a math genius or have perfect dexterity. You just need a willingness to follow instructions and practice for thirty minutes. The barrier to entry has never been lower.
The Psychology of the First Solve
There is a unique psychological boost that comes from solving your first cube. It proves to your brain that persistence pays off. Many adults give up on challenges quickly because they fear failure. The Rubik's Cube is perfect for overcoming this mindset because the rules are fixed, and the outcome is guaranteed if you follow the steps correctly.
When you finally hold a solved cube in your hands after hours of confusion, the dopamine rush is real. It encourages you to try again, perhaps aiming to beat your previous time. This cycle of challenge and reward is what makes the hobby so addictive. Starting with the easy method ensures that your first experience is one of triumph rather than frustration.
Essential Tools and Notation Before You Start
Before diving into the seven steps, it is crucial to establish a common language. Just as you wouldn't start building a house without understanding blueprints, you shouldn't start solving without knowing Cube Notation. This system uses letters to represent the faces of the cube and apostrophes to indicate direction. It might look intimidating at first, but it is actually very simple once you grasp the basics.
Understanding Basic Moves
Think of the cube as having six faces: Up (U), Down (D), Left (L), Right (R), Front (F), and Back (B).
- Single Letter (e.g., R): Means turn the Right face clockwise. Imagine the clock hands moving forward.
- Letter with Apostrophe (e.g., R'): Means turn the Right face counter-clockwise. Imagine the clock hands moving backward.
- Letter with 2 (e.g., R2): Means turn the Right face 180 degrees (twice).
These basic moves form the foundation of every algorithm you will learn. While advanced solvers use complex sequences, our beginner method relies heavily on just a few of these movements repeated in specific patterns. Mastering this notation will make reading the step-by-step guides much easier.
Choosing Your First Cube
Not all cubes are created equal. In 2026, the market offers a wide range of options, from cheap plastic toys to high-end magnetic speed cubes. For a beginner, the most important factor is smoothness. A cube that sticks or feels gritty will frustrate you and slow down your learning process.
You do not need to spend $50 on a professional-grade cube immediately. A mid-range cube from reputable brands like MoYu, GAN, or Cubikon is perfect. Look for terms like "speed cube" or "beginner friendly." These often come pre-lubricated and adjusted out of the box. Avoid the cheapest dollar-store versions, as their internal mechanisms are often too tight, making rotation difficult and increasing the risk of breaking pieces.
Step 1: Creating the White Cross – Building Your Foundation
The journey begins with the simplest goal: creating a White Cross on the top face. This step is entirely intuitive, meaning there are no algorithms to memorize. It relies on observation and logic. Your goal is to arrange the four white edge pieces (the pieces with two colors) so that they form a plus sign (+) on the white face, and importantly, the side colors of these edges must match the center pieces of the adjacent sides.
How to Execute the White Cross
Start by holding the cube with the white center piece on top. Scan the bottom layer for any white edge pieces. If you find one, rotate the bottom layer until the second color on that edge matches the center piece directly below it. For example, if the edge has white and blue, ensure the blue sticker aligns with the blue center.
Once aligned, perform a simple 180-degree turn of the bottom layer to bring the edge up to the top. Repeat this process for all four white edges. As you work, you might encounter an edge that belongs on the bottom layer but is currently stuck in the middle or top. Don't panic! Simply move it out of the way, solve another edge, and then bring the misplaced one back down when you are ready.
Common Mistakes to Avoid
A frequent error beginners make is rushing this step. They try to force an edge into place without checking the side colors. Remember, a correct cross isn't just about white stickers facing up; it's about the entire structure being coherent. If your cross looks messy, take a moment to visualize where each piece needs to go relative to the side centers.
Another pitfall is ignoring the orientation of the cross. Ensure that the arm of the cross extends towards the correct centers. If you build a cross that looks right from above but doesn't match the sides, you will hit a wall in Step 2. Take your time here; this step sets the tone for the rest of the solve.
Step 2: Solving the White Corners – Completing the First Layer
Now that you have a solid white cross, it's time to complete the entire white face. This involves placing the four White Corner pieces (pieces with three colors: white and two others) into their correct positions. Once these are in place, the whole bottom layer should be white, with the side colors matching the centers of the middle layer.
The Right Algorithm
This is the first actual algorithm you will learn, but don't let that scare you. It is short and repetitive: R U R' U'.
Let's break it down:
- R: Turn the Right face clockwise.
- U: Turn the Top face clockwise.
- R': Turn the Right face counter-clockwise.
- U': Turn the Top face counter-clockwise.
Positioning the Corners
Find a white corner piece in the bottom layer. Rotate the bottom layer (D) until the corner is directly underneath where it needs to go. Look at the two non-white colors on the corner; they should form an "L" shape that lines up perfectly with the two corresponding center pieces on the front and right faces.
Hold the cube so this target corner is at the front-right-bottom position. Now, repeatedly apply the algorithm R U R' U'. Watch closely: the corner will wiggle its way up into the top layer. Sometimes it takes one repetition, sometimes five. Keep doing it until the white sticker faces up and the other two colors match their respective centers. The cube will look scrambled during this process, which is normal! Trust the process.
Repeat this for all four corners. Once finished, flip the cube over so the white face is on the bottom. Congratulations! You have successfully solved the first layer. This is a massive milestone.
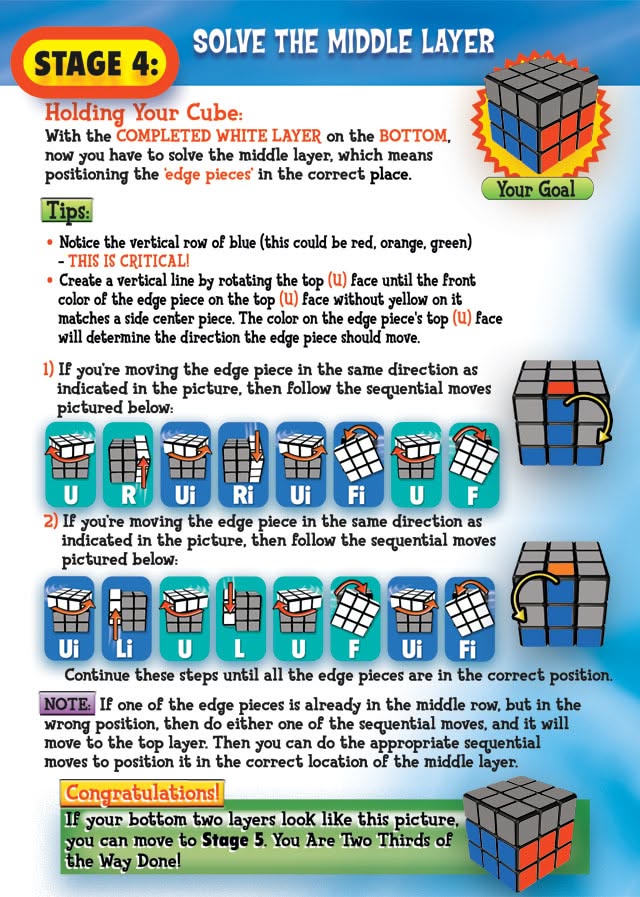
Step 3: Solving the Middle Layer – Filling the Gap
With the white layer complete and sitting safely on the bottom, we now turn our attention to the Middle Layer. This layer consists of four edge pieces that do not contain yellow. Our goal is to insert these four edges between the white layer and the yellow layer, effectively completing the first two layers of the cube.
Identifying the Target Edges
Look at the top (yellow) layer. Find an edge piece that does not have yellow on it. This is your target. Compare its two side colors to the center pieces on the left and right faces. Determine which slot it belongs in: the front-right slot or the front-left slot.
The Two Algorithms
Depending on which direction the piece needs to go, you will use one of two algorithms. Both are variations of the moves you learned in Step 2.
For Moving Right:
If the edge needs to move to the right side, use: U R U' R' U' F' U F.
- Hold the cube so the target slot is at the front-right.
- Perform the sequence. The piece will slide into place, and the top layer will shift, but the first two layers remain solved.
For Moving Left:
If the edge needs to move to the left side, use: U' L' U L U F U' F'.
- Hold the cube so the target slot is at the front-left.
- Perform the sequence. Again, the piece locks into place perfectly.
Troubleshooting Stuck Pieces
Sometimes, you might find a middle-layer edge already in the correct spot but twisted the wrong way, or you might find no suitable yellow-less edges in the top layer. If this happens, simply perform either algorithm once to pull a top-layer edge down into the middle layer (creating a new candidate), solve it, and then continue. Patience is key here; eventually, all four edges will find their homes.
By the end of this step, you should have a fully solved 2x2x2 block on the bottom and a solid 2×3 rectangle on the sides. The only part left unsolved is the top yellow face.
Step 4: Creating the Yellow Cross – Orientation Matters
Now we arrive at the last layer. Flip the cube so the yellow face is on top. Your goal in this step is not to solve the yellow face completely, but simply to create a Yellow Cross on top. This means arranging the yellow edge pieces to form a plus sign (+).
It is important to note that at this stage, the side colors of the yellow edges do not need to match the center pieces yet. We are only concerned with the orientation of the yellow stickers. There are three possible scenarios you might see: a single yellow dot, an "L" shape, or a straight line.
The Universal Algorithm
Regardless of which pattern you start with, you will use the same algorithm to progress toward the cross: F R U R' U' F'.
- If you see a Dot: Perform the algorithm once. You will likely get an "L" shape.
- If you see an "L" Shape: Orient the cube so the "L" looks like a clock's 10:10 position (top-left and front-left). Perform the algorithm once to get a line.
- If you see a Line: Orient the cube so the line is horizontal (left-to-right). Perform the algorithm once to get the full cross.
After performing the algorithm the necessary number of times, you will see a bright yellow cross on top. This feels magical because you haven't touched the sides yet, yet the pattern emerges purely through the mechanics of the top layer.
Step 5: Aligning the Yellow Edges – Matching the Sides
With the yellow cross formed, the next challenge is to make sure the side colors of the yellow edges match the center pieces of the middle layer. Currently, the edges are in the correct shape but in the wrong positions around the circle.
Finding Matches
Look at the four side centers (Front, Back, Left, Right). Is there any side where the yellow edge already matches the center color? If yes, hold that matching side at the back of the cube. If no sides match, just pick any side and hold it at the back; the algorithm will create a match for you.
The Positioning Algorithm
Use this sequence: R U R' U R U2 R'.
This longer algorithm rotates the edge pieces clockwise around the top layer.
- Hold the matched side at the back.
- Execute the algorithm.
- Check the sides. If all four edges now match their centers, skip to Step 6.
- If not, repeat the algorithm. Usually, one or two repetitions are sufficient to align everything perfectly.
This step requires a bit of visual tracking, but since the first two layers remain untouched, you can trust that your progress is safe. You are essentially cycling the edges until they fall into the correct slots.
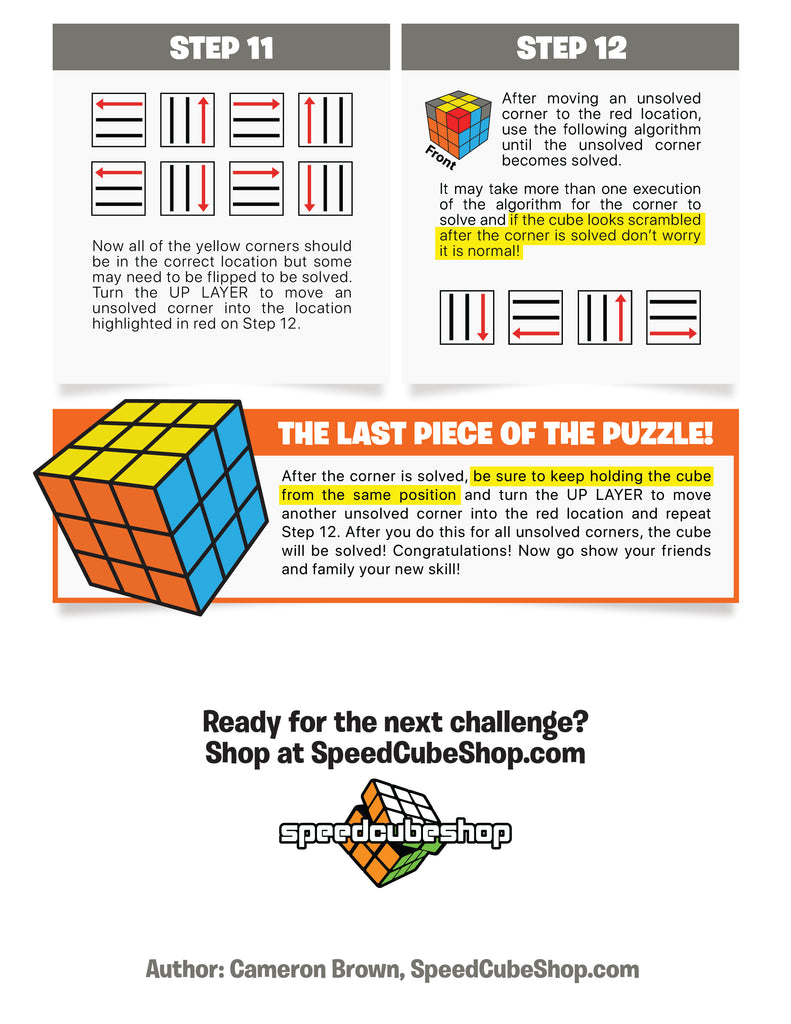
Step 6: Positioning the Yellow Corners – Getting Them Close
Now comes the trickiest part for many beginners: getting the yellow corners into the right spots. Remember, the corners might be in the correct location but twisted incorrectly, or they might be in the wrong location entirely.
The Corner Swap Algorithm
We need to move the corners to their correct positions without worrying about their orientation yet. Look for a corner that is already in the correct spot (all three colors match the adjacent centers). If none are correct, just start anywhere.
Hold the correct corner at the front-right-top position. Then, execute this algorithm: U R U' L' U R' U' L.
This sequence swaps the three other corners in a cycle. After doing it, check the cube again. You might find one corner is now correct. If so, keep that one fixed and repeat the algorithm to fix the remaining three. If no corners are correct initially, do the algorithm once, and it will likely create a correct corner for you to lock in.
Once all four corners are in their correct positions (even if they are still twisted), you are one step away from victory. The cube will look almost solved, with only the yellow stickers needing adjustment.
Step 7: Orienting the Final Corners – The Grand Finale
The final step is to twist the yellow corners so that the entire top face becomes solid yellow. Do not worry about the side colors; we only care about the yellow stickers facing up.
The Repeat Twist Algorithm
This is the famous "Sune" variation used to orient corners. The algorithm is: R U R' U R U2 R'.
- Hold a corner that needs twisting at the front-right-top.
- Perform the algorithm. The corner will twist, but the rest of the cube will look messed up. That's okay!
- Without moving the bottom layer, rotate only the Top face (U) to bring the next unsolved yellow corner to the front-right-top position.
- Repeat the algorithm.
You may need to repeat this process 2, 3, or even 4 times for a single corner. Be patient. Each time you apply the algorithm, the corner twists closer to the correct orientation. Once one corner is solved (yellow facing up), move to the next unsolved corner using the top layer rotation and repeat.
The Moment of Truth
As you solve the last corner, watch closely. Often, solving the final corner will automatically solve the rest of the cube due to the mathematical constraints of the puzzle. If you have followed every step correctly, the moment the last yellow sticker clicks into place, the entire cube will snap into a solved state.
Take a deep breath. Celebrate! You have just mastered a skill that stumps geniuses and champions alike. Whether you did it in 30 minutes or 3 hours, the accomplishment is yours.
Overcoming Common Challenges and Troubleshooting
Even with the best guide, you might encounter hiccups. Here are solutions to the most common problems faced by beginners in 2026.
The Cube Won't Turn Smoothly
If your cube feels sticky or resistant, it likely needs cleaning and lubrication. Open the cube (if it allows), wipe away old grease, and apply a specialized cube lubricant. This is a game-changer for speed and ease of use.
I Made a Mistake and Broke My Progress
Don't despair! The beauty of the beginner method is its reversibility. If you mess up a step, simply re-do the previous step's algorithm in reverse. Most mistakes happen because a corner was inserted upside down; you can usually fix this by repeating the corner algorithm until it pops out, then re-inserting it correctly.
My Cube Looks Unsolvable
If you disassemble your cube and put it back together randomly, it might end up in an unsolvable state (e.g., two swapped edges). This is rare with modern magnets but possible. To fix this, take one layer apart, swap two edge pieces, and reassemble. Always ensure the center caps are oriented correctly relative to each other.
Frequently Asked Questions (FAQ)
Q: How long does it take to learn the easy 3×3 rubiks cube solution no experience needed?
A: Most beginners can solve their first cube within 30 to 45 minutes using this method. With a little practice, you can reduce this to 15-20 minutes. Mastery comes with repetition, not innate talent.
Q: Do I need to memorize all the algorithms?
A: Not at all. This guide uses only seven simple algorithms. You only need to remember the letter sequences and when to apply them based on the pattern you see. Muscle memory will take over with practice.
Q: Can I solve the cube without looking at instructions?
A: Yes! Once you have solved it a few times, the patterns become familiar. Eventually, you will recognize the "dot," "L-shape," and "cross" instantly and know which algorithm to use without thinking.
Q: What is the fastest way to solve a cube in 2026?
A: While speedcubing methods exist, the fastest learning path for a beginner is sticking to the Layer-by-Layer method until you are comfortable. Trying to learn advanced methods too early often leads to frustration and slower initial progress.