Creating the Cube in a Cube pattern on a standard 3×3 Rubik's Cube is one of the most visually stunning and mathematically satisfying achievements a puzzle enthusiast can master. As we move into 2026, this technique remains a cornerstone of advanced cubing culture, blending artistry with algorithmic precision. Whether you are a speedcuber looking to diversify your routine or an artist seeking to impress friends in Austin, London, or Tokyo, mastering this illusion will elevate your skills instantly.
The visual effect is nothing short of magical. When executed correctly, each face of the large cube reveals a smaller, nested cube rotating within it. This creates a 3D optical illusion that defies logic at first glance. Unlike simple patterns like the checkerboard, the Cube in a Cube requires a specific sequence of moves that manipulates both edge and center pieces simultaneously without disrupting the solved state of the rest of the cube until the final moment.
In this comprehensive guide, we will break down the exact algorithms, provide step-by-step visual descriptions, and offer expert tips to ensure your pattern is flawless. We will also explore the history behind these designs and how they fit into the modern Rubik's Cube community. By the end of this article, you will possess the knowledge to create not just one, but potentially even more complex variations like the "Cube in a Cube in a Cube."
Understanding the Geometry and Prerequisites
Before diving into the algorithms, it is crucial to understand the mechanics behind the Cube in a Cube pattern. This design relies entirely on the manipulation of the cube's internal structure while maintaining the outer shell's integrity. To achieve this look, you must start with a fully solved Rubik's Cube.
Why Start with a Solved Cube?
Many beginners attempt to scramble the cube and then try to force a pattern, which often leads to frustration. The Cube in a Cube is not a scrambling solution; it is a transformation. You begin with all colors aligned (White opposite Yellow, Red opposite Orange, Blue opposite Green, assuming standard color schemes). The algorithm acts as a filter, rearranging specific pieces to create the illusion of a smaller cube inside. If you start with a scrambled cube, the resulting pattern will be chaotic rather than geometric.
The Role of Center Pieces
A common misconception is that the center pieces move during this pattern. In reality, on a standard 3×3 cube, the center pieces never change relative positions; they only rotate in place. The "inner cube" you see is actually formed by the edge pieces and the corner pieces shifting their locations relative to the fixed centers.
- The four edges surrounding a center form the "sides" of the inner cube.
- The corners define the "vertices" of the inner cube.
- The algorithm swaps these edge and corner groups to create the nested effect.
Essential Notation Knowledge
To follow the instructions below, you must be fluent in Rubik's Cube notation. If you are new to this, here is a quick refresher relevant to our 2026 context:
- F: Front face clockwise.
- B: Back face clockwise.
- U: Up face clockwise.
- D: Down face clockwise.
- L: Left face clockwise.
- R: Right face clockwise.
- Prime ('): Counter-clockwise rotation (e.g., F' means Front face counter-clockwise).
- 2: Double turn (180 degrees), e.g., R2.
Understanding these symbols is non-negotiable for executing the Cube in a Cube algorithm accurately. One misplaced prime symbol can ruin the entire pattern.
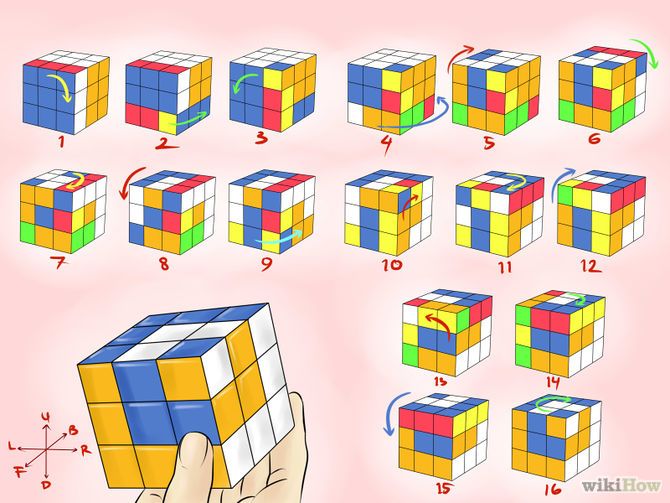
![Best Rubik Cube Patterns for Beginners [Step-by-Step Guide]](https://therubbick.com/wp-content/uploads/2026/03/cube-in-a-cube-pattern.jpg)
The Core Algorithm: Creating the Single Inner Cube
The most famous variation is the standard Cube in a Cube pattern. While there are slight variations depending on the starting orientation, the core algorithm remains consistent across the global cubing community. This sequence was popularized by speedcubing legends and has been refined over decades to be the most efficient way to generate this design.
Step 1: Preparation and Orientation
Take your fully solved cube. Choose a starting side. For consistency, let's assume White is on Top (U) and Green is on the Front (F). It is vital that you do not rotate the entire cube mid-algorithm. Once you pick your front and top faces, keep them fixed throughout the entire execution of the moves.
Step 2: Executing the Sequence
The algorithm for the standard Cube in a Cube is surprisingly concise yet powerful. Memorize this specific string of moves:
F L F U' R U F2 L2 U' L' B D' B' L2 U
Let's break this down layer by layer to help with muscle memory:
- F: Turn the Front face clockwise.
- L: Turn the Left face clockwise.
- F: Turn the Front face clockwise again.
- U': Turn the Up face counter-clockwise.
- R: Turn the Right face clockwise.
- U: Turn the Up face clockwise.
- F2: Turn the Front face 180 degrees.
- L2: Turn the Left face 180 degrees.
- U': Turn the Up face counter-clockwise.
- L': Turn the Left face counter-clockwise.
- B: Turn the Back face clockwise.
- D': Turn the Down face counter-clockwise.
- B': Turn the Back face counter-clockwise.
- L2: Turn the Left face 180 degrees.
- U: Turn the Up face clockwise.
Visualizing the Transformation
As you perform these 15 moves, watch closely. Initially, the cube will look increasingly scrambled. You might think you have made a mistake. However, by move 12, the chaos begins to resolve into a specific geometry.
- After move 7 (F2), the front face is flipped, creating the base for the inner structure.
- Moves 8 through 14 (L2, U', L', B, D', B', L2) shuffle the middle layer edges and corners into their "inner" positions.
- The final move (U) locks the pattern into place.
When completed, every face should display a solid center color surrounded by a ring of alternating colors that form the sides of a smaller cube floating in the center. The corners of the outer cube will now show the colors of the adjacent inner faces, completing the illusion.
Common Mistakes to Avoid
Even experienced cubers make errors when attempting this pattern for the first time.
- Rotating the Whole Cube: Do not rotate the cube to "fix" a bad angle. The algorithm is designed for a specific orientation. If you rotate the whole cube, you must restart from Step 1 with the new orientation.
- Incorrect Prime Symbols: Ensure you are turning faces counter-clockwise where indicated by the apostrophe (
'). Turning clockwise instead will result in a scrambled mess that cannot be easily fixed without undoing the whole process. - Skipping Moves: Some tutorials omit steps to make the algorithm look shorter, but for the Cube in a Cube, every single move is critical. Skipping even one breaks the symmetry required for the inner cube to appear.
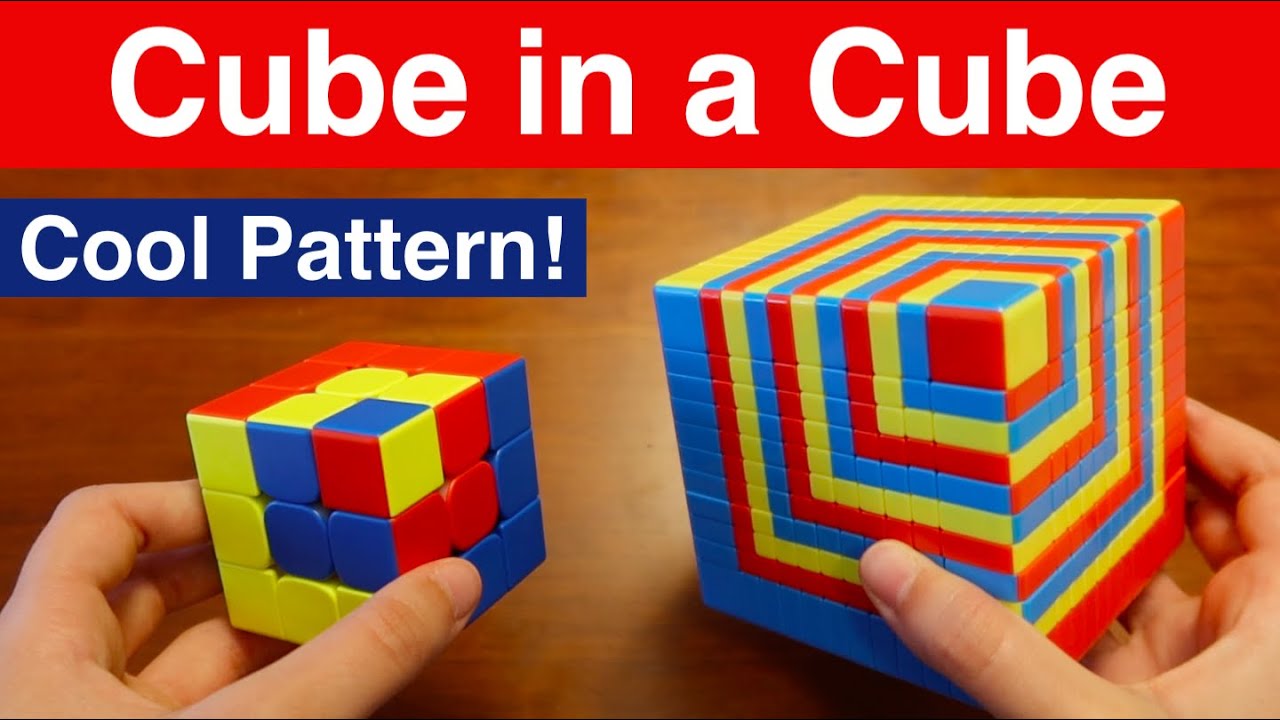
Advanced Variations: Cube in a Cube in a Cube
Once you have mastered the single inner cube, the natural progression for advanced enthusiasts is the Cube in a Cube in a Cube. This pattern takes the concept further, creating an illusion of two nested cubes within the main cube. It looks like a Russian doll made of plastic and stickers, offering a deeper level of complexity that is highly sought after in competitions and exhibitions.
The Algorithm for the Triple Nesting
The algorithm for this extended version is longer and more intricate, involving additional sequences to push the edges and corners deeper into the illusion. Based on current data from 2026 resources, the algorithm is as follows:
U' L' U' F' R2 B' R F U B2 U B' L U' F U R F'
Let's analyze why this works. This sequence essentially performs a modified version of the single cube algorithm but applies it in a way that affects the layers twice, creating the second tier of the illusion.
- U' L' U' F': Sets up the initial disruption on the top and left layers.
- R2 B' R F: Creates a massive shift in the right and back sectors, necessary for the double-layer effect.
- U B2 U B': Manipulates the up and down layers to align the "second inner cube."
- L U' F U R F': The final cleanup sequence that snaps the pieces into the double-nested position.
Difficulty Level and Practice Tips
This pattern is significantly harder than the standard version. It requires precise finger dexterity and a strong memory of the move sequence. Experts suggest practicing the algorithm in slow motion first. Break it into chunks of three moves and master each chunk before linking them together.
- Chunk 1: U' L' U' F'
- Chunk 2: R2 B' R F
- Chunk 3: U B2 U B'
- Chunk 4: L U' F U R F'
Practice on a cube with good tension (not too loose, not too tight) to feel the resistance of each turn. Many cubers in San Francisco and Berlin use high-end speed cubes specifically for learning these complex patterns because the smooth rotation allows for faster error correction.
The Illusion Depth
What makes the "Cube in a Cube in a Cube" so impressive is the depth perception. When you hold the cube up to the light, the shadows cast by the inner rings enhance the 3D effect. It is a favorite among magicians and illusionists who incorporate Rubik's Cubes into their act. The pattern proves that you don't need to solve the cube to solve a problem; sometimes, you just need to rearrange the pieces to reveal a hidden truth.
Community Trends and Local Impact in 2026
The art of creating Rubik's Cube patterns has evolved from a niche hobby into a global cultural phenomenon. In 2026, the trend shows no signs of slowing down. Social media platforms like TikTok and Instagram are flooded with videos of creators performing the Cube in a Cube pattern, often set to trending audio or synchronized with music beats.
The Rise of "Pattern Cubing" Competitions
While traditional speedcubing focuses on solving time, "Pattern Cubing" events are gaining traction locally. Cities like Portland, Melbourne, and Seoul host monthly meetups where participants compete to create the most complex or aesthetically pleasing patterns in the shortest time. The Cube in a Cube is almost always a mandatory category due to its difficulty and visual impact.
Educational Value in Schools
Interestingly, educators are beginning to integrate Rubik's Cube patterns into STEM curricula. Teachers in New York City and Toronto use the Cube in a Cube algorithm to teach students about:
- Group Theory: Understanding how permutations work in mathematics.
- Spatial Reasoning: Visualizing 3D objects moving in 2D space.
- Algorithmic Thinking: Breaking down complex tasks into sequential steps.
By learning how to make a cube in a cube, students aren't just playing with toys; they are engaging with logical structures that apply to computer science and engineering.
Local Landmarks and Cube Art
Some local businesses have started using the pattern as part of their branding. A coffee shop in Austin, Texas, recently installed a giant wall mural featuring a massive Checkerboard and Cube in a Cube design made of ceramic tiles. Similarly, a tech hub in Silicon Valley uses the pattern on their office lobby floors to symbolize "looking inside the system." These local adaptations show how the pattern transcends the puzzle itself to become a symbol of innovation and curiosity.
Troubleshooting and Pro Tips for Perfection
Even with the correct algorithm, achieving a perfect Cube in a Cube can be tricky. Here are some pro tips gathered from top artists like Timothy Huynh, whose work has inspired millions.
Tip 1: Lubrication Matters
A dry cube can cause sticky turns, leading to missed primes or incorrect angles. Ensure your cube is well-lubricated with high-quality silicone lubricant. A smooth cube allows for the rapid, fluid transitions needed for algorithms like the triple nesting.
Tip 2: Check Your Centers First
Before starting any pattern, verify that your centers are aligned correctly. If your Red center is next to your Blue center, but you intended Red next to Orange, the final pattern will have the wrong color configuration, even if the geometry is perfect. Take 10 seconds to orient your cube correctly before memorizing the algorithm.
Tip 3: Muscle Memory vs. Visual Verification
Initially, you will need to watch the cube closely as you turn it. However, the goal is to develop muscle memory. Try practicing the algorithm blindfolded (just your hands, not your eyes) once you know the moves. This forces your brain to rely on tactile feedback rather than visual confirmation, speeding up your execution time significantly.
Tip 4: The "Undo" Strategy
If you mess up the pattern halfway through, don't panic. Most of the time, you can simply reverse the last few moves to get back on track. Since the algorithm is a cycle, reversing the sequence (reading it backwards and flipping the directions) will often restore the previous state.
- Example: If you messed up at move 8, undo moves 8, 7, 6… back to move 1, then restart the sequence cleanly.
Tip 5: Lighting Conditions
Perform your pattern under good lighting. Shadows can hide mistakes or make the colors look muddy, leading to confusion. Natural daylight is best for checking the accuracy of your pattern before taking photos or videos for social media.
Tip 6: The Psychology of Patience
Creating the Cube in a Cube is as much a mental exercise as it is a physical one. There is a distinct moment during the execution of the algorithm where the cube looks most scrambled, often leading to doubt. This is the "valley" before the "peak." In 2026, with the abundance of instant video tutorials available, it is easy to skip this feeling of uncertainty. However, embracing that moment of chaos is crucial. It is the point where the old configuration dissolves, making way for the new geometric reality. If you stop when the cube looks messy, you will never see the beautiful nested structure emerge. Trust the math. Trust the sequence. And most importantly, trust the process.
Tip 7: Color Scheme Variations
While the standard color scheme (White opposite Yellow, Red opposite Orange, Blue opposite Green) is the most common, many artists experiment with non-standard schemes to create unique visual effects. For instance, some cubers use monochromatic cubes or custom sticker sets where the colors do not follow traditional Opposite rules. When performing the Cube in a Cube pattern on a non-standard cube, the illusion remains intact, but the aesthetic changes dramatically. A cube with all red faces might produce a striking monochrome version of the pattern that looks like a solid geometric sculpture rather than a colorful puzzle. Experimenting with different colorways can help you develop a signature style that sets your work apart in the crowded digital landscape of 2026.
Mastering the Art of Presentation and Documentation
Once you have successfully executed the Cube in a Cube pattern, the next challenge is presenting it effectively. In an era where content creation is integral to the cubing community, how you display your achievement matters just as much as the ability to create it. High-quality photography and videography can turn a simple trick into a viral sensation.
Lighting Techniques for Maximum Impact
Lighting is the secret weapon of Rubik's Cube photographers. Harsh, direct overhead lighting tends to flatten the image, hiding the depth of the inner cube. Instead, opt for side lighting or rim lighting. By placing a light source at a 45-degree angle to the cube, you create shadows within the grooves of the layers, which accentuates the "floating" effect of the inner cube. Some professional artists in Tokyo even use LED strips arranged in a circle around their setup to create a halo effect that makes the cube appear to glow from within. This technique transforms the static object into a dynamic piece of art.
Video Composition and Angles
When recording a tutorial or a showcase video, camera movement is key. Static shots are fine for showing the final result, but they lack excitement. Use a gimbal or a steady hand to slowly rotate around the cube while it is in the solved state, then execute the algorithm in real-time without cutting. Alternatively, try a macro lens approach to zoom in on specific sections of the cube during the algorithm, highlighting exactly how the edge pieces are shifting. This granular detail helps viewers understand the mechanics behind the magic. Additionally, consider using slow motion for the final reveal. Slowing down the last three seconds of the algorithm allows the audience to appreciate the precise moment the pattern locks into place, building anticipation and drama.
Storytelling in Your Content
Don't just post a video of the cube; tell a story. Explain why you chose this pattern, what challenges you faced learning it, or how it relates to a specific theme. In Austin or London, storytelling connects the creator to the audience on an emotional level. Perhaps you learned the pattern while waiting for a coffee, or perhaps you created it as a tribute to a friend. Adding a personal narrative to your Cube in a Cube demonstration turns a technical feat into a relatable human experience, fostering a stronger connection within the global community.
The Mathematical Beauty Behind the Illusion
To truly appreciate the Cube in a Cube pattern, one must delve into the mathematical principles that govern it. This pattern is not merely a trick; it is a tangible demonstration of group theory, permutations, and symmetry operations. Understanding the math behind the moves elevates the hobby from a pastime to a study of abstract algebra.
Permutation Cycles
At its core, the algorithm is a series of permutation cycles. A permutation cycle describes how pieces move from one position to another and eventually return to their starting positions after a series of operations. In the Cube in a Cube algorithm, we are essentially creating a large cycle involving multiple edge and corner pieces. The specific sequence of moves ensures that no piece is left in a random position; instead, they are rearranged in a predictable, cyclic manner that results in the nested appearance.
- Even Permutations: It is important to note that all valid Rubik's Cube algorithms result in even permutations. The Cube in a Cube pattern adheres to this rule, meaning the parity of the cube remains solvable. You could theoretically reverse the algorithm to return the cube to its solved state, proving that the pattern is just a reversible state of the same system.
Symmetry and Group Theory
The pattern exhibits a high degree of rotational symmetry. Once the algorithm is complete, rotating the cube by 90 degrees around certain axes often reveals similar patterns on adjacent faces. This symmetry is a hallmark of well-designed mathematical structures. In group theory terms, the set of moves forms a subgroup of the larger Rubik's Cube group. By studying this subgroup, mathematicians and cubers alike can explore concepts like commutators and conjugates, which are fundamental to solving complex puzzles and understanding the limits of the cube's mechanics.
The Concept of "Superflip" vs. "Cube in a Cube"
It is worth distinguishing the Cube in a Cube from other famous states like the Superflip, where all edges are flipped but the cube is otherwise solved. The Superflip is a single state, whereas the Cube in a Cube is a dynamic transformation that requires active manipulation to achieve. While the Superflip demonstrates that a cube can be in a highly disordered yet symmetric state, the Cube in a Cube demonstrates how order can be hidden within apparent chaos. Both are testaments to the infinite possibilities contained within a 3x3x3 grid.
Future Horizons: Beyond the Standard Pattern
As we look toward the future of cubing in 2026 and beyond, the Cube in a Cube serves as a foundational stepping stone to even more mind-bending creations. The limitations of the standard 3×3 cube are being pushed daily by inventors and enthusiasts who are combining mechanical innovations with artistic vision.
Integration with AI and Generative Design
Artificial Intelligence is beginning to play a role in pattern generation. Algorithms can now analyze millions of possible move sequences to find new, previously unknown patterns that humans might never discover. Imagine an AI suggesting a variation of the Cube in a Cube that incorporates a third layer of nesting with a specific color gradient that follows a mathematical sequence known only to computers. These AI-generated patterns could then be taught to human cubers via haptic feedback gloves, allowing them to "feel" the correct moves without looking.
Mechanical Innovations
The hardware itself is evolving. New cube designs with adjustable tension, magnetic stabilization, and modular layers are making complex patterns easier to execute. Some prototype cubes in development allow for independent rotation of the inner layers, effectively turning the cube into a 4×4 or 5×4 mechanism while maintaining the external 3×3 appearance. This would allow for true "inner cube" manipulation where the center pieces could actually move, breaking the current limitation where centers are fixed. Such innovations could lead to a new genre of puzzles where the Cube in a Cube is not just an illusion, but a physically movable reality.
Global Cultural Exchange
The beauty of the Cube in a Cube lies in its universality. It transcends language barriers and cultural differences. A child in a remote village in Africa can learn the same algorithm as a speedcuber in Singapore. This shared knowledge creates a global network of learners and artists. As internet connectivity improves, local variations of the pattern may emerge, blending traditional techniques with regional aesthetics. We might see African-inspired color palettes, Asian-inspired geometric precision, or European-inspired minimalist designs all coexisting in the global cubing ecosystem.
Frequently Asked Questions (FAQ)
To ensure you have all the information needed to master this pattern, here are answers to the most common questions asked by the community in 2026.
Q: Can I make the Cube in a Cube pattern on a damaged or worn-out cube?
A: Technically, yes, but the result will likely be imperfect. Worn stickers or misaligned cores can prevent the pieces from locking into the precise positions required for the illusion to work. For a clean, professional-looking pattern, it is highly recommended to use a cube in good condition with fresh, high-quality stickers. If your cube has loose pieces, the "floating" effect may look jagged or incomplete.
Q: How long does it take to memorize the algorithm?
A: For most people, memorizing the standard Cube in a Cube algorithm takes between 15 to 30 minutes of focused practice. Breaking the sequence into smaller chunks, as suggested in the guide, significantly speeds up this process. Once you reach muscle memory, you can perform the pattern in under 10 seconds, making the memorization phase almost instantaneous in terms of execution.
Q: Is there a way to verify if my cube is oriented correctly before starting?
A: Yes. Before executing the algorithm, hold the cube so that the White center is on Top and the Green center is on Front. Then, check the Right face; it should be Red. If the colors are not in this standard orientation (White-Up, Green-Front, Red-Right), rotate the entire cube until they match. Starting with incorrect orientations will result in a pattern that looks rotated or distorted, even if the algorithm was performed perfectly.
Q: Can I combine the Cube in a Cube with other patterns?
A: Absolutely. Many advanced cubers create hybrid patterns by applying the Cube in a Cube algorithm to a cube that already has a checkerboard or stripes pattern. This creates multi-layered illusions where the outer pattern interacts with the inner cube. However, be aware that combining patterns increases the complexity and the likelihood of errors, so practice extensively before attempting these combinations in public.
Conclusion: The Endless Journey of Discovery
Mastering the Cube in a Cube pattern is a milestone in any cuber's journey, representing a blend of patience, precision, and creativity. As we stand in 2026, this classic pattern remains relevant, inspiring new generations of solvers and artists. It teaches us that sometimes, the solution to a problem lies not in fixing what is broken, but in rearranging the existing parts to reveal a hidden beauty.
Whether you are performing for a crowd in Austin, filming a tutorial for Tokyo, or simply enjoying a quiet afternoon in Portland, the Cube in a Cube offers a moment of wonder. It reminds us that logic and art are not mutually exclusive; in fact, they are deeply intertwined. The mathematics of the algorithm provides the structure, while the visual result provides the emotion.
As you continue to explore the world of Rubik's Cubes, remember that every pattern you learn opens the door to new possibilities. The skills you develop—spatial reasoning, algorithmic thinking, and fine motor control—extend far beyond the plastic puzzle. They are tools for life. So, grab your cube, orient your faces, and prepare to execute the sequence. Watch closely as the chaos resolves into order, and let the magic of the Cube in a Cube transport you to a world where anything is possible. The journey doesn't end here; it only deepens with every turn.