The Rubik's Cube remains one of the most enduring and intellectually stimulating puzzles in modern history. Since its invention by Ernő Rubik in 1974, over 450 million units have been sold worldwide, cementing its status as the best-selling puzzle game of all time. Despite its ubiquity, a staggering number of individuals still view the 3×3 cube as an insurmountable challenge, often abandoning their attempts after scrambling the first face. This perception is a misconception; solving the cube is not a test of innate genius but a learnable skill based on pattern recognition and algorithmic execution.
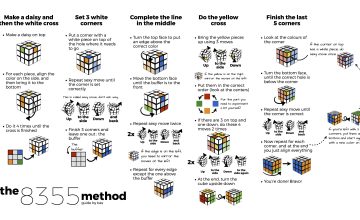
In 2026, the methodology for teaching this skill has been refined to maximize efficiency and cognitive retention. The Layer-by-Layer (LBL) method stands as the gold standard for novices, serving as a highly beginner-friendly method that breaks the complex permutation of 43 quintillion possible states into seven manageable, logical stages. By mastering this systematic approach, any individual can transition from a complete beginner to a competent solver in under two hours of focused practice. This comprehensive Rubik’s Cube solution guide provides a rigorous, step-by-step technical breakdown designed to eliminate confusion and ensure a successful solve every time.
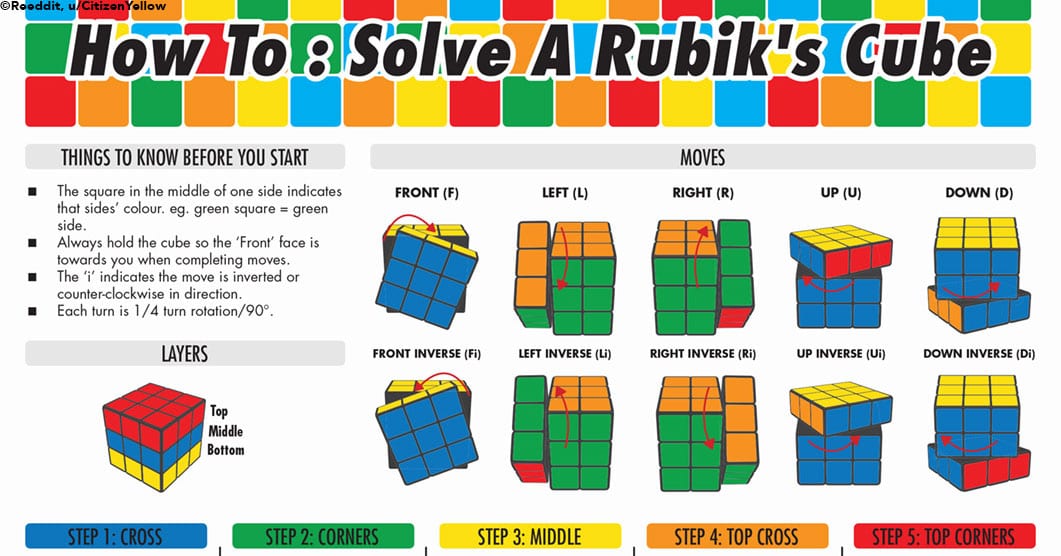
Understanding the Mechanics and Notation Systems
Before attempting to manipulate the puzzle, one must possess a fundamental understanding of its mechanical architecture and the universal language used to describe movements. A common error among beginners is attempting to solve the cube "face by face." This approach is mechanically flawed because the center pieces are fixed relative to one another. The cube is solved layer by layer, meaning that completing the white face simultaneously completes the top row of the adjacent red, blue, orange, and green faces.
The Anatomy of the 3×3 Cube
The standard 3×3 Rubik's Cube consists of 26 visible "cubies" arranged around a central core mechanism. These pieces are categorized into three distinct types, each with specific movement constraints:
- Center Pieces: There are six center pieces, each displaying a single color. Crucially, these pieces never change position relative to each other. The white center is always opposite the yellow center; blue is opposite green; and red is opposite orange. They serve as the immutable reference points for the entire solve.
- Edge Pieces: There are twelve edge pieces, each containing two colors. These pieces occupy the spaces between the corners and can move to different edge slots but cannot become corner pieces.
- Corner Pieces: There are eight corner pieces, each containing three colors. These occupy the vertices of the cube and can be permuted and oriented but will always remain corners.
Understanding that you are moving only 20 movable pieces (8 corners and 12 edges) rather than 54 stickers is the first cognitive leap required for success.
Mastering Cube Notation
To execute the algorithms required for solving, one must fluently read the standard notation system established by the World Cube Association (WCA). This essential cube notation guide uses an alphanumeric code to describe rotations of the cube's faces. In 2026, this notation remains the global standard for all cubing literature and competition.
The basic letters correspond to the six faces of the cube, viewed from the perspective of holding the cube with the target face toward you:
- R (Right): The right vertical face.
- L (Left): The left vertical face.
- U (Up): The top horizontal face.
- D (Down): The bottom horizontal face.
- F (Front): The face currently facing the solver.
- B (Back): The face opposite the front, facing away from the solver.
Modifiers indicate the direction and degree of rotation:
- Letter alone (e.g., R): Rotate the face 90 degrees clockwise.
- Letter with an apostrophe (e.g., R'): Rotate the face 90 degrees counter-clockwise (often called "prime").
- Letter with a 2 (e.g., R2): Rotate the face 180 degrees. The direction does not matter for a half-turn.
Mastery of this notation is non-negotiable. It allows solvers to communicate complex sequences concisely and ensures that algorithms function identically regardless of the cube's orientation in space.
Phase One: Constructing the First Layer
The initial phase of the Layer-by-Layer method focuses on creating a solid foundation. This involves solving the white cross and then inserting the white corners to complete the entire first layer. Unlike later stages, this phase relies heavily on intuition rather than memorized algorithms, allowing the solver to develop spatial awareness.
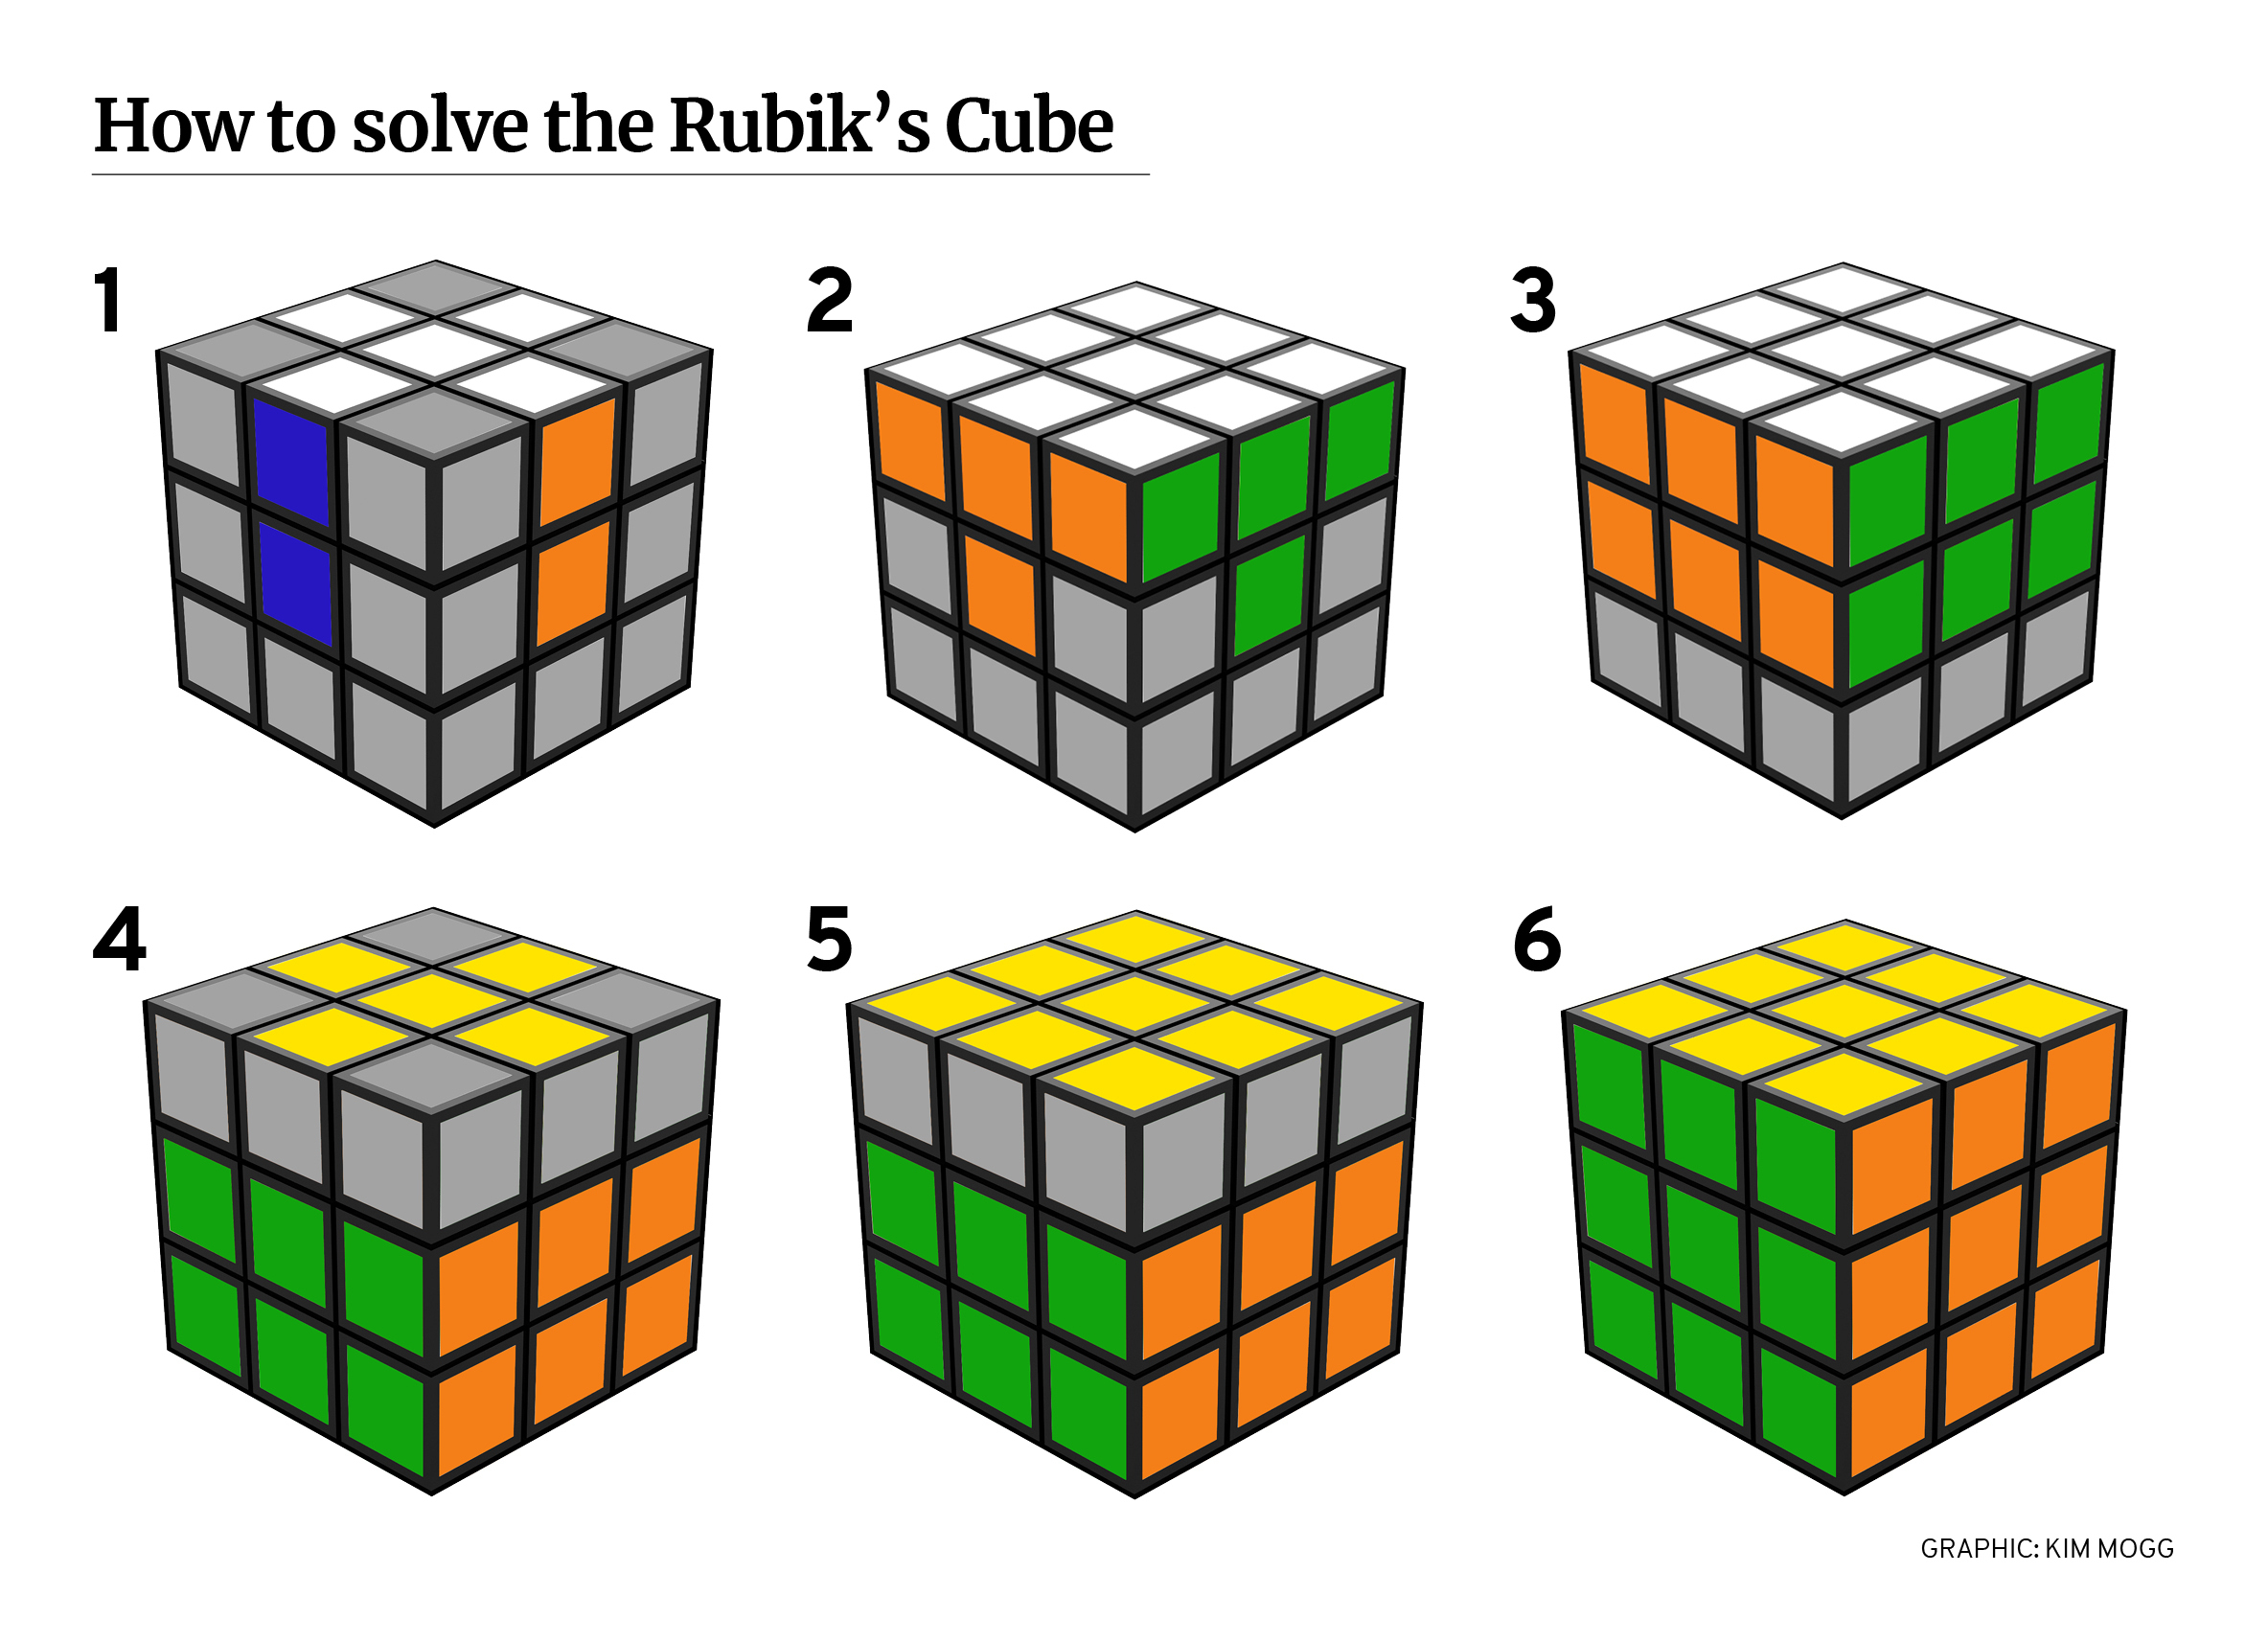
Step 1: The White Cross
The objective is to form a white cross on the top face (assuming the white center is oriented upward) such that the side colors of the white edge pieces align perfectly with their respective center pieces. This crucial first layer cross forms the foundation of the solve. For instance, the white-red edge piece must sit between the white center and the red center.
A highly effective technique for beginners in 2026 is the "Daisy" or "White Lily" method. Instead of trying to place edges directly into their final positions immediately, start by surrounding the yellow center piece with the four white edge pieces. This creates a flower-like pattern on the top face. Once the daisy is formed, inspect the side color of each white edge. Rotate the top layer until the side color matches the center piece below it (e.g., align the red part of the edge with the red center). Once aligned, rotate that face 180 degrees to bring the white edge down to the white center. Repeat this for all four edges.
This method prevents the common pitfall of breaking previously solved edges while trying to insert new ones. Upon completion, flipping the cube over should reveal a perfect white cross on the bottom, with the side colors forming inverted "T" shapes on the adjacent faces.
Step 2: Inserting White Corners
With the white cross secured on the bottom, the next task is to insert the four white corner pieces to complete the first layer. Locate a corner piece in the top layer that contains a white sticker. Identify its destination slot in the bottom layer by looking at its other two colors. For example, a white-red-green corner belongs between the white, red, and green centers.
Position the cube so that this target slot is in the front-right-bottom position. Move the corner piece so it is directly above its target slot in the top-right-front position. Apply the following fundamental algorithm, known as the "Right-Hand Algorithm":
R U R' U'
Execute this sequence repeatedly. Each iteration cycles the corner piece through different orientations. Typically, repeating this algorithm 1 to 5 times will drop the corner into the correct slot with the white sticker facing down. If a white corner is already in the bottom layer but incorrectly oriented or positioned, simply perform the algorithm once to eject it to the top layer, then re-insert it correctly. Once all four corners are solved, the entire first layer will be complete, presenting a solid white face and a continuous band of matching colors on the second tier.

Phase Two: Solving the Middle Layer
Having completed the first layer, the solver must now address the middle layer edges. At this stage, the first layer should remain intact and facing downward throughout the process. The goal is to insert these four specific middle layer edges that do not contain yellow into their correct positions between the center pieces of the second layer.
Identifying Target Edges
Scan the top (yellow) layer for edge pieces that do not have a yellow sticker. These are the pieces destined for the middle layer. Align the front-facing color of the edge piece with the corresponding center piece to form an inverted "T" shape. Determine whether the piece needs to move to the right or the left to reach its home.
Executing Middle Layer Algorithms
Two symmetrical algorithms are used to insert these edges without disturbing the solved first layer.
Case A: Moving the Edge to the Right
If the target slot is to the right of the current position, use the following sequence:
U R U' R' U' F' U F
This algorithm moves the edge from the top-front position to the front-right middle slot. Notice how it temporarily disrupts the first layer corner but restores it immediately at the end of the sequence.
Case B: Moving the Edge to the Left
If the target slot is to the left, apply the mirror image algorithm:
U' L' U L U F U' F'
It is crucial to maintain fluidity in execution. If an edge piece is already in the middle layer but in the wrong position or flipped, simply use one of the algorithms to replace it with a non-yellow edge from the top layer. This ejects the incorrect piece to the top, where it can be realigned and re-inserted correctly. Upon completion of this step, the first two layers (often abbreviated as F2L in speedcubing contexts) will be fully solved, leaving only the top yellow layer scrambled.
Phase Three: Orienting the Last Layer (OLL)
The final phase involves solving the yellow face. This is divided into two sub-steps: creating the yellow cross (orientation of edges), which is the initial part of last layer orientation (OLL), and then positioning/orienting the corners. While advanced methods combine these steps, the beginner method separates them for clarity.
Step 4: Forming the Yellow Cross
Inspect the top face to identify the pattern of yellow stickers. There are four possible scenarios: a single dot, an "L" shape, a horizontal line, or a complete cross. Regardless of the starting pattern, the same algorithm is applied to progress toward a cross. Ensure the cube is oriented correctly before executing:
- Dot: Perform the algorithm from any angle.
- "L" Shape: Rotate the top layer so the "L" resembles a backward "L" (one edge pointing back, one pointing left).
- Line: Orient the line horizontally.
The algorithm for creating the yellow cross is:
F R U R' U' F'
Repeat this sequence until a yellow cross appears on the top face. Note that at this stage, the side colors of the yellow edges may not yet match the side centers; only the top yellow stickers need to form a cross.
Step 5: Aligning Yellow Edges
Once the yellow cross is formed, the edges must be permuted so their side colors match the center pieces of the adjacent faces. Rotate the top layer (U moves) to see if any two adjacent edges match their centers.
- If two adjacent edges match (e.g., Front and Right), hold the cube so these matched faces are on the Back and Right, then execute the algorithm below.
- If two opposite edges match, perform the algorithm once to create an adjacent match, then re-orient and repeat.
The algorithm to swap the Front and Left edges is:
R U R' U R U2 R' U
(Note: Some variations exist, but this is a robust standard for beginners. Alternatively, the "Sune" variation R U R' U R U2 R' followed by a U adjustment is often taught).
After this step, the yellow cross edges will perfectly align with the side centers, leaving only the corners to be solved.
Phase Four: Permuting and Orienting Last Layer Corners (PLL & OLL Corner)
The final hurdle involves placing the corners in their correct locations, a process known as last layer permutation (PLL), and then twisting them so the yellow stickers face up.
Step 6: Positioning the Yellow Corners
Examine the four top corners. Look for a corner that is already in the correct position (even if twisted incorrectly). The correct position means the three colors of the corner match the three adjacent centers.
- Scenario A: If one corner is correct, hold the cube with that corner in the front-right-top position.
- Scenario B: If no corners are correct, perform the algorithm once from any angle to create a correct corner.
Execute the following algorithm to cycle the other three corners counter-clockwise:
U R U' L' U R' U' L
Repeat this until all four corners are in their correct positions. You will know this is achieved when every corner's side colors match the center pieces below them, even if the yellow stickers are not yet facing up.
Step 7: Orienting the Yellow Corners
This is the most critical step where beginners often make mistakes. The goal is to twist the corners so the yellow stickers face the top. Hold the cube with an unsolved corner (yellow not on top) in the front-right-top position.
Apply this simple repeating algorithm:
R' D' R D
Crucial Warning: You must repeat this sequence (R' D' R D) either 2 or 4 times until that specific corner is solved with yellow on top. Do not rotate the whole cube to find the next unsolved corner. Instead, once the first corner is solved, keep the yellow face on top and rotate only the top layer (U) to bring the next unsolved corner into the front-right-top position. Then, repeat R' D' R D until it is solved.
Continue this process for all four corners. It may appear that the rest of the cube is getting scrambled during this process; trust the algorithm. Once the final corner is oriented, a final adjustment of the top layer will restore the cube to its solved state. Congratulations, you have successfully solved the Rubik's Cube.
Advanced Insights and Optimization for 2026
While the beginner method described above guarantees a solution, the landscape of cubing in 2026 emphasizes efficiency and ergonomics. For those looking to progress beyond the initial solve and discover more Rubik’s Cube tips and tricks, several key concepts define the transition to intermediate levels.
The Importance of Finger Tricks
In the early stages, solvers often rotate the entire cube with their wrists to execute moves. This is inefficient. Modern technique utilizes finger tricks, where individual fingers flick the layers. For example, the 'U' move is typically executed with the index finger, while 'U'' uses the ring finger. Mastering these micro-movements reduces solve times significantly and reduces physical strain.
Look-Ahead and Inspection
Speedcubing is as much about mental processing as manual dexterity. The concept of look-ahead involves solving the current pair of pieces while visually tracking the location of the next pair. During the mandatory 15-second inspection period allowed in competitions, expert solvers plan their entire first two layers (F2L), executing the first several moves without pausing.
Hardware Evolution
The hardware available in 2026 has evolved drastically from the stiff, clicky mechanisms of the past. Modern speedcubes feature magnetic stabilization and adjustable tension systems. These cubes allow for smoother turns and better control, preventing overshooting during fast algorithms. For a beginner, investing in a quality magnetic 3×3 cube (such as those from major brands like MoYu, Gan, or QiYi) can reduce frustration and improve learning velocity by up to 40% compared to using a generic toy-store cube.
Frequently Asked Questions (FAQ)
Q: How long does it take for a complete beginner to solve the cube?
A: With dedicated practice using the Layer-by-Layer method, most individuals can achieve their first full solve within 2 to 4 hours of cumulative study. Reaching a consistent sub-2-minute solve time typically takes 2 to 4 weeks of daily 15-minute practice sessions.
Q: Is it necessary to memorize all the algorithms at once?
A: No. The beauty of the beginner method is its modularity. While memorizing algorithms is essential for speed, for your first solve, you only need to master the algorithm for the specific step you are working on. Many learners find it effective to master the White Cross and Corners intuitively before moving on to memorizing the middle layer algorithms.
Q: What should I do if my cube seems impossible to solve?
A: If you have followed the steps correctly and the cube remains unsolvable (e.g., a single edge is flipped or two corners are swapped), the cube has likely been physically tampered with or popped and reassembled incorrectly. This creates a parity error that is mathematically impossible to resolve via legal moves. The solution is to manually disassemble the problematic piece and reinsert it in the correct orientation.
Q: Can I solve the cube blindfolded using this method?
A: The standard Beginner Method is not designed for blindfolded solving. Blind solving requires specialized techniques like the Old Pochmann method or M2/R2, which rely on memorizing the permutation of individual pieces rather than solving layers visually. However, mastering the sighted beginner method is an excellent prerequisite for understanding piece mechanics before attempting blindfolded challenges.
Conclusion
Solving the Rubik's Cube is a journey that transforms a chaotic scramble into a state of perfect order through logic, patience, and practice. This comprehensive Rubik’s Cube tutorial, detailing the Layer-by-Layer method, serves as the foundational bedrock for millions of solvers worldwide. By internalizing the notation, mastering the seven distinct steps, and understanding the mechanical constraints of the puzzle, anyone can conquer this iconic challenge.
As we move further into 2026, the tools and resources available to learners are more robust than ever. From interactive 3D simulators to high-performance magnetic cubes, the barriers to entry have never been lower. Remember that every speedcuber started exactly where you are now: staring at a scrambled cube, unsure of the first move. Embrace the process, practice the algorithms until they become muscle memory, and soon you will be joining the ranks of those who can effortlessly restore order to chaos. The cube is not just a puzzle; it is a testament to human problem-solving capability. Now, pick up your cube and make your first move.
References
- Ruwix — How To Solve The Rubik's Cube: Beginners Method, 2026
- SpeedCube.com.au — How to solve a Rubik's cube: Step by Step Beginner Instructions, 2026
- Cubzor Editorial Team — Beginner's Guide: How to Solve a Rubik's Cube, May 2026
- WikiHow — How to Solve a Rubik's Cube (with Pictures), Co-authored by Timothy Huynh, March 2026
- SolveTheCube — Beginner's Guide: The Layer-by-Layer Method, 2026
- World Cube Association — Official Regulations and Guidelines for Competitions, 2026