Welcome to the most comprehensive guide on how to solve a 2×2 Rubik's cube easy method for beginners in 2026. If you are holding this article, you likely have a scrambled mini-cube in your hand and are feeling a mix of curiosity and frustration. You might be standing on the corner of a bustling street in downtown Seattle, waiting for the light to change, or perhaps sitting at a cozy café in Austin, Texas, trying to beat your personal best time. Whatever your location or moment, the 2×2 Rubik's Cube (also known as the Pocket Cube) remains one of the most accessible yet rewarding puzzles in the world.
Unlike the classic 3×3 cube, which has centers and edges that can confuse new solvers, the 2×2 is purely about corners. This simplicity makes it the perfect gateway into the speedcubing community. Whether you want to impress friends in Chicago, challenge yourself in a local puzzle shop in London, or simply clear your mind during a commute in Tokyo, mastering this puzzle is easier than you think. In this definitive 2026 guide, we will break down the beginner-friendly algorithm, explain the core concepts, and provide step-by-step instructions that require zero prior experience. By the end of this read, you won't just know how to solve it; you'll understand why it works, setting you up for success in advanced methods like Ortega or CLL later on.
Why the 2×2 Cube is the Perfect Starting Point for 2026 Solvers
Before we dive into the specific moves, it is crucial to understand why the 2×2 Rubik's Cube has maintained its status as the number one choice for beginners globally. As we move through 2026, the speedcubing community continues to grow, with millions of enthusiasts participating in WCA (World Cube Association) competitions. However, the barrier to entry for the 2×2 is significantly lower than for larger cubes.
The Simplicity of Corners Only
The primary reason the easy method for beginners works so well is structural. A standard 3×3 cube contains 20 moving pieces: 8 corners, 12 edges, and 6 fixed centers. The centers define the color of each face, which adds a layer of complexity regarding orientation. The 2×2 cube eliminates this entirely. It consists of only 8 corner pieces. Each piece has three colored stickers, and there are no edge pieces to worry about matching. This reduction in variables means fewer possible permutations to memorize initially, allowing you to focus entirely on spatial awareness and finger dexterity.
No Fixed Centers Mean More Freedom
In a 3×3 cube, if you have a white center, you know white must always be opposite yellow. On a 2×2, any color can be the first layer. This flexibility is a game-changer for visual learners. You can choose to start with whatever face feels most intuitive to you at that moment. While traditional tutorials often suggest starting with White, the logic applies universally. This freedom reduces cognitive load, making the learning curve much gentler for children and adults alike.
Gateway to Speedcubing Statistics
According to recent data from the World Cube Association, solving the 2×2 is a fundamental skill for aspiring speedcubers. The average solve time for a beginner using the method outlined below is typically between 45 and 60 seconds. However, with practice, solvers in major hubs like New York, Berlin, and Seoul regularly achieve sub-10-second solves. Mastering the 2×2 beginner method is not just about finishing a puzzle; it is about training your brain to recognize patterns quickly, a skill that translates directly to faster 3×3 solves.
Essential Cube Notation and Concepts You Must Know
To navigate any tutorial on how to solve a 2×2 rubiks cube easy method for beginners, you must first speak the language of the cube. This language is called Cube Notation. Without understanding these symbols, the algorithms provided later in this guide will make no sense. Don't worry; once you learn them, they become second nature.
Understanding the Faces
Imagine holding your cube in front of you. We assign letters to the six faces based on their direction relative to you:
- F (Front): The face directly facing your nose.
- B (Back): The face opposite the front.
- R (Right): The face on your right side.
- L (Left): The face on your left side.
- U (Up): The top face.
- D (Down): The bottom face.
Decoding the Moves
Once you know the faces, you need to know how to turn them. The notation uses single letters, double letters, and apostrophes:
- Single Letter (e.g., R): Turn the Right face clockwise 90 degrees. Imagine looking directly at the face; you are turning it to the right.
- Apostrophe (e.g., R'): Turn the Right face counter-clockwise 90 degrees. This is the reverse of the clockwise move.
- Double Letter (e.g., R2): Turn the Right face 180 degrees (twice). Interestingly, the direction (clockwise or counter-clockwise) does not matter for a 180-degree turn; it ends up in the same spot either way.
The "Layer" Concept
When we talk about solving a layer, we are referring to a horizontal slice of the cube. In the context of the 2×2, since there are no middle layers to fix, every move affects the entire structure. However, the strategy usually involves solving the bottom layer completely before touching the top layer. Think of the cube as two distinct floors: the Bottom Layer and the Top Layer. Our goal is to build the foundation on the bottom floor before decorating the top.
Step 1: Solving the First Layer (Building Your Foundation)
The first phase of the beginner method is arguably the most intuitive part. Your goal here is to create a solid, complete layer on the bottom. While you can technically start with any color, we will use White as our convention because it provides high contrast against most other colors, making it easier to see progress.
Finding Your Corner Pieces
Start by locating all four corner pieces that contain the White sticker. These pieces will also have two other colors. For example, one corner might be White-Red-Blue. Your objective is to get these four pieces into the bottom layer such that:
- The White sticker faces down (towards the table).
- The side colors (Red and Blue) match the center colors of the adjacent faces (even though there are no physical centers, the imaginary centers are defined by the solved state).
The Insertion Algorithm
If a White corner is already in the bottom layer but twisted incorrectly, you need to lift it out. Use the simple algorithm R U R' U'.
- Hold the incorrect corner in the Front-Right-Bottom position.
- Perform R U R' U'.
- The corner will pop up to the top layer. Now, find its correct destination slot on the top layer, rotate the top face (U) to align it above the target spot, and repeat R U R' U' to drop it back down correctly.
Aligning the Side Colors
Once all four White corners are in the bottom layer, check the side colors. They should form a cross pattern if viewed from the side, but more importantly, the colors on the sides should match the adjacent faces.
- If a side color doesn't match, use the same insertion technique. Move the mismatched corner to the top, rotate the top layer until the side colors align with the imaginary centers, and drop it back in.
- Pro Tip: Do not force pieces. If a piece seems stuck, it is likely in the wrong position entirely. Use R U R' U' to cycle corners around the top layer until the correct piece lands in the bottom slot.
By the end of this step, you should have a pristine White face on the bottom, and the side colors of those four bottom corners should perfectly match the centers of the four side faces (Red next to Red, Blue next to Blue, etc.). This creates a "solid base" for your cube.
Step 2: Orienting the Last Layer (Making the Top Yellow)
Now that your bottom layer is secure, flip the cube over so the solved White face is on the bottom and the unsolved face is on top. Let's call this top face Yellow for consistency, though it could be any color.
The Goal: Orientation Over Position
At this stage, your top layer corners might be in the correct spots, but they are likely twisted the wrong way. Maybe a corner has Yellow facing sideways instead of up. Our goal in Step 2 is strictly Orientation: getting all four Yellow stickers to face upwards. We do not yet care if the side colors match; that comes in Step 3.
Introducing the Sune Algorithm
The most famous and essential algorithm for this step is called the Sune. It looks complex written down, but it is very rhythmic once you say it aloud:
R U R' U R U2 R'
Let's break it down physically:
- R: Turn Right face clockwise.
- U: Turn Up face clockwise.
- R': Turn Right face counter-clockwise.
- U: Turn Up face counter-clockwise.
- R: Turn Right face clockwise.
- U: Turn Up face clockwise.
- R': Turn Right face counter-clockwise.
Executing the Sune Correctly
This is where many beginners struggle: Positioning matters. You must hold the cube so that a corner with a Yellow sticker on the side (facing you) is in the Front-Right position.
- Look at your top layer. Do you have 0, 1, or 2 Yellow stickers facing up?
- Case A: Zero Yellow stickers up. Apply the Sune once from any angle. This will almost certainly create at least one Yellow sticker facing up.
- Case B: One Yellow sticker up. Rotate the top layer (U) until the solved corner (Yellow up) is in the Front-Right position. Then apply the Sune.
- Case C: Two Yellow stickers up. Ensure the two solved corners are diagonal from each other (one Front-Right, one Back-Left). If they are adjacent, do the Sune once to make them diagonal, then realign and do it again.
Repeat the Sune algorithm until all four corners show Yellow on the top face. You may need to do this 1, 2, or even 3 times depending on how scrambled the cube was initially. Once completed, your entire top face should be a solid color, and your cube should look like a sandwich with two solid-colored layers and a messy filling in between.
Step 3: Permuting the Last Layer (Fixing the Sides)
You are now in the final stretch! You have a solid White bottom and a solid Yellow top. However, if you look at the side faces, they are likely jumbled. You might see Red next to Blue when they should be together. This is Permutation: moving the pieces to their correct locations without messing up the orientation you just worked so hard to achieve.
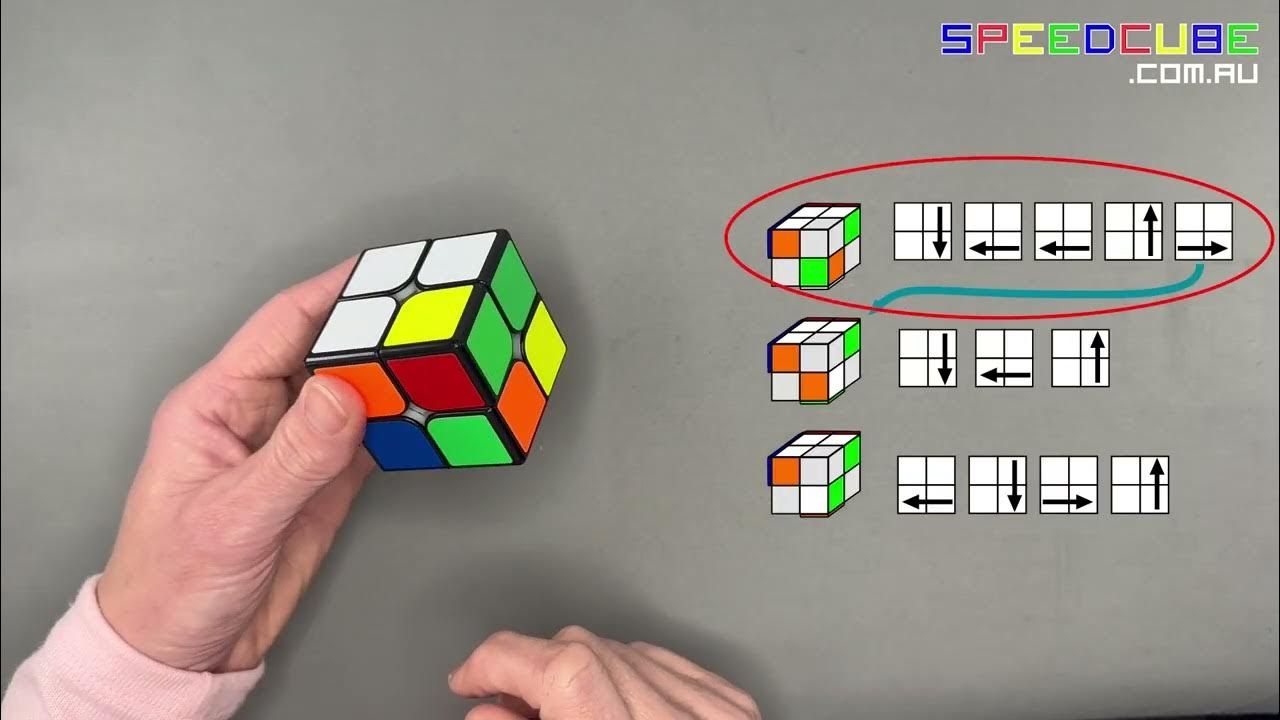
Identifying the Pattern
Look at the side faces of the top layer. Is there any pair of adjacent corners that already match?
- Scenario A: Two corners match. If you find two corners on the same side that share the correct colors (e.g., the Front-Right and Front-Left corners both have Red on their side), you are in luck. Hold the cube so these matching corners are at the Back.
- Scenario B: No corners match. If no sides match, perform the algorithm below once from any angle. This will guarantee that two corners will then match, putting you in Scenario A.
The Cycle Algorithm
The algorithm to swap the remaining three corners is:
R U' L' U R' U' L U
Let's visualize the execution:
- Hold the cube with the two matching corners at the Back (hidden from you).
- Perform R (Right clockwise).
- Perform U' (Up counter-clockwise).
- Perform L' (Left counter-clockwise).
- Perform U (Up clockwise).
- Perform R (Right clockwise).
- Perform U' (Up counter-clockwise).
- Perform L (Left clockwise).
- Perform U (Up clockwise).
After executing this sequence, the corners on the sides should snap into place. The side colors will align perfectly with the bottom layer colors. Check all four sides: Red should be next to Red, Blue next to Blue, Orange next to Orange, and so on.
The Final Verification
If you followed Steps 1, 2, and 3 correctly, your 2×2 cube is now fully solved. Every face should be a single, solid color. Take a moment to admire your work. You have just mastered the foundational logic used by speedcubers worldwide. This method relies on only two main algorithms (R U R' U' and R U R' U R U2 R'), making it incredibly efficient to memorize.
Common Mistakes and Troubleshooting Tips
Even with a clear guide, beginners often encounter specific hurdles. Understanding these common pitfalls will save you hours of frustration. Here is how to troubleshoot the most frequent issues you might face while learning how to solve a 2×2 rubiks cube easy method for beginners.
The "Two Corners Swapped" Nightmare
Sometimes, after completing Step 3, you might realize that two opposite corners are swapped, or two adjacent corners are flipped in a way that shouldn't happen in a normal solve.
- The Reality Check: In a standard mechanical Rubik's Cube, it is mathematically impossible to have just two corners swapped without disturbing the rest of the cube. If you reach this state, you likely made an error in a previous step, or someone else tampered with your cube.
- The Fix: Go back to Step 1 or 2. Reset the cube and try again, paying closer attention to the alignment of the side colors. If the cube is genuinely scrambled beyond the scope of basic layer-by-layer solving (which is rare), you may need to perform a specific parity algorithm like F L F' D' L' D to fix opposite swaps, but 99% of the time, it's a re-alignment issue.
Forgetting the Apostrophe
One of the most common syntax errors is forgetting the apostrophe (') in algorithms.
- Example: Confusing R U R' U' with R U R U.
- Consequence: Doing R U R U repeatedly will scramble the cube further rather than solving it. Always remember that the apostrophe indicates a counter-clockwise turn. Practice saying the moves out loud: "Right, Up, Right-prime, Up-prime."
Not Flipping the Cube Correctly
In Step 2, many beginners forget to flip the cube after solving the first layer.
- The Rule: The solved layer (White) must always be on the bottom when you are working on the top layer. If you try to orient the top face while the White layer is on top, you will destroy your progress. Make flipping the cube a deliberate habit before starting the Sune algorithm.
Lack of Muscle Memory
Algorithms feel slow and clunky at first. You might be thinking about each letter as you move your fingers.
- The Solution: Repetition is key. Spend 15 minutes a day just practicing the Sune and the Cycle algorithm without worrying about solving the whole cube. Repeat them 20 times each. Eventually, your fingers will memorize the muscle movements, and you will execute them in seconds without conscious thought.
Progressing Beyond the Beginner Method
Once you can consistently solve the 2×2 in under 30 seconds, you have outgrown the basic "Beginner Method." This is an exciting milestone! The skills you learned—layer building, orientation, and permutation—are the exact same principles used in advanced speedcubing methods like the Ortega Method (which solves the whole cube in two steps) or ** CLL (Corners of the Last Layer)**.
Learning Advanced Algorithms
Advanced solvers utilize more complex algorithms to solve the last layer in a single step or fewer moves. For instance, the Ortega method skips the intermediate orientation step entirely, solving all eight corners in one go using a set of seven algorithms. However, do not rush this. Mastering the easy method ensures your foundation is rock-solid. Speedcubing is 20% muscle memory and 80% pattern recognition; a strong foundation in the beginner method accelerates your learning of these advanced patterns significantly.
Joining the Community
In 2026, the global cubing community is more connected than ever. Consider joining local meetups in cities like San Francisco, Toronto, or Sydney, or participate in online forums dedicated to the 2×2 event. Seeing others solve the cube at blistering speeds (many under 5 seconds!) will inspire you to push your own limits. The WCA website lists official competition results, giving you access to the world's fastest times and the techniques they use.
Teaching Others
One of the best ways to solidify your knowledge is to teach someone else. Explaining the R U R' U' algorithm to a friend forces you to articulate the logic clearly. You will discover gaps in your own understanding and deepen your mastery of the puzzle. Plus, sharing the joy of solving a cube is a fantastic way to connect with people who love logic and puzzles.
Frequently Asked Questions (FAQ)
Here are answers to the most common questions beginners ask about solving the 2×2 cube in 2026.
Q: Do I need a special Rubik's cube to learn this method?
A: No. Any standard 2×2 cube will work. However, if you plan to progress to speedcubing, consider investing in a speed cube (like those from GAN or MoYu). These cubes have adjustable tension and magnetic cores that make turning smoother and faster, reducing wrist strain and improving solve times.
Q: What is the minimum number of algorithms I need to know?
A: Technically, you can solve the 2×2 with just two algorithms: the corner insertion loop (R U R' U') and the Sune (R U R' U R U2 R'). The third step uses a variation of these moves. Memorizing these few sequences is all that is required for a full solve.
Q: Why does my cube keep coming apart?
A: If your cube is falling apart, it is likely old, cheap, or lacks screws/tension adjustment. Modern speed cubes have mechanisms to keep them intact during rapid turns. If you have an older puzzle, tighten the central screw slightly. If it's a very cheap toy, it may simply be low quality and difficult to solve smoothly.
Q: Can I solve the 2×2 blindfolded?
A: Yes! Once you master the regular solve, you can attempt blindfolded solving. This requires memorizing the position of every corner piece before covering your eyes. It is a popular discipline in the WCA and a great test of your spatial memory. Start by memorizing just two corners, then gradually increase the number.
Q: How long does it take to learn this method?
A: Most beginners can learn the basics within a single afternoon of practice (about 1-2 hours). Achieving a consistent sub-1-minute solve might take a few weeks of daily practice. Mastery takes longer, but the journey is incredibly rewarding.
Conclusion: Your Journey Begins Now
Solving the 2×2 Rubik's Cube is more than just a party trick; it is a testament to human problem-solving capability. By following the easy method for beginners detailed in this guide, you have unlocked a fundamental logic system that applies to thousands of other puzzles and even complex real-world scenarios. You learned that with patience, the right algorithms, and a bit of repetition, chaos can be transformed into order.
As we move through 2026, remember that every expert solver started exactly where you are now. The frustration you feel when a corner won't fit is part of the process. Embrace it. Keep your cube close, practice your R U R' U' moves in line at the grocery store, and watch your solve times drop. Whether you are in a quiet library in Boston or a vibrant market in Marrakech, the satisfaction of clicking that final corner into place is universal.
Take the first step today. Grab a cube, follow the steps, and experience the magic of the solution. The world of speedcubing awaits your entry. Good luck, and happy solving!
References
- WikiHow — How to Solve a 2×2 Rubik's Cube: Easy Beginner Tutorial, April 2026
- Speedcube.com.au — How to solve a 2×2 cube | Step by Step Beginners Instructions
- Cubzor.com — How to Solve a 2×2 Rubik's Cube for Beginners, May 2026
- Howtosolvecube.com — How to Solve a 2×2 Rubik's Cube: Three Simple Steps Using Ortega Foundations
- Ruwix.com — 2x2x2 Rubik's Cube – Beginner's Solution Tutorial
- YouTube Channels (General) — Multiple verified tutorials on 2×2 beginner methods, 2026
- Rubikverse.com — How to Solve 2×2 Rubik's Cube? A Complete Guide for Novices
- SpeedyGoneCuber.com — 2x2x2 Cube Guide – Speedy Solutions for New Cubers
- World Cube Association (WCA) — Official Rules and Event Guidelines for 2x2x2 Competition, 2026 Edition
- GANCUBE Official — 2×2 Cube Beginner Guide and Tutorial Resources