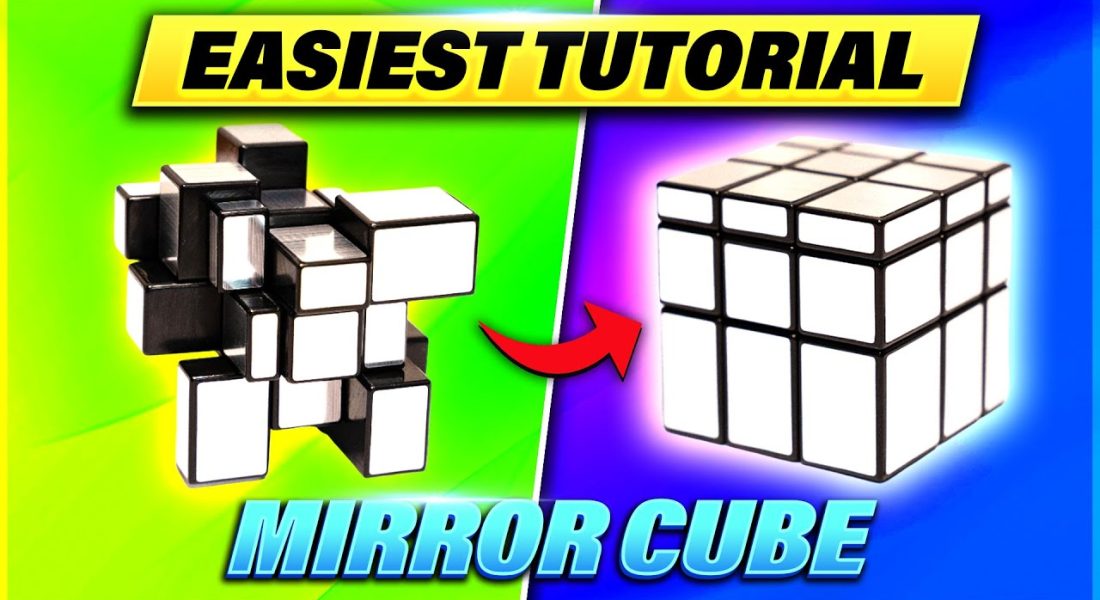
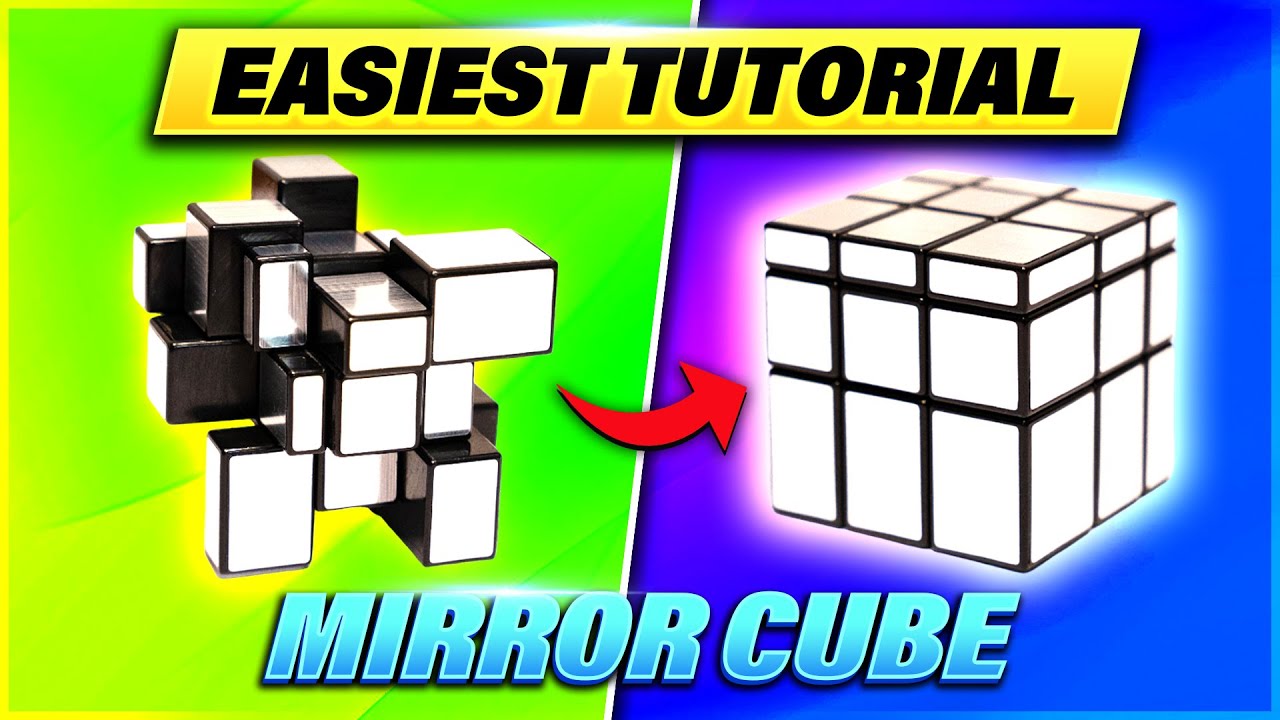
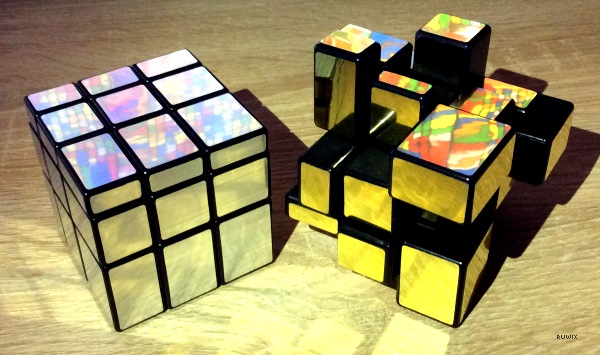
In the ever-evolving world of twisty puzzles, few challenges capture the imagination quite like the Mirror Cube, also known as the Mirror Blocks or Bump Cube. As we step into 2026, this shape-shifting marvel remains a staple for both casual puzzlers and competitive speedcubers. Unlike its colorful predecessor, the standard 3×3 Rubik's Cube, the Mirror Cube presents a deceptive visual complexity. When scrambled, it looks like a jagged, asymmetrical mountain range rather than a perfect geometric solid. Yet, beneath that chaotic exterior lies a familiar mechanism: the classic 3x3x3 core.
The secret to mastering this puzzle is understanding that you are not solving by color; you are solving by shape and size. If you can solve a standard 3×3 cube, you already possess the fundamental skills required to conquer the Mirror Cube. The algorithms remain identical; only your perception needs to shift from identifying hues to recognizing dimensions. This guide will take you on a comprehensive journey through the history, mechanics, and step-by-step strategies needed to turn those confusing bumps into a flawless cube. Whether you are looking to impress friends at a party or aiming for a personal best time, understanding how to solve rubiks cube mirror blocks is essential for any modern cuber.
Understanding the Unique Mechanics of Shape-Shifting Puzzles
To truly master the art of solving these puzzles, one must first appreciate what makes them unique. The Mirror Cube is technically a shape mod (short for shape modification). While the internal mechanism—the way the layers rotate and the pieces interact—is identical to a standard 3×3 cube, the external appearance has been completely altered. In a traditional cube, six distinct colors serve as the primary reference point for orientation and piece placement. In the Mirror Cube, all stickers are removed or replaced with a single reflective material, usually silver or gold.
This monochromatic approach forces the solver to rely entirely on tactile recognition and spatial reasoning. Every movable piece on the cube has a unique height or thickness relative to the core. There is no ambiguity in the solved state: a face is considered solved only when it is perfectly flat, with all pieces sitting at the exact same height. No edges should stick out, and no corners should protrude. This creates a "bumpy" landscape when scrambled, hence the alternative name, the Bump Cube.
The concept extends beyond just the 3×3 version. The family of Rubik's Cube Shape Mods includes various iterations like the Ghost Cube, Fisher Cube, and Windmill Cube. However, the Mirror Cube stands out as the most accessible entry point into this category. It requires no new algorithms to be memorized, making it an ideal bridge between basic cubing and advanced mechanical puzzles. According to data from the Speedsolving community, the Mirror Cube was originally known as the Bump Cube before being mass-produced by major manufacturers like ShengShou, YuXin, and GAN starting in late 2008. Its invention by Hidetoshi Takeji at the IPP26 competition in Boston marked a significant moment in puzzle history, proving that simplicity could yield profound complexity.
When you look at a scrambled Mirror Cube, the sheer variety of heights can be intimidating. One side might have towering peaks while another appears relatively flat. This visual chaos is designed to trick the brain into thinking the puzzle is unsolvable or requires a different set of rules. However, experienced solvers know that the solution lies in treating the cube exactly like a standard 3×3, using height as your new "color." For instance, just as you would look for a red edge next to a red center, you now look for a tall edge next to a tall center.
The Core Mechanism: Why It Feels Like a Standard Cube
The internal architecture of the Mirror Cube is deceptively simple. It utilizes the same core mechanism found in every standard 3×3 cube. This means the physics of rotation, the locking mechanisms that prevent pieces from flying off, and the layer-stacking logic are unchanged. The only difference is the geometry of the plastic shells surrounding these cores.
In a standard cube, the center pieces are fixed relative to each other, defining the color of each face. In the Mirror Cube, the centers are still fixed in position relative to one another, but their shapes vary. You will find one largest center, one smallest center, and four medium-sized centers that are all equal in height. These centers never move relative to each other during the solving process, which is a crucial rule to remember. Just like on a normal cube, the opposite faces are determined by the arrangement of these centers.
The edge pieces also follow a strict hierarchy of heights. There are four tall edges and eight short edges. The tall edges belong between the largest and smallest centers, effectively forming the "cross" on the bottom layer. The short edges fit between the medium centers, occupying the middle layer slots. Finally, the corner pieces come in three varieties: the largest corner, the smallest corner, and six medium corners. Each corner type fits uniquely between specific combinations of center heights.
Understanding this distribution is the key to unlocking the puzzle. If you try to force a short edge into a slot meant for a tall edge, the cube will simply refuse to close properly. This physical feedback loop is what makes the solving process so engaging. It turns every move into a test of observation. You cannot rely on muscle memory alone; you must constantly verify that the piece you are holding matches the target slot in terms of dimension.
This tactile nature of the puzzle also makes it excellent for developing 3D spatial reasoning. Solvers often report that after spending time with the Mirror Cube, their ability to visualize standard cubes improves significantly. They become adept at mentally rotating objects and understanding depth without relying on visual cues like shading or color gradients. This skill transfer is why many professional speedcubers include the Mirror Cube in their training regimen, even if they do not compete in shape-mod events specifically.
Prerequisites and Tools for Success Before You Begin
Before diving into the step-by-step solution, it is vital to ensure you have the right mindset and tools. While the Mirror Cube is challenging, it is designed to be solvable by anyone who understands the basics of the 3×3 Rubik's Cube. However, there are specific prerequisites and preparation steps that will streamline your learning curve and prevent common frustrations.
Essential Prerequisites
The single most important requirement is the ability to solve a standard 3×3 Rubik's Cube. If you are still struggling to complete a color-solved cube, attempting the Mirror Cube may lead to unnecessary confusion. The algorithms for the Last Layer, particularly theOLL (Orientation of the Last Layer) and PLL (Permutation of the Last Layer), remain exactly the same. The only variable you are introducing is the recognition of piece shapes instead of colors.
If you are comfortable with the CFOP method (Cross, F2L, OLL, PLL), you are already ahead of the game. This method is widely regarded as the most efficient for speedcubing and translates perfectly to shape mods. Alternatively, if you prefer the Beginner's Method, you can absolutely use it. The logic of building the cross, inserting corners, and finishing the top layer applies universally. The only adjustment is that instead of matching colors, you will be matching heights.
Another prerequisite is patience and trial-and-error tolerance. Because the Mirror Cube lacks immediate visual confirmation of progress (until the very end), you may spend several minutes trying to insert a piece only to realize it doesn't fit. This is normal. Unlike a standard cube where a wrong move might result in a mismatched color that is immediately obvious, on a Mirror Cube, a piece might look like it fits until you try to rotate the layer, and it jams. Developing the patience to remove and re-insert pieces multiple times is part of the mastery process.
Recommended Tools and Setup
While you can solve the puzzle with your bare hands, having the right equipment can make a massive difference, especially in 2026 where technology and materials have advanced.
- A High-Quality Mirror Cube: Not all Mirror Cubes are created equal. Early versions had sticky mechanisms and poor tolerances, making them frustrating to solve. Modern cubes from brands like Gan, MoYu, and QiYi offer smooth turning, consistent tension, and precise cutting. Look for a cube described as having "good lubrication" and "adjustable tension." A smooth-turning cube allows you to focus on shape recognition rather than fighting the mechanism.
- Lubricant: Using a high-quality silicone-based lubricant is highly recommended. It reduces friction, allowing the layers to turn quickly and quietly. This is crucial for speedcubing but also helpful for beginners who need fluid movements to practice algorithms smoothly.
- A Timer: Even if you aren't racing, timing yourself helps track progress. Many online platforms and apps allow you to record your solves and analyze your weak points. Seeing your times improve over weeks can be incredibly motivating.
- Good Lighting: Since the cube relies on shadows and reflections to distinguish heights, lighting plays a surprisingly large role. Ensure you are working in a well-lit area. Natural light is often best as it provides clear definition of the peaks and valleys on the scrambled cube. Harsh overhead lights can sometimes create glare on the silver stickers that obscures details.
Common Mistakes to Avoid
Even with the right tools, beginners often fall into specific traps when approaching the Mirror Cube. Being aware of these pitfalls can save you hours of frustration.
- Ignoring the Centers: One of the most common mistakes is forgetting that the centers define the face. On a standard cube, you can rotate a face 90 degrees and the colors stay the same. On a Mirror Cube, rotating a face changes the orientation of the centers relative to the rest of the cube. You must treat the centers as fixed anchors. Never assume a face is "correctly oriented" just because it looks like a cross; check the height of the center against the edges.
- Forcing Pieces: Do not force a piece into a slot that doesn't match. If a short edge won't go into a slot next to a tall center, stop immediately. Forcing it can damage the plastic or misalign the internal mechanism. Instead, remove the piece, examine it again, and find the correct slot.
- Overlooking the Top Layer: Many solvers get stuck on the last layer because they try to apply color-based intuition. Remember, the algorithms work the same, but the visual cues are different. A "right swap" algorithm moves pieces based on their position, regardless of whether they are red/blue or tall/short. Trust the algorithm, not your eyes.
- Scrambling Without a Plan: When scrambling the cube, try to create a mix of different heights rather than clustering all the tall pieces on one side. A well-scrambled cube provides a better challenge and prevents you from accidentally solving parts of it early on by luck.
Decoding the Piece Hierarchy: Size Recognition Strategies
The heart of solving the Mirror Cube lies in size recognition. Once you accept that you are solving by shape, the next step is to internalize the specific roles of each piece size. The cube consists of 27 individual cubies: 8 corners, 12 edges, and 6 centers, plus the core. Each category has distinct variations in height that correspond to their position in the solved state.
Center Pieces: The Anchors of Orientation
The six center pieces are the most critical element because they never move relative to each other. Their sizes dictate the identity of each face.
- The Largest Center: This piece sticks out the most. It serves as the anchor for one specific face. In our recommended mapping, this will be your Yellow face (opposite the smallest).
- The Smallest Center: This piece is recessed the most. It is directly opposite the largest center. This will be your White face (the starting point for many methods).
- The Medium Centers: There are four centers of equal height. These form the sides of the cube. They correspond to the standard Red, Orange, Blue, and Green faces.
Pro Tip: Always start by identifying the largest and smallest centers first. Once you have located them, you know exactly which two faces are opposite each other. This establishes your coordinate system for the entire puzzle. If you don't know where a piece belongs, compare its height to the adjacent centers. If a piece is flat with the centers it touches, it is likely in the correct spot.
Edge Pieces: Tall vs. Short
The twelve edge pieces are divided into two distinct groups based on their height relative to the centers they connect.
- Tall Edges (4 pieces): These are the longest edges. They belong exclusively in the slots between the Largest Center and the Smallest Center. There are only four of these, making them easy to count. When you see a tall edge, you know it must connect the "top" and "bottom" of your chosen color scheme.
- Short Edges (8 pieces): These are shorter than the tall edges but taller than nothing. They fit in the slots between the Medium Centers. These occupy the middle layer of the cube in the solved state.
When building your cross, you are essentially looking for the four tall edges. Match them to the largest and smallest centers so that the heights align perfectly. If an edge is above or below the center it is attached to, it does not fit. The cross should look like a flat plane, just like on a standard cube, but composed of uniform height rather than uniform color.
Corner Pieces: The Triad of Heights
The eight corners are the most varied group, coming in three specific sizes. Correctly placing these is often the most challenging part of the puzzle, especially for beginners.
- Largest Corner: This corner connects the Largest Center, the Smallest Center, and two Medium Centers. It is the tallest corner piece.
- Smallest Corner: Conversely, this is the shortest corner piece. It connects the Smallest Center, the Largest Center, and two Medium Centers.
- Medium Corners (6 pieces): These six corners are all the same height. They connect three Medium Centers.
To verify you have placed a corner correctly, hold the cube so the three centers meeting at that corner are visible. Check the height of the corner piece against the centers. In the solved state, the corner should sit flush with the tops of the three adjacent centers. If the corner sticks up or sinks down, it is in the wrong location or incorrectly oriented.
Visualizing the Solved State
It helps to visualize the solved cube as a series of steps or stairs leading up to the largest center and down to the smallest. Imagine walking around the cube; the surface should be relatively flat except for the gradual transitions at the corners and edges. This mental image can help you identify where pieces should be when the cube is scrambled.
Remember, the "place for every piece" theory of a colored cube no longer applies in the traditional sense. Because some pieces are interchangeable in terms of function (e.g., any medium corner can go in any medium corner slot), you don't need to worry about specific permutations as much as you do on a sticker cube. Focus on getting the heights right first. Once the shapes match, the orientations will naturally fall into place, or require only minor adjustments at the very end.
Step-by-Step Solution Guide: From Scramble to Perfection
Now that you understand the mechanics and the piece hierarchy, let's dive into the actual solving process. This guide follows the proven CFOP-inspired method adapted for shape recognition. It breaks the puzzle down into manageable stages, ensuring you build a solid foundation before tackling complex last-layer scenarios. Follow these steps sequentially for the best results.
Step 1: Choose Your Color Scheme and Locate Centers
Before making a single move, establish your reference points. Decide which size represents which "color" on a standard cube.
- Recommended Mapping: Set the Smallest Center as your "White" face (start here). Set the Largest Center as your "Yellow" face (opposite White). Treat the four Medium Centers as Red, Orange, Blue, and Green.
- Action: Hold the cube with the Smallest Center on the bottom. Scan the cube to locate the four Tall Edges. These are your priority pieces for the next step. Feel them; they should stand out immediately due to their height.
Step 2: Solve the First Layer Cross
Just like a standard 3×3, you start by creating a cross on the bottom layer. However, your "colors" are now heights.
- Identify Targets: Find the four tall edges. Each must connect the Smallest Center (bottom) and the Largest Center (top).
- Placement: Move the tall edges to the bottom layer adjacent to the Smallest Center. Ensure the height of the edge matches the height of the Smallest Center.
- Verification: Rotate the bottom layer. All four tall edges should now form a cross around the smallest center. The outer ends of these edges should align with the Medium Centers on the sides.
- Check: Look at the bottom face. It should be perfectly flat. No edges should be sticking up or down. If it looks uneven, you have made a mistake in matching heights.
Once the cross is done, proceed to insert the corners.
- Locate Corners: Find the Smallest Corner (connects Smallest, Largest, and two Mediums) and the corresponding tall edges.
- Insertion: Use standard 3×3 corner insertion algorithms. Place the corner above its destination slot. Observe the heights. Does the corner fit snugly between the Smallest Center and the two adjacent Medium Centers? If yes, drop it in.
- Repeat: Do this for all four corners of the first layer.
- Success Signal: When finished, the entire bottom layer (center + 4 edges + 4 corners) should be a single, cohesive unit with a uniform height profile. It should look like a solid block sitting on the table.
Step 3: Solve the Middle Layer Edges
With the first layer complete, flip the cube over so the solved layer is on the bottom. Now, focus on the middle layer.
- Find Short Edges: Look at the top layer (the one with the Largest Center). You are looking for the eight Short Edges. These belong in the middle layer slots between the Medium Centers.
- Positioning: Use the standard Right and Left insertion algorithms (
U R U' R' U' F' U FandU' L' U L U F U' F'). - Shape Recognition: As you execute the algorithms, pay attention to the shape of the edge piece in your hand. Is it short? Does it fit between two medium-height centers?
- Trial and Error: Sometimes a short edge might look like it fits but isn't quite right. Gently wiggle it. If it resists, remove it and try a different slot. The tactile feedback is your guide.
- Completion: Once all eight short edges are inserted, the middle layer should be solved. Check the sides of the cube; they should appear as flat planes with no gaps or protrusions in the middle section.
Step 4: Create the Top Layer Cross
Now comes the most visually confusing part: the top layer. It will look messy, with pieces sticking out in all directions. Your goal is to orient the edges to form a cross shape, ignoring their final positions for a moment.
- Analyze the Top: Look at the four edges on the top layer. Identify which ones are currently oriented correctly (forming a line or an 'L' shape) and which need adjustment.
- Algorithm Application: Use the standard cross formation algorithms. Since the pieces are different sizes, you might need to repeat algorithms more often than usual to cycle the pieces into the correct orientation.
- Focus on Height: Ensure that the edges you are manipulating are indeed the tall edges connecting the Large and Small centers. If you accidentally move a short edge to the top, the cross won't form correctly.
- Result: After applying the necessary sequences, you should see a cross shape on the top face. The arms of the cross should align with the medium centers on the sides. The center piece itself (the Largest Center) remains stationary.
Step 5: Orient the Top Layer Corners
This step is similar to the "OLL" (Orientation of the Last Layer) phase in standard cubing, but focused on flipping corners so the stickers (or lack thereof) face the correct way. In the Mirror Cube, this means ensuring the corner heights match the adjacent centers.
- Identify Misoriented Corners: Look for corners that are "twisted." On a Mirror Cube, a twisted corner often looks like it is sinking into the cube or poking out excessively compared to its neighbors.
- The Algorithm: Use the standard corner orientation algorithm (often called the "Sune" or "Anti-Sune" variation depending on the pattern). Repeat it until all corners are oriented correctly.
- Verification: Rotate each corner individually. Check if the three faces meeting at that corner now have compatible heights. The corner piece should sit flush with the three adjacent centers.
- Patience Required: You may need to do this multiple times. Remember, moving one corner might disturb others. Keep track of which corners you have fixed.
Step 6: Permute the Top Layer Corners and Edges
Now that the corners are oriented, you need to move them to their correct locations. This corresponds to the PLL (Permutation of the Last Layer) stage.
- Corner Permutation: Find two corners that are already in the correct position (even if rotated wrong). Hold the cube so these are in the back-right and back-left positions. Execute the corner swapping algorithm. Repeat until all corners are in the correct spots.
- Edge Permutation: Finally, address the edges. Use the standard edge cycling algorithms to move the remaining edges into place.
- Final Check: As you place the last few pieces, the cube should begin to resolve into a perfect geometric shape. The jagged bumps should disappear, replaced by a smooth, uniform surface.
Step 7: The Final Tweak and Verification
Sometimes, despite following all steps, the last few pieces might seem swapped or misaligned. This is where trial and error becomes your best friend.
- The Four-Piece Scenario: In some rare cases, you might be left with four unsolved pieces that affect each other's orientation. This is a known phenomenon in shape mods.
- Solution: Try rotating the top layer and performing a full 3×3 PLL algorithm sequence. Often, a simple rotation combined with a standard algorithm will snap the last pieces into place.
- The Test: Hold the cube up to the light. Rotate it slowly. Does every face look flat? Are all pieces at the same height? If yes, congratulations! You have solved the Mirror Cube.
Advanced Techniques and Speedcubing Optimization
Once you have mastered the basic method, you may find yourself wanting to solve the Mirror Cube faster. Speedcubing the Mirror Cube requires refining your shape recognition speed and optimizing your finger tricks. Since you cannot rely on color patterns, your eyes must scan for height differences instantly.
Enhancing Shape Recognition
The biggest bottleneck for intermediate solvers is the time it takes to identify which piece goes where. To speed this up:
- Peripheral Vision Training: Train yourself to notice height differences using your peripheral vision. Don't stare at every piece; glance at the overall silhouette of the cube.
- Muscle Memory for Sizes: Over time, your fingers will learn the weight and texture of the different pieces. A tall edge feels heavier and more substantial than a short one. Trust this tactile sensation when searching for pieces in your scramble.
- Pattern Memorization: Learn to recognize common "bad" shapes that indicate incorrect placement. For example, if you see a "staircase" pattern on the top layer where it shouldn't be, you know an algorithm is needed immediately.
Optimizing Algorithms for Shape Mods
While the algorithms are the same as the 3×3, the execution can be tweaked for shape mods.
- Finger Tricks: Practice executing algorithms using only your fingers rather than whole wrist rotations. This allows for faster layer switching, which is crucial when dealing with the irregular shapes.
- Look Ahead: In standard cubing, you look ahead to the next algorithm. In Mirror Cubing, you look ahead to the next shape configuration. Anticipate how a move will change the heights of the pieces you are about to manipulate.
- Efficient Scrambling: When practicing, learn to scramble the cube efficiently to create challenging but solvable states. A good scramble maximizes the disruption of heights without creating impossible configurations.
Dealing with Specific Challenges
Some solvers encounter specific issues that require tailored approaches.
- The "Stuck" Feeling: If a layer refuses to turn, check if a piece is caught between two others due to incorrect alignment earlier in the solve. Disassemble and restart that section carefully.
- Parity Issues: Although rare on a 3×3 Mirror Cube, parity can occur if the cube was disassembled and reassembled incorrectly. Ensure all pieces are oriented correctly before starting the final layer.
- Visual Fatigue: Solving by shape can be mentally exhausting. Take breaks every 15-20 minutes to reset your visual processing. Fresh eyes see height differences more clearly.
The History and Evolution of the Mirror Cube Phenomenon
To fully appreciate the Mirror Cube, it is helpful to understand its place in the broader history of twisty puzzles. The concept of modifying a standard cube to change its appearance while retaining its mechanism is not new, but the Mirror Cube popularized this trend in a unique way.
Origins: From IPP26 to Mass Production
The puzzle was invented by Hidetoshi Takeji, a renowned puzzle designer. It made its debut at the International Puzzle Party (IPP) 26 in Boston in 2006. Originally, it was marketed under the name Bump Cube. The name perfectly described the physical sensation of solving it—navigating a landscape of bumps and ridges.
Initially, the puzzle was a niche item, sold primarily to puzzle enthusiasts and collectors. However, its appeal grew rapidly due to its accessibility. Unlike the Ghost Cube, which requires complex pre-solving steps to align layers, or the Square-1, which has a fundamentally different mechanism, the Mirror Cube offered a familiar challenge with a fresh twist.
In September 2008, major manufacturers including Rubik's Brand Ltd, MegaHouse, ShengShou, FangGe, Cyclone Boys, YuXin, and GAN began mass-producing the puzzle, renaming it the Mirror Blocks. This commercial release brought the puzzle to the mainstream, making it available in stores worldwide and fueling the rise of online communities dedicated to shape-mod solving.
The Rise of Shape Mods in 2026
Fast forward to 2026, and the Mirror Cube has evolved from a novelty into a serious competitive discipline. While there are no official World Championship events specifically for the Mirror Cube yet, it is a staple in speedcubing competitions and online leagues. The community has developed specialized techniques, databases of optimal solutions, and even custom variants with different cut depths and sticker patterns.
The success of the Mirror Cube paved the way for other shape mods like the Ghost Cube, Skewb Ultimate, and various Supercubes. It proved that solvers were capable of handling extreme visual distortion, expanding the horizons of what people thought was possible with the 3×3 mechanism. Today, seeing a beginner solve a Mirror Cube in under two minutes is not uncommon, thanks to the wealth of tutorials and resources available online.
Cultural Impact and Community
The Mirror Cube has fostered a vibrant subculture within the puzzle community. YouTube channels, TikTok creators, and blogs dedicated to "shape mods" have millions of views. Content creators like Nancy Green and CubeArea have produced countless videos breaking down the solving process, making it accessible to kids and adults alike. The hashtag #MirrorCube trends regularly on social media during puzzle festivals and world championships.
Moreover, the puzzle has educational value. It is frequently used in STEM programs to teach concepts of geometry, symmetry, and problem-solving. Teachers praise the Mirror Cube for forcing students to think critically about spatial relationships without the crutch of color coding. It teaches resilience, as the initial frustration of seeing a "messy" cube often gives way to the satisfaction of seeing order emerge through logical deduction.
Troubleshooting Common Issues and FAQs
Even with a solid guide, solvers may encounter hiccups. Here are answers to frequently asked questions and solutions to common problems.
My cube keeps falling apart when I turn it fast.
This is usually a sign of low quality or improper tension. Ensure you are using a high-quality cube designed for speed. Adjust the tension screws on the core to tighten the cube slightly. If the problem persists, the plastic may be worn out, and you may need to replace the cube.
I solved the cross and first layer, but the second layer edges keep popping out.
Check your algorithm execution. Ensure you are not rushing. Also, verify that you are inserting the correct short edges. Sometimes a tall edge is mistakenly placed in the middle layer, causing instability. Remove the piece and re-evaluate the height match.
Can I solve the Mirror Cube blindfolded?
Yes, advanced solvers do solve the Mirror Cube blindfolded. However, it requires memorizing the position and orientation of every piece based solely on touch and memory. It is a significant challenge that builds upon standard blindfolded 3×3 skills.
Why does my cube look solved but isn't flat?
This often happens if the centers are rotated. On a Mirror Cube, rotating a face changes the center heights relative to the rest of the cube. Ensure you haven't accidentally rotated a face during the solve. If the centers are misaligned, you may need to perform a specific algorithm to fix the center orientation before proceeding.
Is there a shortcut to solving the Mirror Cube?
While there are no true "cheats," experienced solvers use shortcuts like skipping the explicit cross formation if they can see the tall edges immediately, or using intuitive inserts for the first layer corners. However, these shortcuts rely heavily on experience and may not work for beginners. Stick to the systematic method until you are confident.
References
-
Cubelelo — How to Solve a Mirror Cube: Step-by-Step Beginner Guide, 2026
-
Ruwix — The Mirror Blocks Cube – Twisty Puzzle – Ruwix, 2026
-
Solvingrubikscube — Mirror Cube Tutorial – SolvingRubiksCube.com, 2026
-
Ruwix — Rubik's Cube Shape Mods: Mirror, Fisher, Mastermorphix etc., 2026
-
Rubiks — Mirror Cube | WikiCube | Fandom, 2026
-
Youtube — How To Solve 3×3 Mod Cubes – YouTube, 2026
-
Speedsolving — Mirror Blocks – Speedsolving.com Wiki, 2026
-
Cubesolver — From Confusion to Clarity: How to Solve the Mirror Cube, 2026