Welcome to the ultimate Megaminx solver beginner guide layer by layer method for 2026. If you are holding a dodecahedron-shaped puzzle and feeling overwhelmed by its twelve faces, you are not alone. The Megaminx, often called the Hungarian Supernova, presents a unique challenge that sits perfectly between the classic 3×3 cube and complex higher-order puzzles. Unlike the square world of the Rubik's Cube, the Megaminx requires you to think in three dimensions with a star-like geometry that can feel alien at first glance. However, for speedcubers in Chicago, New York, and beyond, mastering this puzzle is the next logical step in their journey.
In this comprehensive 2026 guide, we will break down the beginner's method into digestible steps. You do not need to be a math genius or a professional athlete to solve this; you only need patience and the right algorithmic knowledge. By the end of this article, you will understand how to build your first layer star, navigate the confusing middle layers, and conquer the final face using modified F2L (First Two Layers) logic. Whether you are solving a Diansheng FTO or a vintage GAN i4, these techniques remain timeless. Let's unlock the secrets of the twelve-sided mystery together.
Understanding the Megaminx Geometry and Core Concepts
Before diving into the algorithms, it is crucial to understand the anatomy of the puzzle you are holding. The Megaminx is a face-turning twisty puzzle shaped like a regular dodecahedron. This means it has 12 faces, each containing a fixed center piece, eight movable edge pieces, and five corner pieces. That adds up to a staggering 50 movable pieces in total. This complexity is what makes it significantly harder than a standard 3×3, which only has 20 movable pieces.
The most common version features 12 distinct colors, though some variants use fewer. In the competitive scene governed by the World Cube Association (WCA), the standard is the 12-color model. Each face has one fixed center, which dictates the color of that entire face once solved. The edges are elongated triangles, and the corners are pyramids. When you turn a face, all the pieces on that face rotate, but the centers stay put relative to each other.
For beginners, the biggest hurdle is visualizing the star pattern. On a 3×3, you solve a cross; on a Megaminx, you must solve a five-pointed star. This requires looking at the puzzle from different angles simultaneously. Many solvers struggle initially because they try to treat the Megaminx exactly like a 3×3 without adjusting their perspective. In 2026, with high-quality lubricants and magnetic cubes available everywhere, the tactile experience is smoother, allowing you to focus purely on the spatial logic.
Understanding the notation is also essential. While similar to the 3×3, the Megaminx uses a slightly different set of moves because there are more faces. We use letters like U (Up), R (Right), F (Front), etc., but the "up" face changes depending on which side you are working on. The key concept here is FRU notation: Face-Rotation-Unit. Every move you make affects specific groups of pieces. Mastering this language is the foundation of your Megaminx solver beginner guide.
The Difference Between Megaminx and 3×3 Logic
While the methods are similar, the execution differs. On a 3×3, you might have two edges left to swap; on a Megaminx, you might have an edge that needs to be inserted into a slot surrounded by five other pieces. The layer-by-layer method adapts the familiar CFOP or Beginner's Method concepts to this new geometry. You will find that the intuition you built solving the 3×3 transfers well, but you must learn to extend your fingers further and rotate your wrists differently to access the hidden layers.
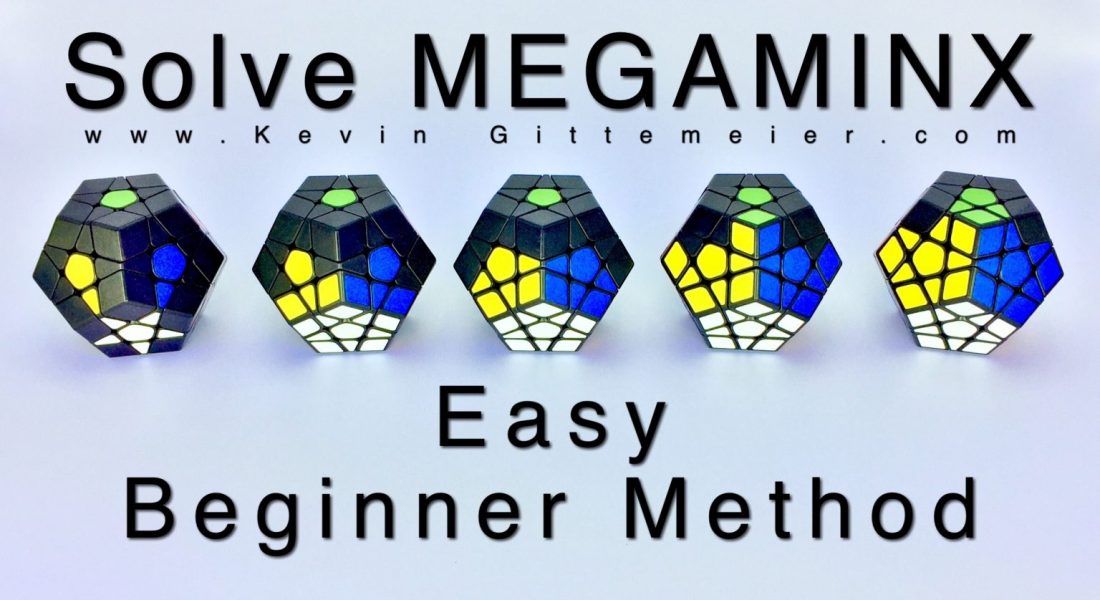
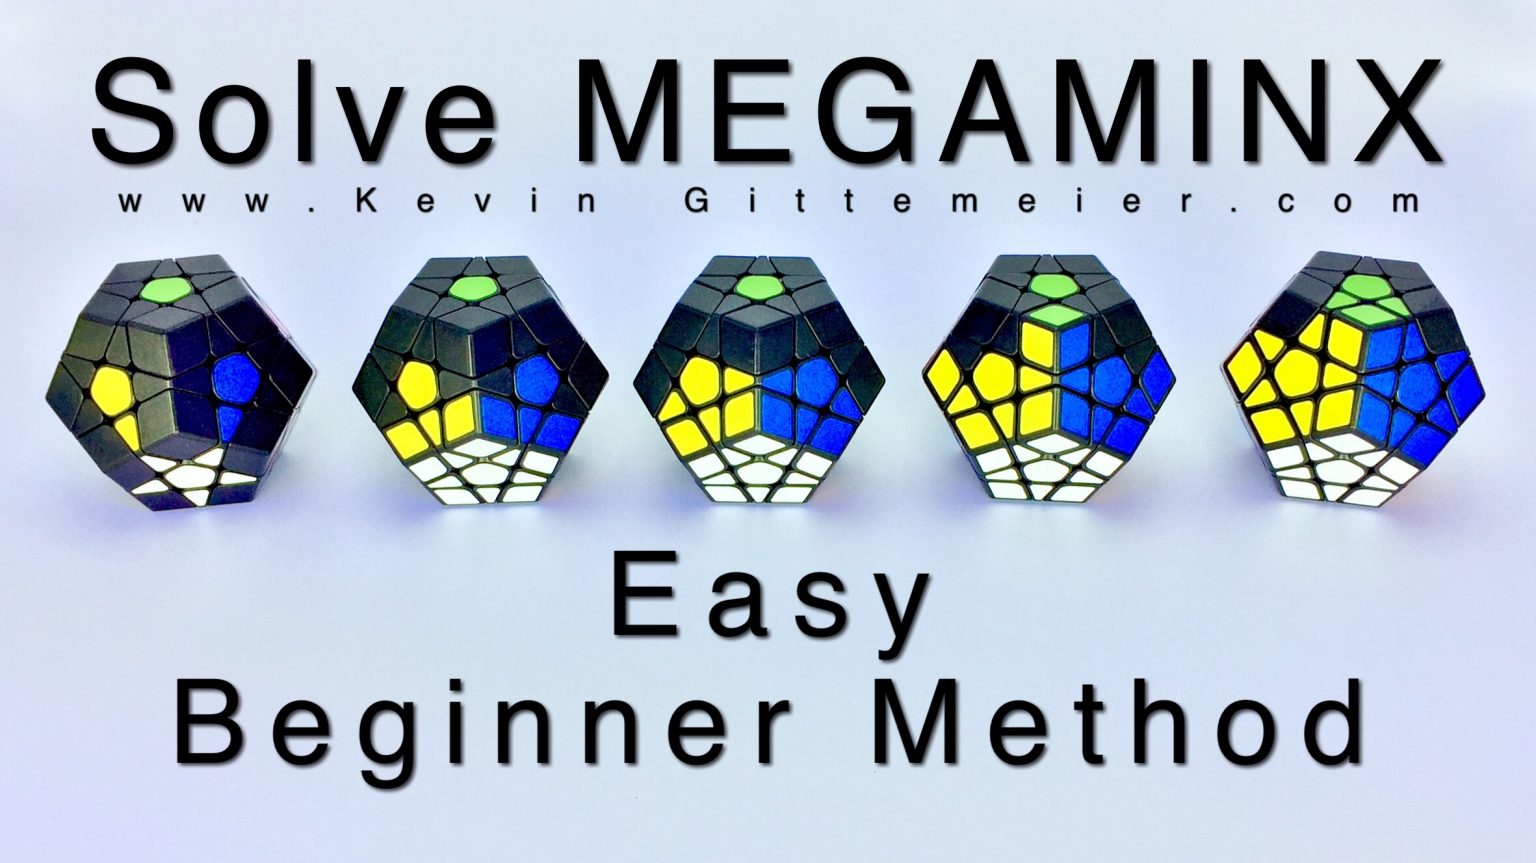
Step 1: Building the First Layer Star
The journey to solving the Megaminx begins with a single, deceptively simple goal: creating the First Layer Star. This step is remarkably similar to forming the white cross on a standard 3×3 cube, but with a five-fold symmetry instead of four. Your goal is to align the five edge pieces around the top center so that each edge matches the color of the adjacent side centers.
Identifying Your Starting Colors
Pick any color for your starting face; traditionally, solvers choose White. Place the white center on top (U). Now, locate the five edge pieces that belong to this white face. These pieces will have white on one side and another color on the other. Your objective is to place them so the white sticker faces up and the second color matches the center of the adjacent face.
Holding the cube with the White center on top and the Purple center facing you (or whichever side you are currently working on) is the standard orientation. You will repeat the same logic for all five sides. Imagine the top face as a pizza cut into five slices; you need to place the correct topping on each slice before adding the cheese (the corners).
The Algorithmic Approach
Unlike the 3×3 where you simply slide pieces into place, the Megaminx often requires a specific sequence to insert an edge without disturbing the ones you've already placed. For beginners, the process is intuitive:
- Find an edge piece with the target color on the bottom layer or the top layer but misaligned.
- Rotate the top face until the non-white color of the edge aligns with its corresponding center below.
- Perform a series of turns to bring the edge down, then up, effectively locking it into the star position.
This phase builds muscle memory for the unique turning mechanics of the dodecahedron. If you get stuck, remember that the center pieces never move relative to each other. They act as anchors. Use them to verify if your placement is correct. In 2026, many cubers use apps or online simulators to practice this step without physical wear and tear, but nothing beats the tactile feedback of a real speedcube.
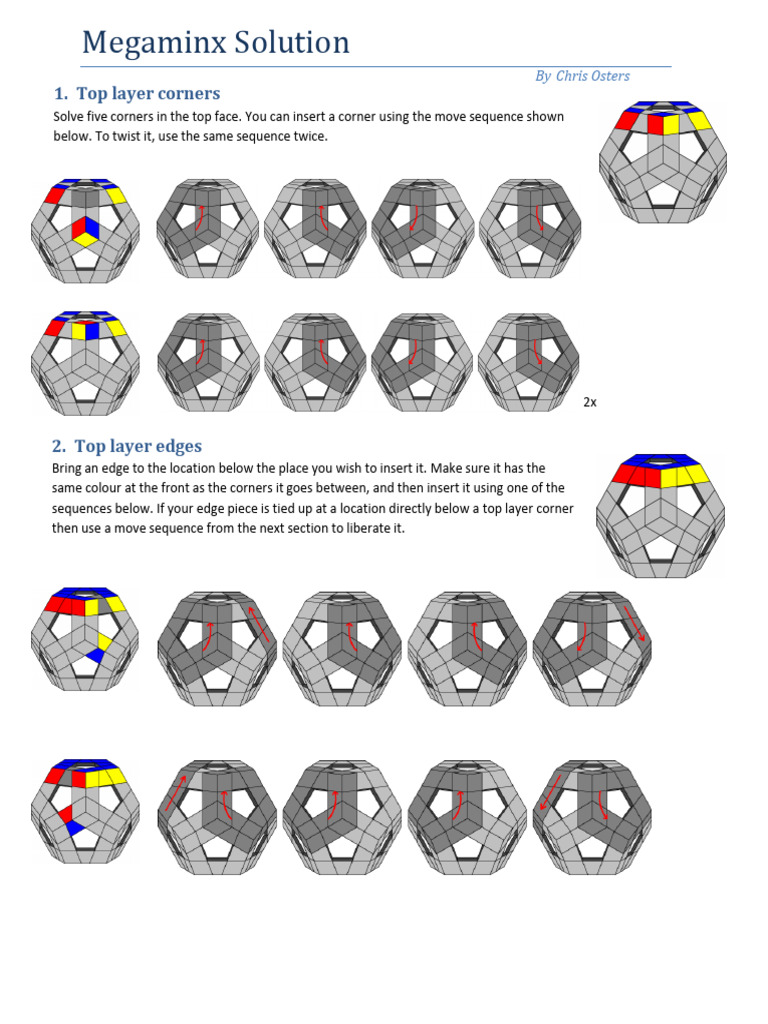
Step 2: Completing the First Layer Corners
Once your white star is complete, the next logical step is to fill in the gaps with the corner pieces. This completes the entire first layer, giving you a solid base to work from. Just like the 3×3, this section relies heavily on intuition rather than complex algorithms, making it an excellent confidence booster for new solvers.
Locating and Inserting Corners
Each corner piece on the Megaminx has three stickers: one white (for our example), and two side colors. You need to find a corner piece that belongs in the gap between two completed edges. Hold the cube so the empty corner slot is at the front-right-bottom position.
Look at the corner piece in your inventory. Does it have white? If yes, orient it so the white sticker faces down (towards the solved layer) and the side colors match the adjacent centers. If the piece is scrambled, you may need to cycle it around the top layer until it finds its home.
The Intuitive Insertion
The insertion technique for Megaminx corners is very similar to the 3×3 "right-hand" or "left-hand" algorithm, but adapted for the pentagonal shape.
- Case A: The corner is already in the correct spot but twisted. You can often fix this with a simple R U R' U' type motion, repeated until the orientation is correct.
- Case B: The corner is elsewhere on the top layer. Bring it directly above the slot where it needs to go. Then, execute a sequence that drops it into place while preserving the star.
Most beginners find this step surprisingly easy. It reinforces the concept that you are building from the bottom up. Once all five corners are in place, your first layer is fully solved. You now have a white face on top and five completed side strips. Turn the cube over so the white face is on the bottom; this prepares you for the middle layers.
Step 3: Solving the Middle Layers (F2L Adaptation)
This is the heart of the Megaminx solver beginner guide layer by layer method. Here, you will apply the logic of F2L (First Two Layers) from the 3×3 world. However, because the Megaminx has five layers instead of three, you are essentially solving five sets of edges and corners sequentially.
The Concept of S2L (Second to Last)
After completing the first layer, you turn your attention to the five edges surrounding the white center. These edges form the "second layer" of the solution process. Your goal is to insert these edges between the completed first-layer corners and the next set of centers.
On a 3×3, F2L pairs an edge and a corner. On the Megaminx, you primarily focus on inserting edges first, then dealing with the corners later, or vice versa, depending on your preference. The Beginner's Method usually suggests:
- Solve all five edges of the second layer.
- Solve the five corners of the second layer.
- Repeat this pattern for the third, fourth, and fifth layers.
Algorithms for Edge Insertion
When an edge piece is located in the top layer but needs to go into the middle layer, you will encounter specific situations. The most common algorithm for inserting an edge on the right side is:
R U R' U R U2 R'
And for the left side:
L' U' L U' L' U2 L
These sequences might look intimidating, but they are designed to cycle pieces without disrupting the layers you have already solved. Practice these slowly. Notice how the U2 (half turn) is crucial; it flips the orientation of the piece to allow it to drop into the correct slot.
Handling Parity and Confusion
Sometimes, an edge will be in the correct position but flipped incorrectly. In the 3×3, this is rare in the beginner method, but on the Megaminx, it happens more frequently due to the odd number of pieces per face. If you find yourself stuck with a flipped edge, you may need to temporarily disrupt a solved layer to reorient it, then rebuild. This is normal! Speedcubers in Austin or London know that making mistakes is part of the learning curve. The key is to have a plan to restore order quickly.
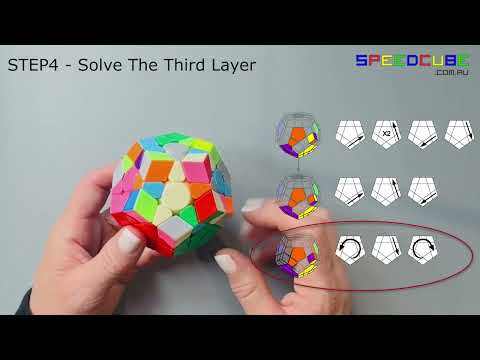
Step 4: Tackling the Third Layer Edges and Corners
By the time you reach the third layer, you have successfully solved the first two layers. The puzzle now looks like a smaller Megaminx floating on top of a solved base. This is where the difficulty ramps up significantly. The third layer contains the most complex interactions because you are working in the "middle" of the puzzle, surrounded by unsolved pieces on all sides.
The Challenge of the Middle Ring
The edges in the third layer are tricky because they sit between the solved second layer and the unsolved fourth layer. You cannot simply grab them and pull them down; you risk breaking the second layer. Instead, you must use insertion algorithms that lift pieces out, swap them, and drop them back in safely.
For the edges, the process involves:
- Locating an edge piece in the top layer (fifth layer) that belongs in the third layer.
- Aligning it so it can be cycled into the third layer using the Left or Right algorithms mentioned earlier.
- Repeating this until all five third-layer edges are in place.
Corner Placement in the Third Layer
Once the edges are sorted, you tackle the corners. Similar to the second layer, you look for corners that belong in the third layer slots. The algorithms here are extensions of the 3×3 corner insertion methods but adapted for the dodecahedral geometry. You will often find yourself performing a sequence like R U R' U R U2 R' multiple times to permute the corners correctly.
It is vital to maintain your orientation. Keep track of which face is "Up" and which is "Front" as you rotate the cube. Confusion here leads to "parity errors," where pieces seem impossible to solve. In 2026, digital guides and video tutorials are invaluable resources for visualizing these rotations. Watching a master solve the third layer can provide the "aha!" moment needed to grasp the flow.
Step 5: Conquering the Final Layer (OLL and PLL)
The final stage is the most daunting yet rewarding. You now have the first four layers solved, leaving only the top face (the fifth layer) to complete. This mirrors the Last Layer phase of the 3×3 cube but requires a much larger set of algorithms because there are more pieces to orient and permute.
Orienting the Last Layer (OLL)
The first sub-step is Orientation of the Last Layer (OLL). Your goal is to make the entire top face a single color (e.g., Yellow). Unlike the 3×3, where OLL involves 57 cases, the Megaminx has far fewer cases due to its symmetry, but they are still complex.
- Start by forming a yellow star on the top face.
- Then, adjust the corners so the yellow stickers face up.
- Finally, ensure the side colors of the top edges match the centers below them.
Many beginners get stuck here because they try to solve everything at once. Break it down: Star -> Corners Oriented -> Edges Oriented. Patience is your best tool. If you mess up, don't panic; just restart the last layer. It is faster to redo the top than to spend hours trying to fix a partial solution.
Permuting the Last Layer (PLL)
Once the top face is solid yellow, you move to Permutation of the Last Layer (PLL). This step swaps the positions of the edge and corner pieces so that every side of the Megaminx is completely solved.
- Edge Permutation: You may need to cycle three edges at a time. Algorithms like R U R' U R U2 R' U' R U' R' U2 R2 are standard for cycling edges clockwise.
- Corner Permutation: Similarly, you will cycle corners using specific sequences to place them in their final slots.
In competitive settings, speedcubers memorize dedicated Megaminx OLL and PLL algorithms to solve the last layer in under 10 seconds. For beginners, understanding the logic behind these moves is more important than memorization. Know why the algorithm works, and you can adapt if you forget a specific sequence.
Common Mistakes and How to Overcome Them
Even with a perfect guide, solvers encounter hurdles. Recognizing these common pitfalls can save you hours of frustration.
Mistake 1: Ignoring Center Orientation
One of the most frequent errors is forgetting that the centers define the color of the face. If you accidentally rotate a whole face, you might think you've made progress when you've actually scrambled the puzzle. Always double-check that the centers remain aligned with your chosen color scheme.
Mistake 2: Poor Finger Tricks
The Megaminx requires wider finger movements than the 3×3. Beginners often try to turn faces using their thumbs or index fingers in ways that cause the cube to slip or lock up. Developing proper finger tricks—using multiple fingers to rotate layers smoothly—is essential for both solving speed and preventing damage to the puzzle.
Mistake 3: Rushing the Algorithms
Algorithms on the Megaminx are longer and more intricate than on the 3×3. Rushing through a sequence can lead to missed moves or incorrect orientations. Take your time. Execute each turn deliberately until the muscle memory kicks in.
The Future of Megaminx Solving in 2026
As we look toward 2026, the landscape of Megaminx solving continues to evolve. With advancements in magnetic technology and lubrication formulas, modern puzzles like the Diansheng FTO and GAN i4 offer unprecedented smoothness. This allows solvers to execute algorithms faster and with greater precision.
The community in major hubs like Chicago, Berlin, and Tokyo is more connected than ever. Online forums, Discord servers, and local meetups provide support for beginners struggling with the layer-by-layer method. The World Record for the Megaminx stands at an incredible 23.18 seconds, held by Leandro Martín López. While this seems unattainable for beginners, it serves as inspiration. Every record was once a beginner's first solve.
Moreover, the integration of AI-driven tutors and interactive 3D simulators has made learning easier. You can now visualize every move before making it on a physical cube. This technological boost ensures that the barrier to entry for the Megaminx is lower than ever, encouraging more people to explore the fascinating world of dodecahedral puzzles.
Conclusion: Your Journey Begins Now
Solving the Megaminx is a testament to persistence and logical thinking. By following this beginner guide layer by layer method, you have equipped yourself with the knowledge to conquer the twelve-sided beast. From building the initial star to navigating the complex final layer, each step builds upon the last, creating a solid foundation for future improvement.
Remember, every expert was once a beginner who refused to give up. Embrace the challenges, celebrate the small victories, and enjoy the process. Whether you are solving it for fun, competition, or simply to challenge your brain, the Megaminx offers a unique satisfaction that few other puzzles can match. Grab your cube, apply these techniques, and start your journey today. The world of twisty puzzles awaits your mastery.
FAQ: Frequently Asked Questions
Q: Do I need to know how to solve a 3×3 cube to solve a Megaminx?
A: While not strictly mandatory, having experience with the 3×3 cube is highly recommended. The layer-by-layer method shares many similarities, such as building from the bottom up and using similar rotation logic. If you know the 3×3, you will pick up the Megaminx much faster.
Q: What is the easiest method for a complete beginner?
A: The Beginner's Method or Layer-by-Layer is widely considered the easiest entry point. It breaks the puzzle into manageable chunks: Star, Corners, Middle Edges, Middle Corners, and Final Layer. This structured approach prevents overwhelm.
Q: How long does it take to learn the Megaminx?
A: With consistent practice, most beginners can solve the Megaminx for the first time within a few days to a week. Memorizing the necessary algorithms and developing finger dexterity may take a bit longer, but the satisfaction of your first solve is immediate.
Q: Are there specific Megaminx models recommended for beginners in 2026?
A: Yes. Cubes like the Diansheng FTO, Gan 356 M, or MoYu RS3M are excellent choices. Look for models with good stability, smooth turning, and strong magnets. Avoid cheap, stiff puzzles as they can hinder your learning progress.