In 2026, the allure of the Rubik's Cube remains as strong as ever, serving not just as a toy but as a global benchmark for problem-solving skills and cognitive flexibility. For decades, the narrative surrounding the puzzle has been dominated by the idea that it requires genius-level memory, complex algorithms, and hours of rote practice to master. However, this perception is rapidly changing. The most effective approach for modern solvers is shifting toward an easy method without complicated formulas. This guide dismantles the myth that you need to memorize long sequences of moves to crack the code. Instead, we will explore a logical, layer-by-layer methodology that relies on intuition, simple patterns, and basic logic rather than heavy memorization. Whether you are a complete novice who has never touched a cube or someone looking to refresh their skills with a more intuitive approach, this comprehensive tutorial provides the definitive path to solving the 3×3 cube in 2026.
The beauty of this specific method lies in its accessibility. It breaks down the seemingly impossible task of aligning 54 colored stickers into manageable, bite-sized challenges. By focusing on one layer at a time and understanding the fundamental mechanics of the cube, anyone can achieve a solved state. We will move away from the confusing jargon of speedcubing and focus on simple steps that guarantee success. This is not about becoming a world-record holder tomorrow; it is about understanding the puzzle deeply enough to solve it reliably every single time. In an era where information is abundant but clarity is scarce, this article cuts through the noise to deliver a proven, step-by-step framework that works for absolute beginners.
Understanding the Core Mechanics Before You Start
Before diving into the actual solving process, it is crucial to establish a solid foundation of knowledge. Many beginners fail because they try to treat the cube like a jigsaw puzzle, trying to force pieces into place without understanding how the mechanism works. To master the Rubik's Cube easy method, you must first internalize three core principles that govern the entire puzzle. These concepts act as the "rules of the road" for your journey.
The Fixed Nature of Center Pieces
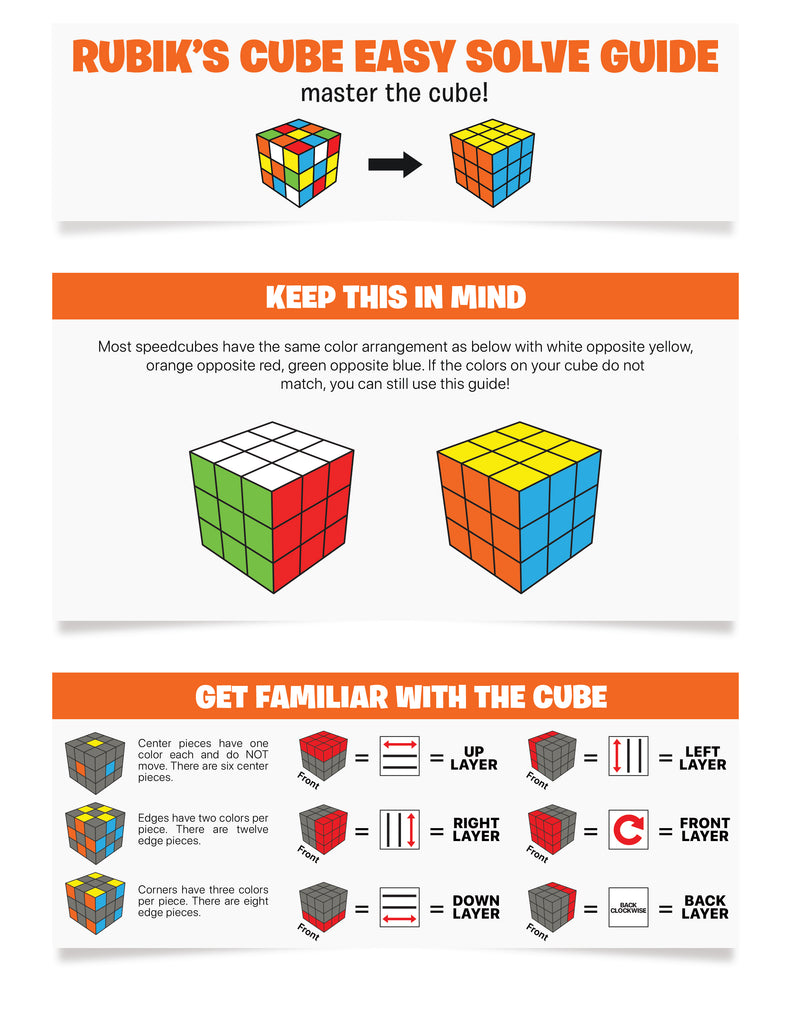
The most critical concept to grasp immediately is that center pieces never move. On a standard 3×3 Rubik's Cube, there are six center pieces, one for each face: white, yellow, red, orange, blue, and green. These centers are attached directly to the internal core mechanism. When you rotate a face, the center piece rotates in place, but it never changes its position relative to other center pieces.
This fact is the anchor of the entire solving process. It means that if the center piece on the top face is white, that entire face will always be the white face. If you see a red center, that side will always be red. This stability allows you to use the centers as reference points throughout the entire solve. Without this understanding, you might spend hours trying to figure out which color belongs where, leading to frustration. In 2026, remembering this simple rule saves countless hours of confusion. It transforms the cube from a chaotic mess of colors into a structured system with fixed coordinates.
Layer-by-Layer vs. Face-by-Face
A common mistake made by beginners is attempting to solve the cube face by face. They might try to make all the white stickers match first, then all the red, and so on. This approach almost always leads to a dead end because moving one face inevitably disrupts the progress made on another. The correct and only viable strategy for the beginner method is to solve the cube layer by layer.
Think of the cube as having three horizontal slices: the bottom layer, the middle layer, and the top layer. Your goal is to completely solve the bottom layer (including the side colors), then move to the middle, and finally the top. This systematic approach ensures that once a layer is solved, it stays solved. Each subsequent step builds upon the previous one, creating a stable foundation. This logical progression is the heart of the no-formula solution. You aren't fighting against your own progress; you are adding to it steadily.
The Three Types of Cubies
To navigate the cube effectively, you must understand the different types of movable pieces, known as cubies. There are exactly 20 movable cubies on a 3×3 cube (excluding the 6 fixed centers). These are divided into three distinct categories, each with unique properties:
- Edge Pieces: There are 12 edge pieces. Each has exactly two colors. These pieces sit between two corner pieces. For example, a white-red edge piece belongs on the edge shared by the white face and the red face.
- Corner Pieces: There are 8 corner pieces. Each has exactly three colors. These sit at the intersections of three faces. A white-red-green corner belongs in the slot where those three colors meet.
- Center Pieces: As mentioned earlier, there are 6 center pieces. While they don't move relative to each other, they define the color identity of each face.
Understanding these distinctions helps you visualize where a piece should go. When you pick up a scrambled cube, you are essentially looking at 20 misplaced items that need to be sorted into their correct slots based on their color combinations. This mental model simplifies the puzzle significantly. Instead of seeing a chaotic block of plastic, you see a organized system of parts waiting to be arranged.
Essential Notation and Basic Moves
Once you understand the mechanics, the next hurdle is learning the "language" of the cube. Solving the puzzle requires communicating specific movements to the cube's layers. This communication happens through cube notation, a standardized system of letters and symbols that describes every possible turn. Learning this notation is not about memorizing complex math; it is about learning a simple alphabet that tells you exactly which way to twist the cube.
Decoding the Letters
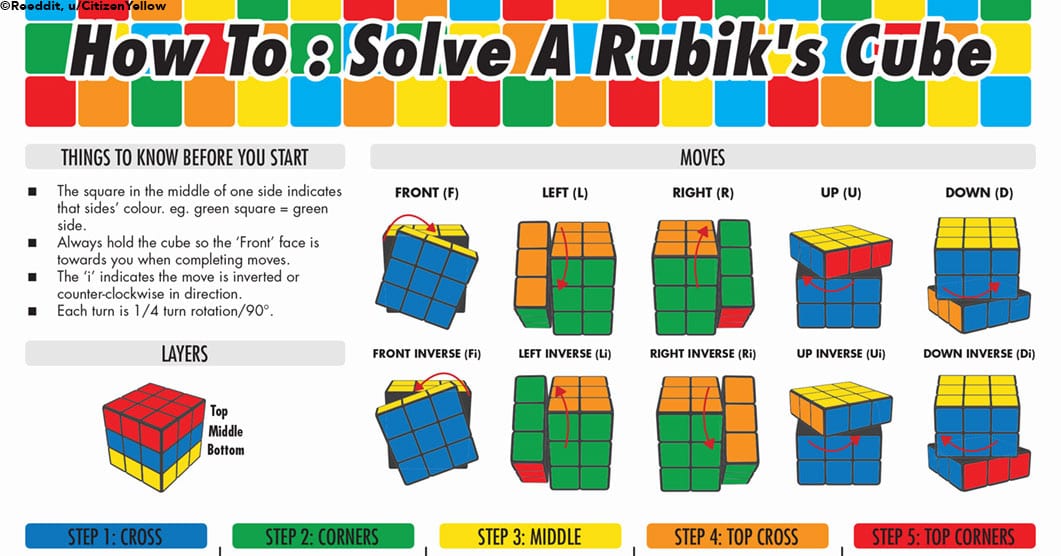
The notation uses seven letters, each representing one of the faces of the cube. To use them, imagine holding the cube in front of you. Here is the breakdown of what each letter means:
- F (Front): The face directly facing you.
- B (Back): The face opposite the front, away from you.
- R (Right): The face on your right hand side.
- L (Left): The face on your left hand side.
- U (Up): The top face of the cube.
- D (Down): The bottom face of the cube.
- M (Middle): Occasionally used in advanced methods, but less relevant for the basic beginner method.
These letters are the building blocks of every algorithm you will ever encounter in this guide. However, knowing the face names isn't enough. You also need to know the direction of the turn. This is where the apostrophe symbol comes in.
Clockwise vs. Counterclockwise
In cube notation, the direction of the rotation is indicated by the presence or absence of an apostrophe (').
- No Apostrophe (e.g., R): This means turn the face clockwise by 90 degrees. Imagine turning the key in a lock to the right.
- With Apostrophe (e.g., R'): This means turn the face counterclockwise by 90 degrees. Imagine turning the key to the left.
- Double Turn (e.g., R2): This means turn the face 180 degrees (twice 90 degrees). The direction doesn't matter for double turns; R2 is the same whether you turn it clockwise or counterclockwise.
Mastering these basic moves is the prerequisite for everything else. Before attempting to solve any part of the cube, you should practice these rotations until they become muscle memory. Hold the cube firmly with one hand and use your index finger of the other hand to execute the turns. Consistency is key; ensure every turn is a full 90-degree rotation to avoid misaligning the layers.
Visualizing the Moves
It can be challenging to visualize these moves purely from text, which is why interactive tools are invaluable in 2026. Many resources now offer interactive simulators that allow you to practice these moves on a virtual cube before touching a physical one. These tools let you input scrambles and watch the solution unfold, helping you internalize the spatial relationships between the pieces.
When practicing, try to keep the cube oriented consistently. For instance, always hold the cube with the white face on the bottom during the initial stages. This consistency reduces cognitive load, allowing you to focus entirely on the mechanics of the moves rather than constantly re-orienting the puzzle in your hands. As you get comfortable with F, B, R, L, U, and D, you will find that executing algorithms becomes second nature. You won't be thinking "Okay, now I need to do R prime," your hand will just know to twist the right face counter-clockwise.
Step 1: Creating the White Cross
The first major milestone in the beginner's method is creating the White Cross. This step might seem deceptively simple, but it sets the stage for the entire solve. The goal is to form a plus sign (+) on the white face, ensuring that the side colors of the edge pieces match the center pieces of the adjacent faces.
The Goal of the White Cross
You want four white edge pieces arranged around the white center. But it's not just about the white stickers being on top; the secondary color on each edge must align perfectly with the center of the adjacent face. For example, if the edge piece between white and red is placed, the red sticker on that piece must line up with the red center piece on the side.
If you look at a solved cube, you will see that the white cross extends down the sides of the cube, forming a continuous path of matching colors. This cross acts as the foundation. Once it is correctly formed, the rest of the first layer becomes much easier to construct.
How to Execute the White Cross
Unlike later steps, this stage requires no algorithms. It is entirely intuitive and relies on observation and simple manipulation. Follow these logical steps to build your cross:
- Locate the White Edges: Scan the cube for the four edge pieces that contain a white sticker. Ignore corners for now; focus only on the edges.
- Position Below the Target: Move each white edge piece to the bottom layer (the D layer) directly underneath where it needs to go on the top layer (the U layer).
- Align the Side Colors: Rotate the bottom layer until the side color of the edge piece matches the center piece of the adjacent face.
- Bring it Up: Perform a simple U (Up) move to bring the white sticker to the top face. Repeat this for all four edges.
As you work, you will naturally develop a sense of where the pieces belong. If an edge piece is already on the top layer but flipped the wrong way (white on top but side color mismatched), simply move it to the bottom layer, re-align it, and bring it back up correctly. There is no need to panic or use complex sequences here. Just use your fingers to slide the pieces into place.
Verification Checklist
How do you know you have succeeded with the White Cross? Check these criteria:
- All four white stickers are on the top face, forming a clear plus sign.
- The secondary color on each white edge piece matches the center color of the side face it sits between.
- No other pieces (corners or non-white edges) are disturbed in a way that breaks the alignment of the cross.
- The bottom layer (D face) may be messy, but that is acceptable at this stage. We will fix it later.
Step 2: Solving the White Corners
With the white cross complete, the next logical step is to fill in the gaps by placing the white corner pieces. This action will complete the entire first layer, including the side colors. Completing the first layer is a massive psychological win; suddenly, you have one whole face solved and three sides partially aligned.
The Logic Behind Corner Insertion
Corner pieces have three colors. To solve the first layer, you need to insert these eight-corner pieces into the slots between the white edges. The challenge is doing this without messing up the white cross you just spent time building. The secret lies in finding the correct "home" for each corner and using a simple insertion technique.
Every corner piece has a specific location where its three colors meet the corresponding centers. For instance, the white-red-green corner belongs in the corner slot where the white, red, and green centers intersect. Your job is to get that specific piece into that specific slot, with the white sticker facing down (towards the white center).
The Simple Insertion Algorithm
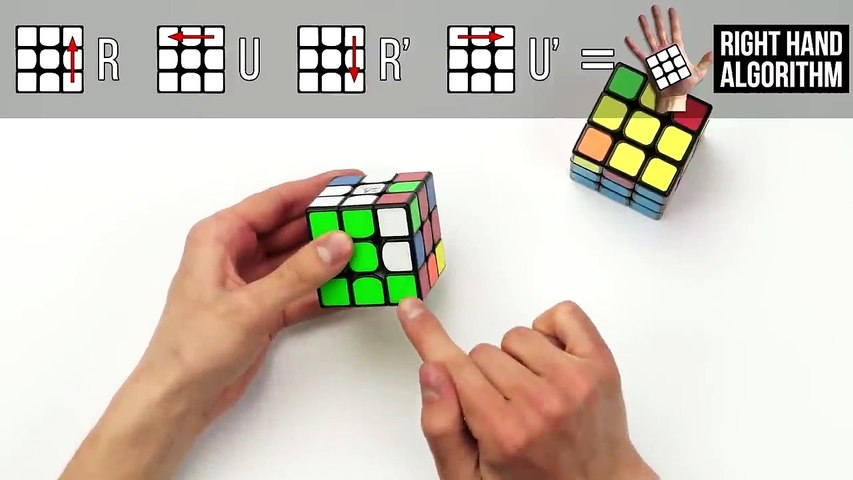
While many tutorials teach a specific algorithm like R U R' U', for the "easy method without complicated formulas," we can simplify the concept into a repeatable motion. Think of it as a "grab and drop" maneuver.
- Find the Corner: Locate a white corner piece on the bottom layer (D layer). Look at its three colors.
- Align the Side: Rotate the bottom layer (D) until the corner piece is directly below its target slot (the space between the three centers it belongs to). Ensure the side colors match the centers horizontally.
- Execute the Move: With the corner below its spot, perform the following sequence: R U R' U'.
- Wait! Let's break this down simply. You are turning the Right face Up, then the Up face Right, then the Right face Down, then the Up face Left.
- Actually, for the absolute beginner, a simpler visual trick often works better: Hold the cube so the corner is in front of you. If the white sticker is on the Right face, do R U R' U'. If the white sticker is on the Front face, do F' U' F U.
- Note: Even if you don't memorize the letter notation yet, just remember the pattern: Bring the corner up, rotate the top to align, bring it down.
- Repeat: Do this for all four white corners. Each time you insert a corner, the white face starts to take shape, and the side colors begin to connect.
Common Pitfalls and Warnings
Be careful not to force pieces into place. If a corner doesn't want to go in, you likely haven't aligned the side colors correctly on the bottom layer. Double-check that the red sticker on the corner lines up with the red center before attempting the move. Forcing it will scramble your progress. Also, ensure you are inserting the corner with the white sticker facing down. If you accidentally flip it so white is on the side, the layer won't solve correctly.
Verifying Success
Once all four white corners are inserted, check your cube:
- The entire White Face should be solid white.
- The first layer (bottom slice) should be completely solved, meaning the white face is done, and the side colors of the bottom layer match the centers of the adjacent faces.
- If the first layer is perfect, you have successfully completed 20% of the puzzle. Congratulations! This is a significant achievement for a beginner.
Step 3: Solving the Middle Layer Edges
Now that the first layer is locked in, you can ignore it. It is solved and will stay solved as long as you follow the rules of this method. Your new focus shifts entirely to the middle layer. This involves placing the 12 edge pieces that belong in the middle slice of the cube (between the white layer and the yellow layer).
Identifying Middle Layer Pieces
Look at the top layer (the yellow face). You will see several edge pieces. Some of these belong in the middle layer. An edge piece belongs in the middle layer if it does not have a yellow sticker. If an edge piece has yellow on it, it belongs in the top layer and should be ignored for now.
Scan the top layer for edges like Red-Blue, Green-Orange, etc., that lack yellow. These are your targets. You need to move them from the top layer down into the middle layer slots.
The Two-Sided Insertion Technique
There are two scenarios for inserting a middle layer edge: it needs to go to the right or it needs to go to the left. The good news is that the logic is mirrored, making it easy to remember.
Scenario A: The Edge Needs to Go to the Right
- Position: Rotate the top layer (U) until the target edge piece forms a "T" shape with the front center. The side color of the edge should match the front center.
- The Move: Perform the algorithm: U R U' R' U' F' U F.
- Simplified logic: Move the piece out of the way, shift the layer, bring the piece down into the empty slot, and restore the layer.
- Alternatively, think of it as: Raise the piece, move it aside, lower it into the gap.
Scenario B: The Edge Needs to Go to the Left
- Position: Rotate the top layer until the edge piece matches the front center color.
- The Move: Perform the inverse algorithm: U' L' U L U F U' F'.
- This is simply the mirror image of the right-side move.
Why This Works Without Complex Memory
This step feels like magic, but it is pure logic. The algorithm creates a temporary hole in the top layer, slides the middle layer piece into that hole, and then restores the top layer around it. Because the first layer is already solved, these moves happen in the upper and middle slices, leaving the bottom layer untouched.
Try to visualize the path: The piece travels from the top front, gets lifted up, moved to the side, dropped down into the middle, and the top layer closes back up. Once you understand the flow, you won't need to memorize the letters. You'll just know the "pattern" of the move.
Verification Steps
After inserting all non-yellow edges:
- Check the middle layer. It should be fully solved. The side colors of the middle layer should match the centers of the adjacent faces.
- Look at the top layer. It should now consist only of yellow stickers and possibly some edges/corners that were already there.
- The cube should look like a "sandwich": White on bottom, a colorful middle layer, and a mostly yellow top layer.
Step 4: Creating the Yellow Cross
You have now solved two layers. The cube looks nearly complete, except for the top face, which is currently yellow (or scrambled yellow). The goal of this step is to form a Yellow Cross on the top face. Unlike the white cross, the yellow cross does not require the side colors to match yet; we only care about the arrangement of the yellow edge pieces.
The Patterns of the Yellow Cross
Depending on how the yellow edges are scattered on the top face, you will start with one of three patterns:
- The Dot: No yellow edges are connected. Just a single yellow center dot.
- The L-Shape: Two yellow edges form an "L" shape next to each other.
- The Line: Two yellow edges form a straight line across the face.
Your goal is to transform any of these into a Cross shape where four yellow edges connect to form a plus sign.
The Universal Algorithm
There is a single, simple algorithm that handles all three cases. You will apply it repeatedly until the cross appears. The formula is: F R U R' U' F'.
- Don't Panic: This looks scary, but let's break it down. It involves moving the Front face, Right face, Up face, and their inverses in a specific sequence.
- Application:
- If you have a Dot: Apply the algorithm once. You will likely get an L-shape.
- If you have an L-Shape: Orient the L so it looks like a clock hand pointing to 10 and 12 (top-left and top-front). Apply the algorithm. You should get a Line.
- If you have a Line: Orient the line horizontally (9 o'clock to 3 o'clock). Apply the algorithm. You will get the Cross.
Orientation Matters
For this algorithm to work correctly, you must orient the cube properly before applying it. Always ensure the yellow center is on top. Then, arrange the existing yellow edges into the specific pattern required for the current step (Dot, L, or Line) relative to the front face.
If you apply the algorithm and nothing changes, check your orientation. Did you forget to rotate the top layer to match the pattern description? Precision in positioning is key here. The algorithm manipulates the edges based on their current relationship to the front and right faces.
Checking Progress
After applying the algorithm (usually 1 to 3 times), inspect the top face:
- Do you see four yellow edge pieces forming a plus sign (+)?
- Are the ends of the cross extending towards the side centers?
- If yes, you have successfully created the Yellow Cross. The side colors might still be mismatched, but that is fine. We will fix that in the next step.
Step 5: Aligning the Yellow Edges
Now that you have a yellow cross, the next challenge is to align the side colors of these yellow edge pieces with the corresponding center pieces of the side faces. Currently, the yellow cross exists, but the colors around the perimeter might be scrambled.
The Objective
You need to rotate the top layer (U) so that each yellow edge piece matches the color of the center piece directly behind it. For example, if the edge piece between Yellow and Red is next to the Red center, it must be rotated so the red sticker faces the red center.
The Rotation Algorithm
This step requires a specific algorithm to cycle the edge pieces without disturbing the yellow cross you just made. The formula is: R U R' U R U2 R' U.
- What it does: This sequence rotates the three edge pieces on the top layer in a clockwise direction (or counter-clockwise, depending on your starting orientation).
- How to use it:
- Look at the top layer. Identify how many edges are already correctly aligned.
- If none are aligned, perform the algorithm.
- After performing the algorithm, rotate the top layer (U) to check again.
- Repeat the process until at least one edge is aligned.
- Once one edge is aligned, keep that edge at the front and repeat the algorithm until all four edges are aligned.
Strategic Approach
Do not try to guess which edges need moving. Simply run the algorithm. It acts as a "shuffler" for the edges. Every time you run it, the positions change. Eventually, the permutation will result in all edges lining up with their respective centers. This is a guaranteed mathematical outcome; you cannot get stuck forever.
Verification
Check the top layer again:
- Does every yellow edge piece match the color of the center piece on its side?
- If the answer is yes, the top layer's edge ring is now consistent with the side centers.
- The cube now looks like a checkerboard pattern on top, with yellow edges surrounding a yellow center, and the side colors matching the vertical columns.
Step 6: Positioning the Yellow Corners
With the edges aligned, the final layer is almost ready, but the yellow corner pieces are likely in the wrong positions. They might be in the correct spots but twisted the wrong way, or they might be sitting in the wrong corners entirely. This step focuses on positioning the corners so that the three colors on each corner match the three adjacent centers.
Identifying Misplaced Corners
Look at the four corners of the top layer. Compare the colors on each corner to the three centers it touches.
- If a corner has the correct three colors in the correct relative positions, it is in the correct spot (even if twisted).
- If a corner has the wrong combination of colors, it is in the wrong spot.
You need to swap the misplaced corners until every corner is in its correct geometric location. Note that you do not need to fix the orientation (twisting) yet; just get them in the right box.
The Swap Algorithm
There is an algorithm to swap two adjacent corners and two adjacent corners diagonally. For beginners, the easiest approach is to handle adjacent swaps first.
The algorithm is: U R U' L' U R' U' L.
- Usage:
- Find two adjacent corners that are swapped (e.g., the front-right and front-left corners need to swap places).
- Place the cube so these two corners are in the front-top-right and front-top-left positions.
- Apply the algorithm. This will swap the two corners.
- If the corners are diagonal, you may need to do the algorithm once to make them adjacent, then swap them.
Iterative Process
Apply the algorithm repeatedly. After each application, rotate the top layer to check the progress. You will find that the corners eventually fall into place. Once all four corners are in their correct positions (matching the side centers), proceed to the final step.
Verification
Ensure that:
- The top face has four corners, each sitting in the slot defined by the three centers (e.g., the corner touching White, Red, and Blue centers is in that specific slot).
- The colors on the sides of the corners match the adjacent centers.
- The cube looks like a "striped" top layer where the side colors form a continuous loop around the cube.
Step 7: Orienting the Final Corners
This is the grand finale. All pieces are in the right place, but the yellow corners are likely twisted. The yellow stickers are not all facing up. You need to rotate these corners in place so that the yellow face is complete.
The Twisting Algorithm
This is the most famous algorithm in cubing, but in our easy method, we treat it as a simple repetitive task. The formula is: R' D' R D (Repeat).
- The Mechanism: This sequence twists a single corner piece clockwise (or counter-clockwise, depending on orientation) without affecting the rest of the cube.
- Execution:
- Hold the cube so a twisted corner is in the front-right-top position.
- Perform R' D' R D.
- Watch the yellow sticker. If it doesn't turn up yet, keep repeating the sequence while keeping that corner in the same spot.
- Usually, after 2 to 4 repetitions, the yellow sticker will face up.
- Once that corner is solved, rotate the top layer (U) to bring the next twisted corner to the front-right-top position.
- Repeat the process for all four corners.
Crucial Warning
Be very careful not to rotate the entire top layer (U) while the algorithm is running. The algorithm assumes the corner stays in the specific slot. If you rotate the whole cube or the top layer mid-sequence, you will undo your progress. Only rotate the specific face (R or D) as dictated by the algorithm, or rotate the whole cube to move the next corner into position before starting the sequence again.
Final Verification
After twisting all four corners:
- Rotate the entire top layer slowly. Does the yellow face look solid?
- Are all side colors matching their respective centers?
- If yes, congratulations! You have solved the Rubik's Cube using the easy method without complicated formulas.
Troubleshooting and Advanced Tips for 2026
Even with a straightforward method, you might encounter hiccups. Here are some common issues and how to resolve them based on the data provided.
"My Cross Keeps Breaking"
If your white cross falls apart when you try to insert corners, you are likely moving pieces from the bottom layer incorrectly. Remember: never disturb the first layer once it is solved. If you make a mistake, backtrack to the previous step and try again. Patience is your best tool.
"I Can't Get the Yellow Cross"
If the algorithm F R U R' U' F' isn't working, check your orientation. Ensure the yellow center is strictly on top. Sometimes, the pattern looks like a line but is actually rotated 45 degrees; adjust your cube orientation until it matches the textbook description (L-shape or Line).
Practice Makes Perfect
The transition from "understanding" to "doing" takes practice. Use online interactive simulators to practice the algorithms without fear of breaking a real cube. Many resources in 2026 offer free web-based trainers that allow you to reset the cube instantly after every failed attempt.
Finger Tricks
As you progress, you will notice that large wrist movements are slow. Learn finger tricks—using your fingers to flick the layers quickly rather than rotating the whole cube. This increases your speed and makes the process feel more fluid. Resources like Cubzor provide excellent guides on developing these motor skills.
References
-
Ruwix — How To Solve The Rubik's Cube – Beginners Method – Ruwix, 2026
-
Rubiks — Beginner's Method – Rubik's Cube Learning Hub, 2026
-
Hobbylark — The Easiest Way to Solve a Rubik's Cube, With Step-By-Step Pictures …, 2026
-
Youtube — Rubik's cube solve without Formulas – YouTube, 2026
-
Xelplus — Solve a 3×3 Rubik’s Cube (7-Step Beginner Method + Cheat Sheet), 2026
-
Cubzor — Beginner's Guide: How to Solve a Rubik's Cube – cubzor.com, 2026
-
Youtube — How to Solve Rubik’s Cube Easily | Don't skip this beginner freindly …, 2026
-
Solvethecube — Beginner's Guide | SolveTheCube, 2026