You’re staring at a scrambled Rubik’s Cube, a vibrant chaos of colors, wondering if you can conquer it. The burning question isn’t if you can solve it, but how long it will take. Popular myths range from “minutes” to “never.” Let’s replace the hype with real data.
Based on comprehensive 2026 research from the speedcubing community, here is the honest, step-by-step timeline for a complete beginner. This guide will not only give you realistic expectations but also the proven roadmap to get from your first agonizing solve to consistent, speedy finishes.
The Unfiltered Beginner Timeline: From First Solve to First Minute
Let's cut through the noise. Nobody genuinely learns to solve a Rubik's Cube “in 10 minutes” without prior knowledge. The journey is structured, rewarding, and follows a predictable pattern.
Days 1-2: The First Solve (1-3 Hours)
Your very first completed solve, following a tutorial step-by-step, typically takes 1 to 3 hours. This includes pausing, rewinding, getting confused, and starting over. This is completely normal.
If it feels daunting, consider this: Erno Rubik, the inventor, needed a full month to solve his creation for the first time, with no guides or help. You are already on a faster path.
The goal here is simple: follow instructions to achieve a solved cube. Speed is irrelevant. Understanding is minimal. Success is purely about persistence.
Days 3-7: Solving Without Assistance
After your first successful solve, the next critical milestone is doing it from memory. Most people need 3 to 7 days of casual practice (about 20-30 minutes daily) before they can solve the cube without checking a guide.
At this stage, you are not fast. A typical solve takes 5 to 10 minutes. This is perfectly fine. You are building muscle memory for the basic algorithms.
Weeks 2-4: Building Consistency (Under 3 Minutes)
With consistent daily practice, most beginners reach a 2- to 3-minute average within a few weeks. The cube transforms from a puzzling mystery into a mechanical routine.
This achievement places you in a notable minority. According to Rubik’s own estimates, only about 5.8% of the global population can solve a cube. Reaching a sub-3-minute solve means you’re in that club.
Weeks 4-8: Breaking the One-Minute Barrier
This is the major benchmark for a progressing beginner. Solving under 1 minute is a massive achievement. It puts you well above the curve for a newcomer.
Using the beginner's method, many people can solve a Rubik's Cube in under 1 minute with dedicated practice, and some even push below 30 seconds. This requires refining your basic technique, learning efficient finger tricks, and reducing pauses.
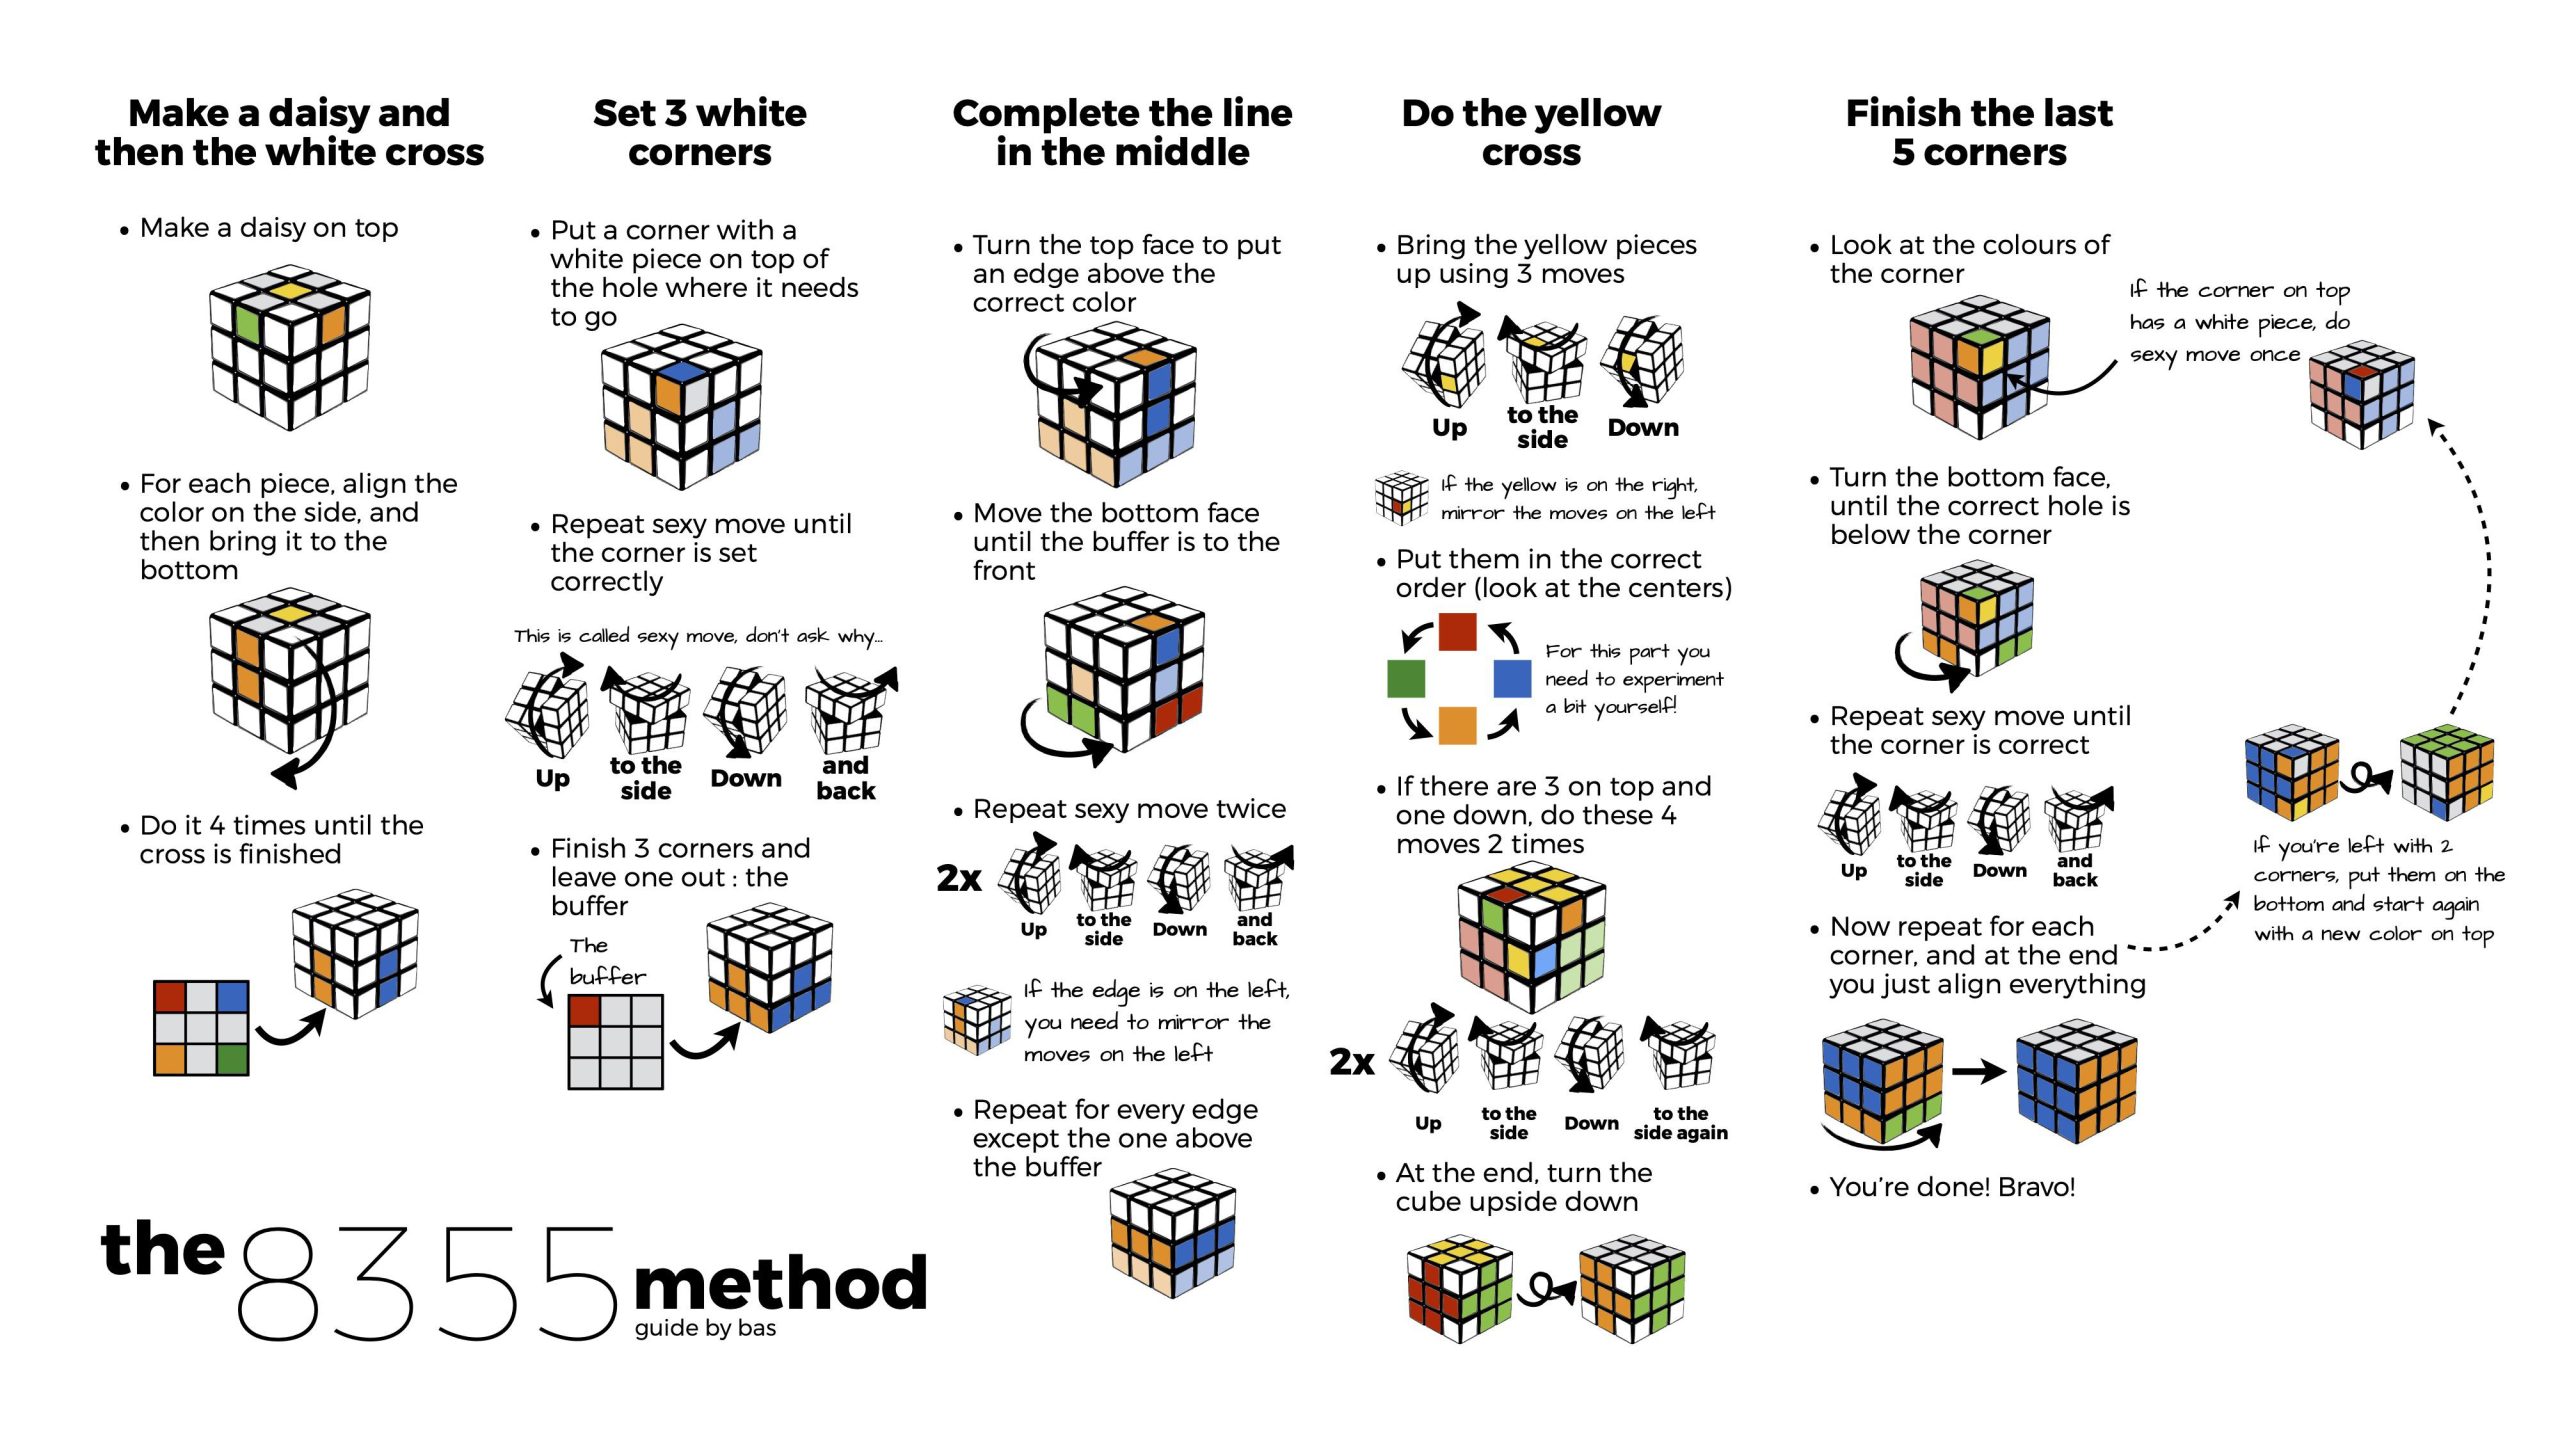
What Exactly Are You Learning? The Beginner's Method
The timeline above assumes you are learning the Beginner’s Method, also known as the Layer-by-Layer method. This is the standard, most-taught approach for first-time solvers. It’s designed for clarity, not minimal moves.
The 7-Step Roadmap of the Beginner's Method
This method divides the solving process into 7 clear, sequential steps. Mastering each step is key to progressing through the timeline.
- Solve the White Cross: Create a plus sign on the white face, ensuring the adjacent edges match the side center pieces.
- Solve the White Corners: Complete the entire first layer (white face and its sides).
- Solve the Second Layer: Insert the four middle-layer edge pieces.
- Create the Yellow Cross: Form a plus sign on the last layer (yellow face).
- Orient the Yellow Edges: Arrange the yellow cross so its edges align with the side centers.
- Position the Yellow Corners: Place the yellow corner pieces in their correct locations (though they may be twisted).
- Orient the Yellow Corners: Twist the final corners to solve the cube completely.
The Moves Required: It's More Than You Think
While advanced speedcubing methods can solve a cube in about 55-60 moves, the beginner's method is less efficient by design, favoring simplicity over optimality.
An analysis of 10,000 scrambles shows that the average beginner method solve takes 210 atomic moves. It can range from a lucky 80 moves to a grueling 321 moves. This move count directly impacts your time; more moves mean more time, until your execution speed improves.
The Tools and Mindset You Need Before Starting
Prerequisites & Materials:
- A standard 3×3 Rubik’s Cube. A smooth, modern speed cube (even a budget model) is highly recommended over a stiff, old-style toy cube.
- A reliable beginner tutorial (this article serves as your guide).
- Patience and the expectation that the first session will be long.
- A commitment to 15-30 minutes of daily practice for rapid improvement.
Common Pitfalls & How to Avoid Them:
⚠️ Don't Try to Solve One Whole Face First: The biggest beginner mistake is trying to solve the entire white face, ignoring the side colors. The beginner method solves layer-by-layer, not face-by-face. The center pieces are fixed; use them as your color guide.
⚠️ Don't Memorize Everything at Once: Learn the steps sequentially. Master Step 1 before worrying about Step 2. Your first goal is to finish the cube using the tutorial as a cheat sheet.
⚠️ Don't Focus on Speed Initially: Your first week is about accuracy and memory. Speed comes naturally later as muscle memory develops. Rushing leads to mistakes and frustration.
Your Step-by-Step Guide to the First Solve
Follow this numbered sequence closely for your initial learning sessions. Verify each step before proceeding.
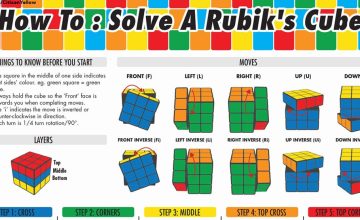
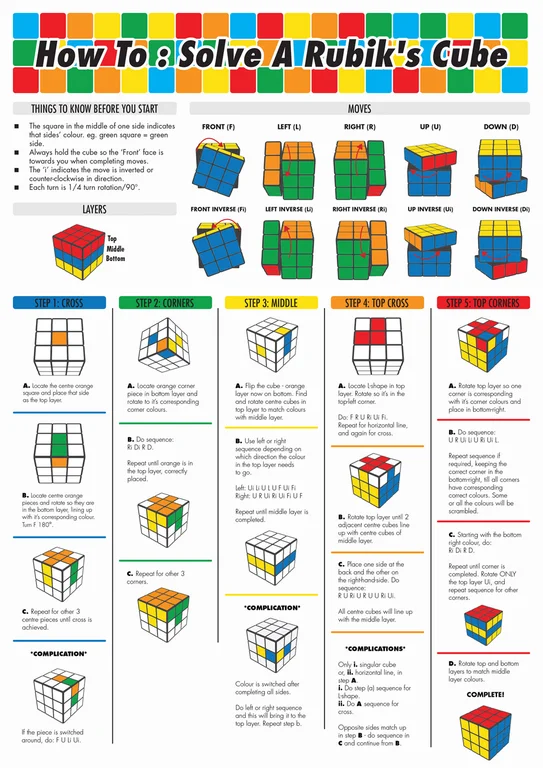
Step 1: Understanding Your Cube and Notation
Before you turn anything, understand the cube's anatomy and the universal language used to describe moves.
- Fixed Centers: The six center pieces never move relative to each other. The white center is always opposite the yellow, red opposite orange, blue opposite green.
- Piece Types: There are 12 Edge pieces (two colors) and 8 Corner pieces (three colors).
- Cube Notation: Algorithms are written using letters for faces:
- R (Right), L (Left), U (Up), D (Down), F (Front), B (Back).
- A letter alone (e.g., R) means a clockwise 90-degree turn of that face.
- A letter with an apostrophe (e.g., R') means counterclockwise.
- A letter with a 2 (e.g., R2) means a 180-degree turn.
Verification: Hold your cube. Perform R, R', and R2. You should understand how each notation affects the right face.
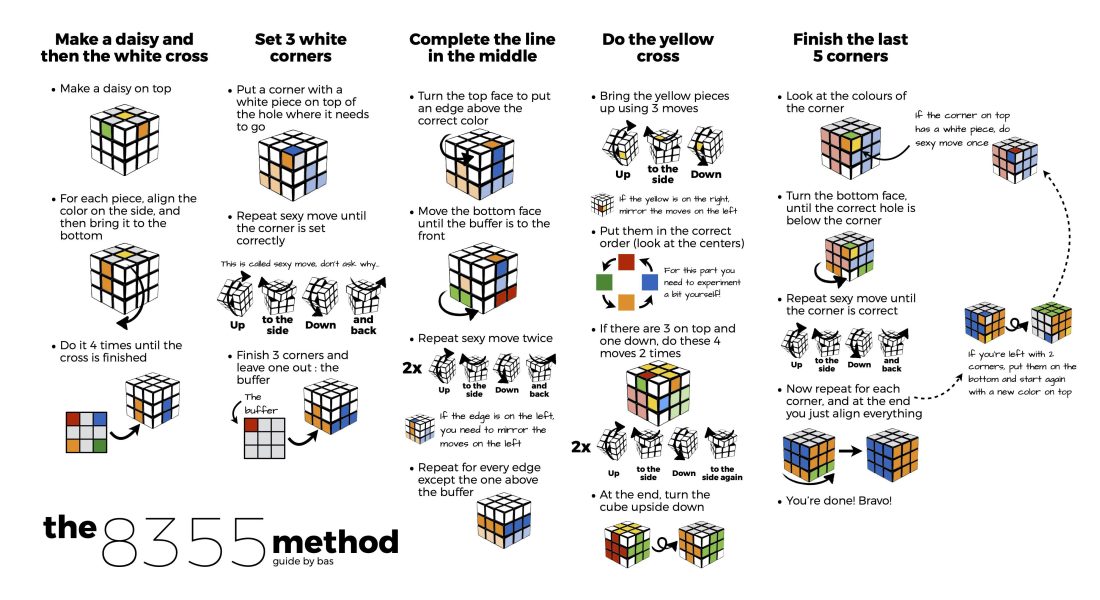
Step 2: Solving the White Cross
Goal: Create a white cross on the white face (often started on the bottom), with each white edge piece correctly aligned with the two center colors it touches.
- Find the four white edge pieces scattered in the cube.
- Without using algorithms, intuitively move each white edge to the bottom layer, positioning it so its white sticker is on the bottom and its other color aligns with the corresponding side center.
- A common issue is an edge being in the correct position but flipped. If so, move it out to the bottom layer, rotate the bottom until it's under its target, and bring it up correctly.
Verification: The white face has a complete plus sign. Looking at the sides, the color next to each white edge matches the center of that side.

Step 3: Solving the White Corners (Completing the First Layer)
Goal: Insert the four white corner pieces to finish the entire first layer (white face plus a correctly-colored bottom ring).
- Locate a white corner piece in the top layer (or bottom layer).
- Position it above its target slot on the bottom. The target slot is defined by the two side colors adjacent to the white square.
- Use the fundamental algorithm: R U R' U'. Repeat this sequence (often called the "sexy move") until the corner piece drops into place correctly.
Verification: The entire bottom layer is solved. The white face is complete, and the first ring of colors around it matches the adjacent side centers perfectly.
Step 4: Solving the Second Layer
Goal: Insert the four middle-layer edge pieces, leaving the top (yellow) layer scrambled.
- Look for an edge piece on the top layer that does not have yellow on it.
- Align this edge so its front color matches the front center piece.
- Depending on which side the edge needs to go to, use one of two algorithms:
- To move an edge to the left: U' L' U L U F U' F'
- To move an edge to the right: U R U' R' U' F' U F
- If an edge is already in the middle layer but in the wrong position or flipped, use the same algorithm to move it to the top layer, then re-insert it correctly.
Verification: The cube is solved up to the second layer. Only the top (yellow) layer remains unsolved.
Step 5: Making the Yellow Cross on the Last Layer
Goal: Form a yellow plus sign on the top face, ignoring the positions of the corner pieces.
You will encounter one of four possible patterns: a single yellow dot, a small "L" shape, a line, or the completed cross.
Use the same algorithm, F R U R' U' F', repeated a specific number of times depending on your pattern:
- Dot: Perform the algorithm three times.
- L: Perform the algorithm twice, ensuring the L is positioned in the top-left.
- Line: Perform the algorithm once, with the line horizontal.
Verification: A correct yellow plus sign is visible on the top face.
Step 6: Aligning the Yellow Cross with the Side Colors
Goal: Position the yellow edge pieces so their side colors match the centers of the second layer.
- Look at the side colors of the yellow edges. You need to get two adjacent edges matching their side centers. Rotate the top layer (U) to check.
- If you find two adjacent edges already correct, hold them in the front and right positions. Use the algorithm: R U R' U R U2 R'.
- If no edges are correct (opposite edges are correct), perform the same algorithm once from any orientation to create the adjacent correct edges, then repeat step 2.
Verification: The yellow cross is complete, and each yellow edge's side color aligns perfectly with the color of the middle-layer center below it.
Step 7: Positioning the Yellow Corners
Goal: Place the yellow corner pieces into their correct locations (they may still be twisted and not showing yellow on top).
This step uses the "corner swapping" algorithm.
- Find a corner piece on the top layer that is already in its correct spot (even if twisted). Hold this corner in the front-right-top position.
- Perform the algorithm: U R U' L' U R' U' L.
- Rotate the top layer (U) to bring another correct corner to the front-right-top spot, and repeat the algorithm. Continue until all four corners are in their correct places.
Verification: All four top corners are in their proper locations. The cube may look nearly solved, but some corners likely have yellow on the side, not the top.
Step 8: Final Step – Orienting the Yellow Corners to Solve the Cube
Goal: Twist the final corners to bring yellow to the top face, completing the solve.
Hold the cube so one incorrect corner (yellow not on top) is in the front-right-top position.
Use the final algorithm: R' D' R D. Repeat this sequence 2, 4, or even 6 times until that corner's yellow sticker rotates to the top.
Do not turn the whole cube. Once the first corner is fixed, rotate only the top layer (U) to bring the next incorrect corner to the front-right-top position, and repeat the R' D' R D sequence until it's solved. Continue until all corners are oriented.
Final Verification: Your Rubik’s Cube is completely solved. All six faces show a single, solid color.
How to Accelerate Your Timeline: From Beginner to Speedcuber
Once you can reliably solve the cube in under 5 minutes from memory, you can actively work to reduce your time.
Key Factors That Impact Your Solving Speed
- Practice Consistency: Daily, focused practice is the single biggest driver of improvement. 15-30 minutes daily yields far faster results than sporadic hours.
- Method Efficiency: The beginner method averages 210 moves. Learning more advanced methods like CFOP can cut this to ~60 moves, drastically reducing time.
- Finger Tricks: Learning to twist faces using finger dexterity, not whole-hand movements, saves crucial seconds.
- Cube Quality: A stiff, store-brand cube hinders speed. A well-lubricated speed cube allows for smoother, faster turns.
- Algorithm Memorization: Knowing your algorithms fluently, without hesitation, eliminates pauses.
Benchmarking Your Progress: Average Times by Stage
Understanding where you stand helps set goals.
- Absolute Beginner (First Solve): 1-3 hours.
- Novice (Solving from Memory): 5-10 minutes.
- Comfortable Beginner: 2-3 minutes.
- Advanced Beginner: Under 1 minute. This is a major milestone.
- Intermediate Speedcuber: 15-30 seconds (often using CFOP method).
- Advanced Speedcuber: 8 to sub-15 seconds.
For beginners, just switching to a smoother cube and learning better hand placement can yield a huge immediate improvement.
The Path to Sub-1 Minute and Beyond
To break the one-minute barrier with the beginner's method, focus on:
- Eliminate Pauses: Work on seamless transitions between steps. Know what to look for next before finishing the current move.
- Optimize Your Cross: Solving the white cross intuitively and quickly sets up the entire solve.
- Learn Basic Finger Tricks: Use your fingertips for quick R, U, and F turns. Watch tutorials from experts like Feliks Zemdegs.
- Practice Algorithm Speed: Drill your key sequences (R U R' U', the "sexy move") until you can perform them blindly and rapidly.
- Consider Color Neutrality: Start solving on any color face, not just white. This opens up easier initial crosses, though it's more challenging to learn.
Step-by-Step Deep Dive: Advanced Beginner Techniques
With the foundational steps mastered, your focus must shift from solving to optimizing. This is the bridge between the beginner's method and true speedcubing. The next sections detail specific, actionable techniques to refine each stage of the beginner's method.
Prerequisites for Optimization:
- Ability to solve the cube reliably from memory in under 3 minutes.
- A smooth, modern speed cube—optimization is nearly impossible on a stiff, toy-store cube.
- A commitment to targeted practice, drilling specific weak points rather than just solving randomly.
Advanced Cross Building
The white cross is the most critical step for speed. A slow, inefficient cross guarantees a slow solve. The goal is to build it in under 8 seconds and, more importantly, with fewer than 12 moves.
Techniques for a Faster Cross:
- Plan Before You Start: After scrambling, take 5-7 seconds to inspect the cube. Locate all four white edges and visualize the simplest path to connect them to their correct centers. Don't start turning until you have a plan for at least 2-3 pieces.
- Build on Bottom, Not Top: While beginners often build the cross on the top (U face), speed cubers build it directly on the bottom (D face). This allows for immediate transition to inserting corners without a cube rotation.
- Avoid Rotations: Cube rotations (moving the entire cube in your hands) are time-consuming. Use moves like F, B, L, R to bring edge pieces into position without rotating. For example, instead of rotating the cube to place a front edge, use L' or R moves to slot it from the side.
- Pair Edges Efficiently: Look for edges that are already near their target slots. Sometimes, moving one edge can help position another. Advanced solvers use "free slices" where they move middle layers (M, E, S moves) to align pieces without disturbing others.
Verification: Time your cross-building. Aim for consistent sub-8-second solves. Check your move count by writing down your sequence; strive for fewer than 12 moves.
Finger Tricks for Beginner Algorithms
Finger tricks are the ergonomic techniques used to execute moves rapidly using finger rolls, not whole-hand grips. Implementing these on your beginner method algorithms can save 10-20 seconds per solve immediately.
Essential Finger Tricks for Common Algorithms:
-
The "Sexy Move" (R U R' U'):
- R: Use your right index finger to push the right face up.
- U: Use your right index finger (or left) to flick the up face clockwise.
- R': Use your right thumb to pull the right face down.
- U': Use your left index finger to flick the up face counter-clockwise.
- Practice this sequence as a fluid, rolling motion. It should feel like one continuous action.
-
Last Layer Algorithm (F R U R' U' F'):
- Execute the F move with your left thumb pushing forward.
- The subsequent R U R' U' uses the same finger tricks as the sexy move.
- The final F' is done with your left index finger pulling back.
-
Corner Orientation (R' D' R D):
- Perform R' with your right thumb.
- D' is executed with your left ring finger pulling down.
- R with your right index finger.
- D with your left middle finger pushing up.
- This sequence is often repeated rapidly; fluidity is key.
⚠️ Caution: Don't force finger tricks initially. Start slowly, ensuring accuracy. Speed will develop as muscle memory builds. A mis-executed finger trick leading to a popped piece (the cube disassembling) is more time-consuming than a slow, correct turn.
Look Ahead During the Second Layer
"Look ahead" is the skill of identifying and planning your next step while you are executing your current step. The biggest time loss for beginners is the pause between finishing one step and finding the pieces for the next.
How to Practice Look Ahead for Steps 3 & 4:
- While inserting the last white corner, your eyes should already be scanning the top layer for a non-yellow edge to begin the second layer.
- While executing the second-layer algorithm, you should be watching the top layer to see which piece moves into position for your next second-layer insertion.
- Reduce Cube Rotations: If the edge you need is not on the front face, practice using U moves to bring it to the front during your algorithm execution, rather than stopping, rotating the cube, and then starting again.
Verification: Record a solve. Note the total duration and count the number of long pauses (over 1 second) between steps. Target reducing these pauses to zero.
Troubleshooting Common Stuck Points
Even with the steps memorized, specific configurations can cause mental blocks. Here is a diagnostic guide for when your cube seems "broken."
Problem: The Second-Layer Edge is Already in Place, But Wrong
Scenario: You are executing Step 4, but the edge you need to insert is already in the middle layer, either in the wrong spot or flipped.
Solution:
- Treat this as if the slot is already occupied incorrectly.
- Use the standard algorithm (either left or right) to remove that edge. For example, if the front-right slot has a wrong edge, use the "right" algorithm (U R U' R' U' F' U F). This will move that edge to the top layer.
- Now, the top layer contains your target edge. Re-align it and use the same algorithm to insert it correctly into the now-empty slot.
Verification: The incorrectly placed edge is now on the top layer. You can proceed normally.
Problem: No Two Adjacent Yellow Edges are Correct After Making the Cross
Scenario: After Step 6 (Aligning the Yellow Cross), you rotate the top layer and find that opposite edges are correct, not adjacent ones. The algorithm requires adjacent correct edges.
Solution:
- This is a normal case. Perform the algorithm R U R' U R U2 R' once from any orientation.
- After executing it, you will now have two adjacent yellow edges correctly aligned.
- Rotate the top layer to position those correct edges at front and right, then perform the algorithm a second time.
Verification: After the first algorithm, check the top layer. You should now see the required adjacent correct edges.
Problem: All Yellow Corners are in Wrong Positions in Step 7
Scenario: During Step 7 (Positioning Yellow Corners), you cannot find a corner that is in its correct spot.
Solution:
- This means all four corners need to be swapped. It's simpler than it seems.
- Execute the corner-swapping algorithm U R U' L' U R' U' L once from any orientation (pretending one corner is correct).
- This will place one corner into its correct location.
- Now you have a "correct" corner to use as your anchor. Hold it in the front-right-top spot and continue the step as normal.
Verification: After the first algorithm execution, one corner will now be correctly positioned.
Transitioning from Beginner to Intermediate Methods
Once you are consistently solving under 60 seconds with the beginner's method, your progress will plateau. The inherent move inefficiency (~210 moves) becomes a hard ceiling. To break into the 30-second and sub-30-second range, you must adopt a more efficient method.
The CFOP Method: The Standard for Speedcubing
CFOP (Cross, F2L, OLL, PLL) is the most widely used speedcubing method. It is a natural evolution from the beginner's method. The steps are analogous but far more optimized.
Comparison Table: Beginner Method vs. CFOP
| Stage | Beginner Method | CFOP Method | Key Difference & Benefit |
|---|---|---|---|
| 1st Layer | Solve Cross, then Corners separately. | Cross (C): Built in under 8 moves, often on bottom. | Fewer moves, planned during inspection. |
| 2nd Layer | Solve four middle edges individually. | F2L (First Two Layers): Solve corners and edges together in 4 paired "blocks". | Solves 2 layers in ~40 moves instead of ~60. Massive time save. |
| Last Layer Orientation | Two steps: Make Yellow Cross, then Orient Edges. | OLL (Orientation of Last Layer): 57 algorithms to solve the entire yellow face in one step. | Solves all top-face colors in one algorithm, eliminating a step. |
| Last Layer Permutation | Two steps: Position Corners, then Orient Corners. | PLL (Permutation of Last Layer): 21 algorithms to position all last-layer pieces in one step. | Places all final pieces correctly in one algorithm. |
Learning CFOP Incrementally:
Do not try to learn all 78 algorithms (57 OLL + 21 PLL) at once. The transition path is systematic:
- Master Advanced Cross: Continue refining your cross technique as described above.
- Learn Intuitive F2L: This is the biggest leap. Instead of algorithms, F2L uses intuitive pairing principles. Find a corner and its matching edge in the top layer, and slot them into their correct position together. Hundreds of online tutorials focus solely on this intuitive step. Practice this until it's faster than your old beginner second layer.
- Learn 2-Look OLL: A simplified subset. First, learn 10 algorithms to make the yellow cross (like you already do). Then, learn 7 algorithms to orient the remaining yellow corners. This splits the full OLL into two manageable parts.
- Learn 2-Look PLL: Similarly, learn 6 algorithms to position the corners correctly, then 4 algorithms to position the edges. This splits the full PLL.
⚠️ Caution: Transitioning to CFOP will initially slow you down. Your times may jump from 60 seconds to 90 seconds as you learn new, unfamiliar techniques. This is normal. Persist for 2-3 weeks of dedicated practice; your times will drop below your beginner-method plateau.
Practice Regimens for Specific Improvement
Random solving is not optimal practice. Use these targeted drills.
Drill 1: Cross + 1 F2L Pair
- Scramble the cube.
- Plan and execute your cross.
- Solve only one F2L pair correctly.
- Scramble again. Repeat for 10-15 minutes.
- Goal: Increase speed and accuracy of the initial stages.
Drill 2: Last Layer Only
- Set up a cube with only the last layer scrambled (first two layers solved). You can use online tools to generate these scrambles.
- Solve only the last layer using your algorithms.
- Repeat 20-30 times, timing each attempt.
- Goal: Eliminate pauses in OLL and PLL, and memorize algorithm patterns.
Drill 3: Slow, Pause-Free Solving
- Solve the cube at half your normal speed.
- Focus intensely on look ahead. Your hands should never stop moving, even if they move slowly.
- Goal: Build the neural pathways for continuous solving, which will translate to faster speeds when you speed up.
The Role of Hardware: Choosing and Maintaining Your Cube
Your cube is your primary tool. An optimal cube reduces physical resistance and allows your mind to focus on solving.
Choosing a Speed Cube
A modern speed cube differs radically from a classic Rubik's brand cube.
Key Features of a Speed Cube:
- Corner Cutting: The ability to turn a face before adjacent pieces are fully aligned. This allows for sloppier, faster turns without locking up.
- Magnetic Stabilization: Small magnets inside the pieces provide a self-aligning "snap" feel, increasing stability and control.
- Adjustable Tension: Screws allow you to loosen or tighten the internal mechanism for a faster or more controlled feel.
- Smooth Lubrication: Factory-applied lube reduces friction and sound.
Recommended Beginner-Intermediate Cubes (2026):
- MoYu RS3M MagLev: A budget-friendly cube with excellent magnets and smoothness, often considered the best value.
- GAN 356 M: A mid-range cube with adjustable magnets and tension, offering high customization.
- QiYi Valk 3: A classic, reliable design that is forgiving and stable for learners.
Cube Maintenance Basics
A poorly maintained cube will degrade performance.
Basic Maintenance Routine:
- Cleaning: Every few months, disassemble the cube (pop out an edge piece to start). Wipe dust and old lube from the internal pieces and core.
- Lubrication: Apply a drop of speed cube lubricant (like Martian, DNM-37, or Traxxas) to the moving parts. Avoid over-lubricating.
- Tension Adjustment: If the cube feels too loose (pieces fall out) or too tight (hard to turn), use a small screwdriver to adjust the tension screws on the center pieces evenly.
Verification: After maintenance, your cube should turn smoothly with minimal effort, have a consistent feel across all faces, and not "pop" (pieces dislodging) during aggressive turns.
Measuring Progress and Setting Goals
Quantifiable goals motivate improvement. Use these metrics.
Create a Practice Log
Track your solves in a simple spreadsheet or notes app.
Data to Record for Each Session:
- Date & Duration of Practice
- Average Time of 5 Consecutive Solves
- Best Single Solve Time
- Specific Focus of Session (e.g., "Cross practice," "F2L look ahead")
- Key Struggle Observed (e.g., "Slow transition from cross to F2L")
Analyzing this log weekly will reveal your true progress and highlight areas needing attention.
Standardized Benchmark Goals
Use this tiered benchmark system, based on community data Source 3, Source 4.
- Tier 1: Novice (< 5 min): Goal is simply consistent, error-free solves.
- Tier 2: Comfortable (< 3 min): Goal is to eliminate all pauses longer than 3 seconds.
- Tier 3: Advanced Beginner (< 1 min): Goal is to implement basic finger tricks and learn intuitive F2L.
- Tier 4: Intermediate (< 45 sec): Goal is to master 2-Look OLL and 2-Look PLL.
- Tier 5: Speedcuber (< 30 sec): Goal is to learn full CFOP (or another advanced method like Roux) and advanced look ahead.
The Importance of "Bad" Solves and Scrambles
Not every scramble is equal. Some are inherently easier ("lucky") and some harder. Your average time is more important than your personal best. Furthermore, practicing with "bad," non-standard scrambles—where the cube is only partially scrambled—is a valuable tool for drilling specific steps (like Last Layer only).
Mental Aspects and Overcoming Plateaus
The cognitive challenge is often greater than the physical one.
The "Last Layer Wall" and Algorithm Fatigue
As noted in research Source 3, the Last Layer Wall is a common plateau. After the intuitive first two layers, the last layer relies purely on memorized algorithms. This can feel like a disconnected, frustrating chore.
Strategy to Break Through:
- Understand the Algorithm's Effect: Don't just memorize moves. Watch what the algorithm does. For example, the Sune algorithm (R U R' U R U2 R') rotates three corners. Understanding the pattern makes recall easier.
- Use Mnemonics: Create stories or patterns for sequences. For example, the "sexy move" (R U R' U') has a back-and-forth rhythm that is easy to feel.
- Drill Without Solving: Execute your last-layer algorithms on a solved cube repeatedly to build pure muscle memory. Do this for 5 minutes daily.
Dealing with Frustration and Burnout
Learning any complex skill involves cyclic frustration.
Tactics to Maintain Momentum:
- Set Micro-Goals: Instead of "get faster," aim for "solve the cross in 10 seconds today" or "complete 50 F2L pair drills."
- Take Deliberate Breaks: If you hit a frustration point, stop for 24 hours. Often, a short break leads to subconscious consolidation of skills.
- Join the Community: Engage with online forums (like r/Cubers on Reddit), watch YouTube solves, or follow speedcubers on social media. Seeing others' progress and struggles normalizes your own.
- Celebrate Non-Time Milestones: Celebrate learning a new algorithm, successfully lubricating your cube, or finally understanding a concept like "corner cutting."
Beyond the 3×3: Next Steps in Your Cubing Journey
Solving the 3×3 is a gateway. The speedcubing world offers vast depth.
Other Puzzles to Explore
- 2×2 Cube: A simpler puzzle that focuses heavily on last-layer algorithms, excellent for algorithm practice.
- 4×4 Cube: Introduces new concepts like "center building" and "parity" (special, long algorithms to fix unique problems). It dramatically improves your 3×3 look ahead and planning skills.
- Pyraminx: A tetrahedron-shaped puzzle that is intuitive and fast, offering a different spatial challenge.
The World of Speedcubing Competitions
Organized by the World Cube Association (WCA), competitions are held globally. They are friendly, inclusive events where cubers of all levels compete in various events.
What to Expect at a Competition:
- Standardized Scrambles: Each solver gets the same scramble sequence.
- Multiple Attempts: Typically 5 solves, with the average time (excluding fastest and slowest) counting.
- A Supportive Environment: Competitions are less about winning and more about community, sharing techniques, and personal achievement.
Attending a local competition, even as a beginner averaging 2 minutes, can be immensely motivating and educational.
The Long-Term Timeline: From Months to Years
Your journey from first solve to advanced speeds is a long, rewarding arc.
- First 3 Months: Focus on consistency and breaking the 1-minute barrier with the beginner's method.
- 6 Months: Transition to CFOP and aim for sub-45 seconds.
- 1 Year: With dedicated, smart practice, reaching sub-30 seconds is a realistic goal for many.
- Beyond: Progressing to sub-20 and sub-15 seconds involves deep algorithmic knowledge (full OLL/PLL), extreme look ahead, and customized hardware tuning. This is the realm of serious speedcubers.
The key takeaway from the data Source 1, Source 2, Source 3 is that the initial hurdle—the first solve—is the highest. Once crossed, improvement becomes a matter of structured, incremental practice. The cube is not a mystery to be unlocked once, but a skill to be refined over time, offering endless depth and satisfaction. Your timeline is yours to define.
References
-
Expertbeacon — How Long Would It Take to Solve a Rubik’s Cube With No Experience?, 2026
-
Cubesolver — How Long to Solve A Rubik's Cube? Beginner Time Guide, 2026
-
Cubeunstuck — How Long Does It Take to Learn the Rubik's Cube?, 2026
-
Learningtocube — How to Solve a Rubik’s Cube for Beginners, 2026
-
Reddit — How long did it take you to solve the Rubik's Cube for the … – Reddit, 2026
-
Cubzor — Beginner's Guide: How to Solve a Rubik's Cube – cubzor.com, 2026
-
Cubelelo — How to Get Faster in Rubik's Cube [Beginners to Pro] ?, 2026
-
Hoshyoga — How fast is the average Cuber? – Hosh Yoga, 2026