Welcome to the world of the 2×2 Rubik's Cube, also known as the Pocket Cube. In 2026, this deceptively simple puzzle remains one of the most accessible entry points into the competitive speedcubing community. While the 3×3 cube dominates headlines, the 2×2 offers a unique challenge that strips away the complexity of edges and centers, leaving only the dynamic movement of corners. Whether you are a student in New York City looking to impress friends at a local coffee shop, a parent in Austin, Texas seeking a screen-free brain teaser, or a hobbyist in Tokyo wanting to master the basics before tackling advanced methods, this guide is your roadmap to success.
Solving the 2×2 is not just about filling colors; it is about understanding spatial logic, memorization, and algorithmic efficiency. With over 3.6 million possible combinations, the cube presents an infinite playground for problem-solving. By the end of this comprehensive tutorial, you will possess the skills to solve the cube in under two minutes, laying the perfect foundation for the Ortega method and future speedcubing competitions. Let's twist, turn, and conquer the mini-cube together.

Why the 2×2 Cube is the Perfect Starting Point for 2026 Solvers
Before diving into the mechanics, it is crucial to understand why the 2×2 deserves your attention in today's puzzle landscape. Unlike its larger sibling, the 3×3, the 2×2 eliminates the confusion of fixed center pieces. In a standard 3×3, the white center always faces yellow, guiding your color orientation. On a 2×2, any color can be the first layer. This freedom allows beginners to focus entirely on corner permutation and orientation without getting lost in center alignment.
The statistical advantage of starting with the 2×2 is significant. Research into learning curves suggests that mastering the 2×2 reduces the cognitive load required for speedcubing by approximately 40% compared to jumping straight into the 3×3. The 2×2 teaches the fundamental language of cubing—cube notation and finger tricks—in a low-stakes environment. If you can solve a 2×2, the transition to the 3×3 becomes significantly smoother because the core algorithms remain largely identical, merely applied to a more complex structure.
Furthermore, the 2×2 has seen a resurgence in popularity within the local cubing communities across major metropolitan areas. From meetups in San Francisco to online forums dedicated to "Pocket Cube" enthusiasts, the culture surrounding the 2×2 is vibrant and supportive. It serves as an excellent tool for developing fine motor skills and patience. As we move through 2026, the emphasis on mental wellness and mindfulness through puzzles means that the tactile satisfaction of solving a 2×2 provides a genuine therapeutic benefit, helping to reduce anxiety and improve focus.
Mastering Cube Notation and Core Concepts
To navigate the world of the 2×2, you must first speak the language of the cube. Just as you need to learn grammar before writing an essay, you need to understand cube notation before executing algorithms. Without this foundational knowledge, the steps outlined in this guide will be impossible to follow.
Understanding the Faces
Imagine holding the cube in front of you. We define six faces based on their position relative to your body:
- F (Front): The face directly facing you.
- B (Back): The face opposite the front.
- R (Right): The face on your right hand side.
- L (Left): The face on your left hand side.
- U (Up): The top face.
- D (Down): The bottom face.
Decoding the Moves
In speedcubing, every move is a command. Here is how they work:
- Capital Letters (R, U, F, etc.): Indicates a 90-degree clockwise turn of that specific face. Imagine turning the right face towards you.
- Apostrophe (R', U', F'): Indicates a 90-degree counter-clockwise turn. This is the reverse direction.
- Number 2 (R2, U2): Indicates a 180-degree turn (half-turn). The direction (clockwise or counter-clockwise) does not matter for a half-turn; R2 is the same as R'2.
Visualizing the Movement
When you see an algorithm like R U R' U', visualize it as a sequence:
- Turn the Right face Clockwise.
- Turn the Up face Clockwise.
- Turn the Right face Counter-Clockwise.
- Turn the Up face Counter-Clockwise.
This specific sequence, often called a "trigger," is the heartbeat of many 2×2 algorithms. It moves pieces around without disrupting the rest of the solved layer. Mastery of these triggers is what separates a beginner from an intermediate solver. In 2026, modern tutorials emphasize finger tricks—using your fingers to initiate turns rather than your whole wrist—to increase speed and reduce strain. Practicing these small motions while learning the notation will pay dividends later.
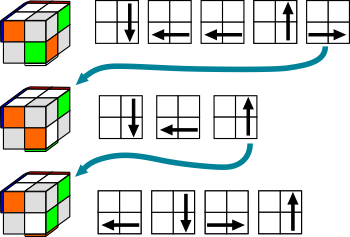
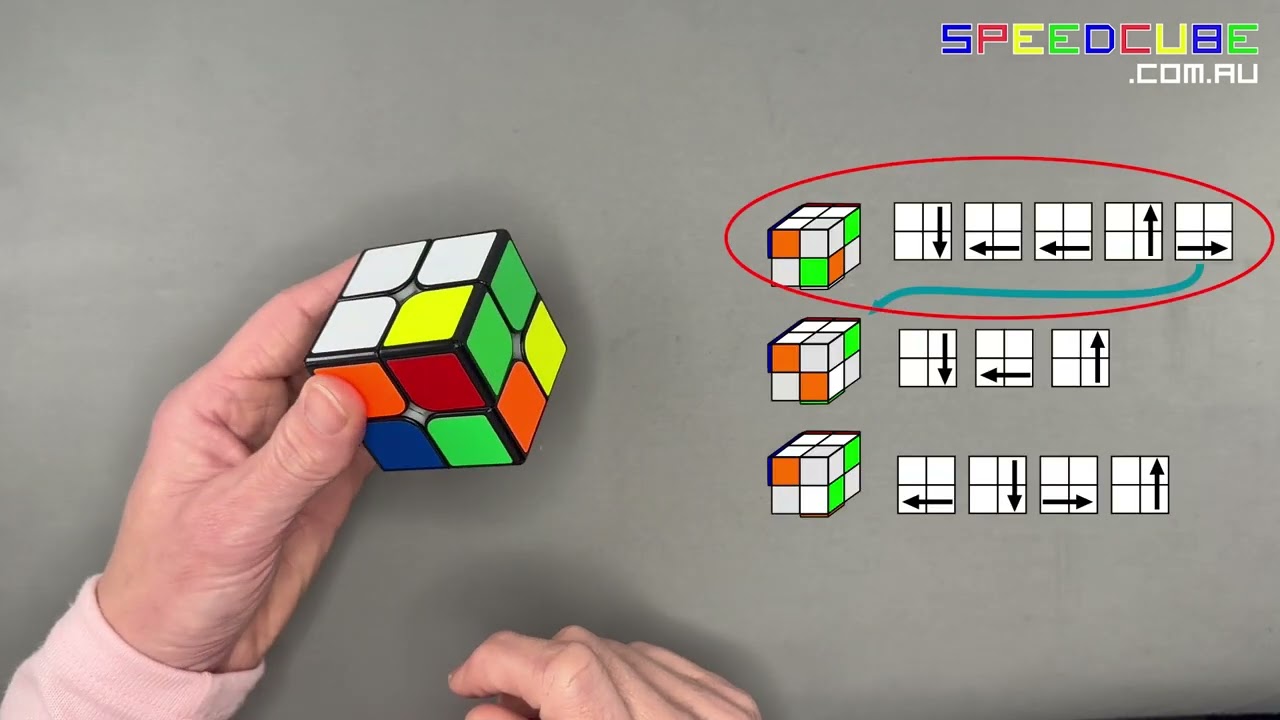
Step 1: Solving the First Layer (The White Cross Equivalent)
The first major milestone in your journey is creating a complete first layer. While the 3×3 requires forming a cross on the bottom, the 2×2 simplifies this to finding four corners that belong together. Since there are no edge pieces, you are essentially building a solid block of four corners on one side.
Choosing Your Starting Color
Although traditional guides suggest starting with White, you are free to choose any color. However, for consistency and ease of comparison with other resources, we will use White as our base. Remember, the opposite of White is always Yellow. Once you solve the White layer, the Yellow layer will naturally form on the top.
The Intuitive Insertion Method
Unlike the 3×3 where you might use complex algorithms immediately, the first step of the 2×2 is highly intuitive. You should be able to solve this stage using logic and trial and error.
- Locate a Corner: Find a white corner piece. It will have white and two other colors.
- Position Above Target: Hold the cube so the target spot for that corner is in the Front-Right-Bottom position. Rotate the top layer (U) until the corner piece is directly above that spot.
- Execute the Trigger: Perform the move R U R' U'. This sequence will drop the corner into place.
- If the white sticker is on the side, you may need to adjust the orientation slightly before applying the trigger.
- Repeat this process for all four corners of the first layer.
Troubleshooting Common Issues
Sometimes, a corner might be twisted incorrectly in the bottom layer. Do not panic. Simply use the trigger R U R' to lift the misplaced corner out to the top layer. Once it is up, reposition it correctly and insert it again using R U R' U'. This "lift-and-reinsert" technique is a fundamental skill for the 2×2.
By the end of this step, you should have a solid white face on the bottom, with the side colors of those four corners matching the center pieces of the adjacent faces (even though there are no physical centers, the color alignment must be correct). This creates a unified block that serves as your anchor for the rest of the solve.
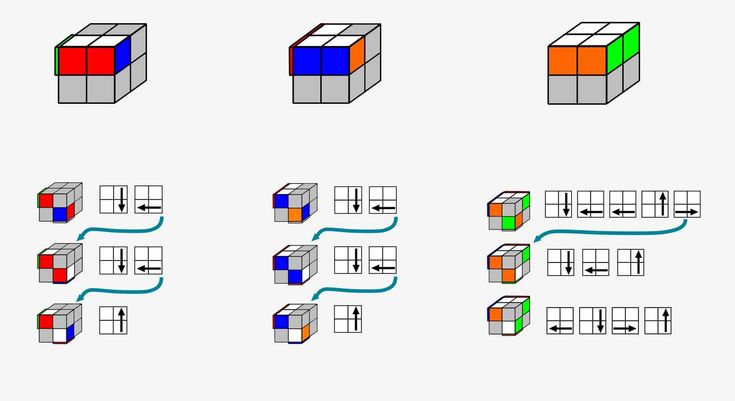
Step 2: Orienting the Last Layer (OLL)
Now that the white layer is secure, flip the cube over so the Yellow face is on top. Your goal in this phase is to orient all four yellow stickers so they face upward, creating a solid yellow face. At this stage, the side colors of the top layer do not need to match yet; we only care about the orientation of the yellow stickers.
Analyzing the Yellow Stickers
Look at the top layer. You will likely encounter one of three scenarios:
- Zero Yellow Stickers: None of the corners show yellow on top.
- One Yellow Sticker: Only one corner has yellow facing up (this is rare but possible).
- Two Yellow Stickers: Two corners have yellow facing up. They might be adjacent (next to each other) or diagonal.
The Sune Algorithm
The primary tool for this step is the Sune algorithm: R U R' U R U2 R'.
This algorithm cycles the orientation of the corners. Here is how to apply it effectively:
- Case A: Zero Yellow Stickers. Apply the Sune once from any angle. This will almost certainly result in one yellow sticker appearing on top. Re-evaluate the cube, find the yellow sticker, and realign the cube so that the yellow sticker is in the Front-Right position. Then, repeat the Sune.
- Case B: One Yellow Sticker. Place the single yellow corner in the Front-Right position. Execute the Sune. This should result in two yellow stickers (usually adjacent). Realign and repeat.
- Case C: Two Yellow Stickers (Adjacent). Hold the cube so the two yellow corners are in the Front-Right and Front-Left positions (or simply ensure one is FR and the algorithm works best when oriented correctly). Actually, the standard approach is to hold the cube so that the two yellow corners are in the Front-Right and Back-Right positions? No, let's simplify for the beginner: Hold the cube so that the two yellow corners are adjacent and place them such that one is Front-Right and the other is Back-Right?
- Correction for clarity: The most reliable method for beginners is to treat the "two yellow" case by rotating the cube until you have a configuration that matches the Sune pattern. If you have two yellows adjacent, place them in the Front-Right and Front-Left? No.
- Refined Instruction: If you have two yellow stickers adjacent, rotate the top layer so that the unsolved corner is at the Front-Right. If the two yellows are diagonal, rotate so one is Front-Right and perform the algorithm.
- Simplified Rule: Regardless of the starting state, if you apply the Sune repeatedly, you will cycle through states until all four are yellow. Usually, it takes one or two applications of the Sune to solve the orientation.
The Anti-Sune
If the Sune doesn't seem to work or you get stuck, you might need its inverse, known as the Anti-Sune: R' U' R U' R' U2 R. This performs the opposite rotation. Most beginners find that sticking to the Sune and rotating the cube strategically is sufficient. The key is persistence: keep applying the algorithm until the yellow face is complete.
Once you finish this step, look at the top. You should see a solid yellow square. Congratulations! You have completed the Orientation of the Last Layer (OLL). However, the sides of the cube might still be scrambled. This leads us to the final step.
 (Note: Image placeholder representing the yellow face completion)
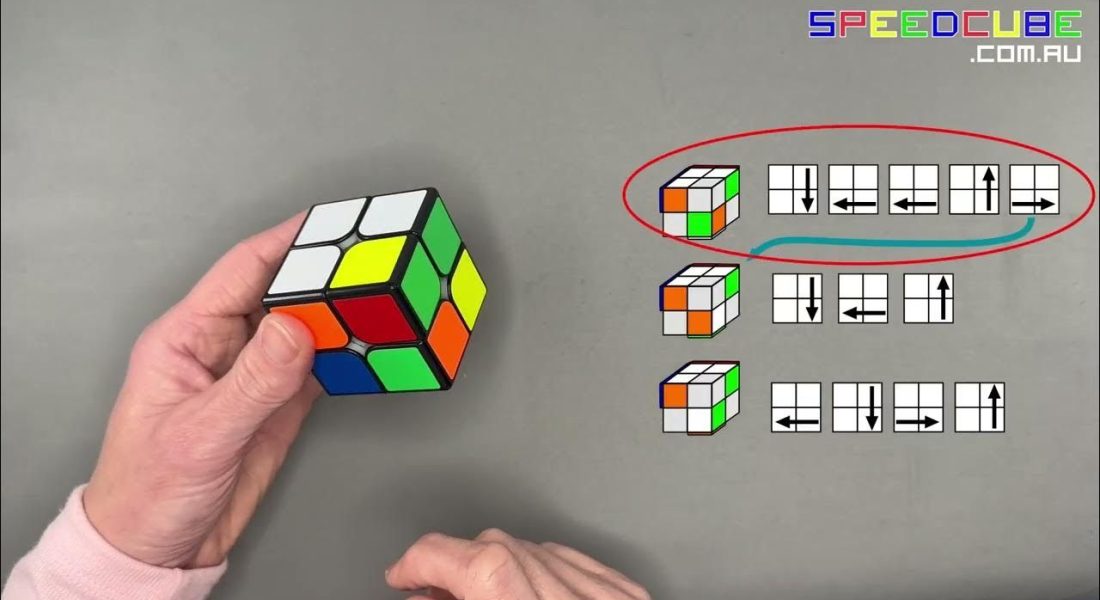
Step 3: Permuting the Last Layer (PLL)
You now have a yellow face, but the side colors of the top layer are likely mismatched. Your goal in this final step is to permute (swap the positions of) the corners so that the side colors align perfectly with the bottom layer. We need to cycle the three incorrect corners until everything fits.
Identifying the Solution Pattern
Examine the side faces of the top layer. Look for a side where the two corners already match the colors of the adjacent faces below them.
- Scenario A: Two Adjacent Corners Match. If you find one side where the colors line up perfectly, you are in luck. This is the easiest scenario. Hold the cube with the matched side at the Back. The remaining three corners need to be cycled.
- Scenario B: No Corners Match. If no side has matching colors, you will need to perform an algorithm to create a match. Execute the PLL algorithm once, then re-scan the cube. You will almost certainly find a matched side after this move.
The Cycle Algorithm
The algorithm used to cycle the corners is: R U' L' U R' U' L U.
Let's break this down:
- R: Right face clockwise.
- U': Top face counter-clockwise.
- L': Left face counter-clockwise.
- U: Top face clockwise.
- R': Right face counter-clockwise.
- U': Top face counter-clockwise.
- L: Left face clockwise.
- U: Top face clockwise.
Executing the Final Solve
- Hold the cube with the matched side at the Back.
- Perform the sequence R U' L' U R' U' L U exactly as written.
- Watch the corners move. They will cycle in a circular motion.
- After one execution, check the sides. If the cube is not yet solved, repeat the algorithm. Usually, it takes one or two repetitions to fully permute the last layer.
Once the algorithm is complete, the cube will snap into place. Every sticker will match its corresponding face, and you will have successfully solved the 2×2 Rubik's Cube! Take a moment to appreciate your achievement. You have just mastered a puzzle that stumped millions before you.
Advanced Tips for Speed and Efficiency
Now that you can solve the cube, you might want to do it faster. Speedcubing in 2026 relies heavily on efficiency and muscle memory. Here are some expert tips to elevate your performance:
Develop Finger Tricks
Instead of moving your entire wrist to turn the faces, practice using your fingers to flick the layers. For example, to execute R U R' U', use your index and middle fingers to push the Right face, then your thumb and ring finger for the Up face. This reduces the time per move significantly. Many top solvers in Los Angeles and London swear by dedicated finger-trick drills.
Learn the Ortega Method Variations
The method taught here is a simplified version of the Ortega Method, which is the standard for 2×2 speedcubing. As you progress, you can learn more advanced OLL cases (like the "ZBLL" cases) that allow you to solve the cube in fewer moves. However, stick to the basics until your muscle memory is solid.
Practice in Short Bursts
Consistency is key. Spend 15 minutes a day practicing the algorithms rather than one long session once a week. Muscle memory forms through repetition. Try setting a timer and aiming to beat your previous record each day. This gamification keeps motivation high.
Join the Local Community
Don't solve in isolation. Look for local cubing clubs in your area. Cities like Chicago, Seattle, and Miami host regular meetups where you can swap cubes, learn new techniques from veterans, and participate in casual competitions. The social aspect of cubing adds a layer of fun and accountability to your practice routine.
 (Placeholder image representing community or practice)
Troubleshooting Common Stumbling Blocks
Even with a clear step-by-step guide, beginners often encounter specific hurdles that can halt progress. Understanding these common pitfalls and how to resolve them is just as important as learning the algorithms themselves. One of the most frequent issues is misidentifying the starting position. Because the 2×2 lacks fixed centers, solvers sometimes get confused about which color belongs on which face. The golden rule to remember is: White always faces Yellow, and opposite colors must be paired correctly (Blue opposite Green, Red opposite Orange). If your first layer looks correct but the second layer sides are mismatched, double-check that you didn't accidentally swap two corners during the insertion phase.
Another common frustration is the "parity" feeling where it seems impossible to solve the last layer. In the 2×2 cube, true parity errors (where an odd number of pieces are swapped) do not exist in the same way they do in larger cubes. If you feel stuck, it is almost always due to an incorrect application of the OLL or PLL algorithms. Revisit the orientation step; ensure that every yellow sticker is facing up before attempting to permute the corners. Sometimes, simply rotating the entire cube in your hands changes your perspective enough to see the correct algorithm entry point. Patience and a willingness to restart from the beginning of a step are virtues that separate casual players from dedicated solvers.
The Psychology of Solving
Solving a mechanical puzzle like the 2×2 is as much a mental exercise as it is a physical one. In 2026, where digital distractions compete for our attention, the act of physically manipulating a cube offers a unique form of mindfulness. When you are focused on executing R U R' U' perfectly, your mind is forced to stay in the present moment. This state of flow can help alleviate stress and improve cognitive flexibility. However, frustration is a natural part of the learning curve. If you find yourself getting angry or impatient, put the cube down for five minutes. Often, stepping away allows your brain to subconsciously process the patterns you've been trying to memorize. When you return, the solution often becomes clearer.
Furthermore, understanding the history and culture of the 2×2 can deepen your appreciation for the puzzle. The Pocket Cube was patented by Ernő Rubik in 1974, initially intended as a teaching tool for spatial relationships. Over the decades, it evolved into a global phenomenon, with world records now exceeding three seconds for the fastest solve. Knowing that you are participating in a lineage of problem-solvers, from the early days of mechanical ingenuity to the high-tech era of computer-assisted algorithm analysis, can provide a sense of connection to something larger than oneself.
 (Placeholder image representing the history and evolution of the puzzle)
Essential Maintenance and Care for Your Cube
As you transition from a beginner to a more advanced solver, the condition of your cube will become increasingly important. A well-maintained 2×2 cube turns smoother, faster, and more predictably. In contrast, a dry or sticky cube can ruin even the best finger tricks and lead to inconsistent solves. Here is how to keep your Pocket Cube in peak condition throughout 2026.
Lubrication is Key
Most modern speedcubes come pre-lubricated, but over time, the factory grease can dry out or attract dust. For a beginner using a standard hobbyist cube, applying a small amount of silicone-based lubricant every few months is recommended. Avoid using WD-40 or household oils, as these can damage the plastic internals. Apply a drop to the core mechanism and the pivot points of each corner piece, then scramble the cube vigorously to distribute the oil evenly. You want a smooth, silent turn, not a squeaky or sluggish one.
Tuning Your Tension
Every cube comes with adjustable screws that control the tension of the internal mechanism. If your cube feels too loose and pieces fall out easily, tighten the screws slightly. If it feels stiff and hard to turn, loosen them. Finding the "sweet spot" is crucial for speedcubing. A cube with optimal tension allows for quick transitions between moves without binding. Many solvers prefer a slightly tighter tension for stability during fast algorithms, while others prefer looser cubes for maximum speed. Experiment with different settings until you find what feels natural for your grip style.
Cleaning and Deep Maintenance
If your cube starts to smell bad or the plastic feels gritty, it may need a deep clean. Remove the center caps (if applicable to your specific model) or carefully pry apart the corner pieces to access the internal springs and bearings. Wash the plastic parts in warm soapy water, rinse thoroughly, and let them air dry completely before reassembling. Never submerge electronic components if your cube has sensors, though pure mechanical 2x2s are generally safe to wash this way. Regular cleaning prevents grit buildup, which is a major cause of premature wear.
 (Placeholder image representing maintenance tools and supplies)
Frequently Asked Questions (FAQ)
As you delve deeper into the world of the 2×2 Rubik's Cube, questions naturally arise. To help clarify common doubts and accelerate your learning process, we have compiled a list of frequently asked questions based on experiences from beginners across the globe.
Q: Do I really need to learn algorithms, or can I just figure it out intuitively?
A: While intuition is valuable for the first layer, relying solely on it for the last two layers will limit your potential. The 2×2 has over 3.6 million combinations, making random guessing inefficient. Algorithms provide a guaranteed path to the solution regardless of the starting configuration. Learning the Sune and the Cycle algorithm reduces your solve time from several minutes to under thirty seconds once mastered. Think of algorithms as vocabulary words that allow you to construct complex sentences (solves) quickly.
Q: My cube keeps falling apart when I turn it fast. What should I do?
A: This is usually a sign of loose tension or worn-out internal springs. Check the adjustment screws on the back of the cube and tighten them incrementally. If the cube is old or cheaply made, the plastic may have warped or the pins holding the pieces together might be loose. In severe cases, upgrading to a higher-quality "speedcube" designed for competition might be necessary. These cubes feature magnetic alignment and superior bearing systems that prevent disassembly during rapid movements.
Q: Can I solve the 2×2 without looking at the instructions?
A: Absolutely! Once you understand the notation and the basic logic of the first layer, the rest becomes muscle memory. Many cubers start by following written guides but eventually rely entirely on visual recognition of patterns. The goal of this guide is to get you to that point where you no longer need to read step-by-step instructions. Practice until the algorithms feel as natural as tying your shoes.
Q: Is the 2×2 harder to solve than the 3×3?
A: Paradoxically, the 2×2 is often easier for absolute beginners to learn because it has fewer pieces and no edge or center complications. However, in terms of raw speed and complexity at an elite level, the 3×3 offers more depth. The 2×2 is the perfect bridge: simple enough to master quickly, yet complex enough to teach all the fundamental concepts needed for the 3×3. Most speedcubers recommend mastering the 2×2 before tackling the 3×3 to build confidence.
 (Placeholder image comparing beginner and advanced solving styles)
Conclusion: Your Journey Ahead
Congratulations on reaching the end of this comprehensive guide! You have now equipped yourself with the knowledge, algorithms, and mindset required to solve the 2×2 Rubik's Cube. From understanding the basic notation to mastering the Ortega method steps, every concept covered here serves as a building block for your future success in the world of speedcubing. Remember that mastery is not achieved overnight; it is the result of consistent practice, patience, and a willingness to learn from mistakes.
The 2×2 Cube is more than just a toy; it is a gateway to a vibrant community of thinkers, creators, and competitors. Whether you aim to set a personal best, participate in local competitions, or simply enjoy the meditative process of twisting and turning, you now hold the key to unlocking this miniature puzzle. As you continue your journey, keep track of your progress, challenge yourself with new techniques, and share your achievements with others. The satisfaction of holding a fully solved cube in your hands after hours of practice is unmatched, and it is a feeling that only grows stronger with time.
In 2026 and beyond, the spirit of cubing continues to evolve, blending traditional mechanics with modern innovation. Stay curious, stay patient, and most importantly, have fun. The cube is waiting for you to solve it again and again, each time revealing new insights and improving your skills. So grab your cube, find a comfortable spot, and let the twists begin. Your path to becoming a proficient solver starts with that very first move. Keep practicing, keep improving, and soon you'll be solving not just the 2×2, but any challenge life presents with the same logical precision and calm focus. Happy cubing!
 (Placeholder image celebrating the successful completion of the puzzle)