Solving the 4×4 Rubik's Cube is a monumental achievement for any speedcuber, but it often hits a wall that doesn't exist on the classic 3×3. That wall is parity. Specifically, OLL parity can feel like an impossible glitch in your solve, leaving you staring at two flipped edges while your cube refuses to obey standard algorithms. If you are reading this in 2026, you need more than just a quick fix; you need a deep understanding of why this happens and how to execute the solution with confidence. This guide breaks down 4×4 parity oll explained step by step for beginners into manageable, logical steps, ensuring you never get stuck again. Whether you are solving in a busy café in London, a studio in Tokyo, or a living room in New York, mastering this skill will unlock your full potential.
Understanding the Mystery of Even-Layered Cubes
Before we dive into the specific algorithm, we must understand the "why." Many beginners think they made a mistake when they encounter parity, but in reality, parity is a fundamental property of even-layered cubes like the 4×4, 6×6, and 8×8. Unlike the 3×3, which has fixed center pieces that define the color of each face, the 4×4 has movable centers. This flexibility allows the internal mechanics to create states that are mathematically impossible on a 3×3.
Why Does OLL Parity Happen?
The core of the issue lies in the reduction method used to solve larger cubes. You start by pairing edge pieces to create single "dedges" (double edges), effectively turning the 4×4 into a giant 3×3. However, during this pairing phase, you might accidentally pair an odd number of edges incorrectly. On a 3×3, every edge orientation is even, meaning you can never have just one edge flipped. On a 4×4, if you flip an odd number of edges while pairing, you end up with a state where two edge pairs appear flipped simultaneously. This is the OLL parity case. It looks like a standard OLL error, but no standard 3×3 algorithm can fix it because the cube's internal logic has been temporarily broken.
Distinguishing Parity from Reduction Errors
One of the most common mistakes beginners make is assuming they have parity when they actually have a simple reduction error. Before applying any parity algorithm, you must perform a strict diagnostic check:
- Check Centers: Ensure all six centers are complete and in a valid color scheme. A misplaced center mimics parity.
- Check Edge Pairs: Verify that every dedge is fully paired. If a single edge piece is out of place within a pair, fix it before proceeding.
- The Test: Once reduced, attempt a standard OLL algorithm. If the cube behaves exactly like a 3×3 but leaves two edges flipped, you have confirmed OLL parity.
The Golden Rule: Recognition and Setup
Speedcubing in 2026 relies heavily on pattern recognition. You cannot solve parity if you don't spot it immediately. The visual cue for OLL parity is distinct: after reducing the cube, you reach the last layer orientation stage, and instead of having 0, 2, or 4 edges oriented correctly (depending on the case), you have exactly one or three edges oriented, but the specific configuration prevents any standard OLL algorithm from working. Usually, you will see two adjacent edges that look flipped relative to the top color.
How to Hold the Cube Correctly
The execution of the algorithm depends entirely on your cube orientation. If you hold the cube wrong, the algorithm will scramble your progress rather than fixing it.
- Identify the Flipped Edges: Locate the two edge pieces that are flipped. In most beginner cases, these are adjacent to each other.
- Face Them: Rotate the entire cube so that these two flipped edges are facing you (on the Front face).
- Verify the Top: Ensure the top face (Up) is not interfering with your view. Sometimes, if the corners are also messed up, you might need to rotate the whole cube vertically (y-move) so the problematic edges are on the Front-Right or Front-Left position, but the standard rule is to have them on the Front face.
Common Misconceptions to Avoid
It is crucial to distinguish between OLL Parity and PLL Parity.
- OLL Parity happens during orientation. The top face colors are mixed up, and you cannot make them all match using normal moves. Two edges look flipped.
- PLL Parity happens during permutation. The top face is already solved (all yellow stickers facing up), but two edge groups need to swap positions, which is impossible on a 3×3.
Mixing these up is a frequent error. If your top layer is already solid yellow but two edges are swapped, do not use the OLL parity algorithm. You need the PLL parity fix instead. This guide focuses strictly on OLL parity, as it is the first hurdle most beginners face.
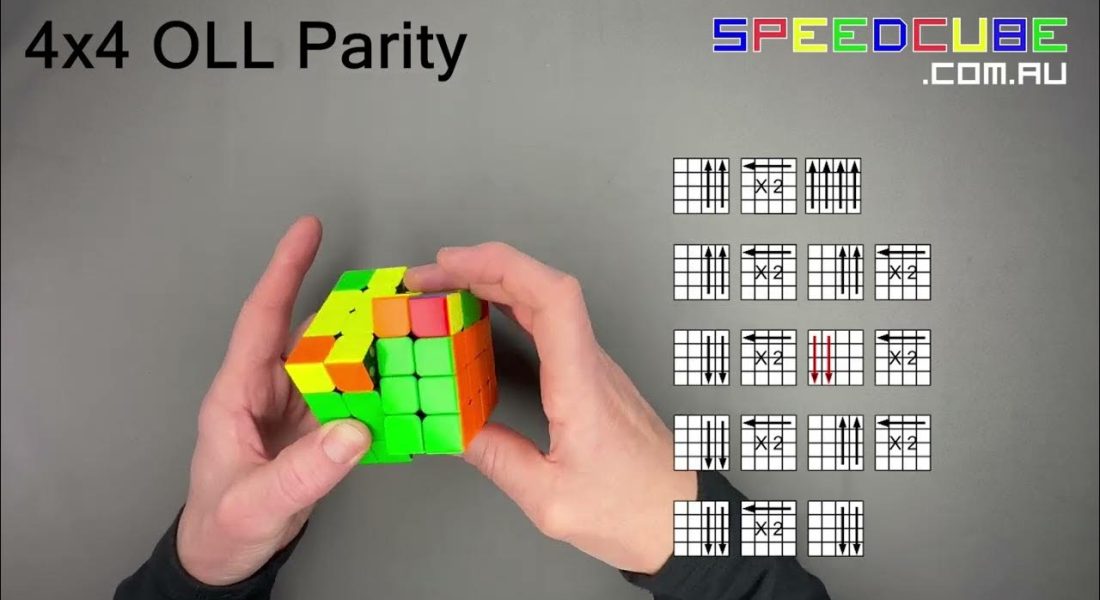
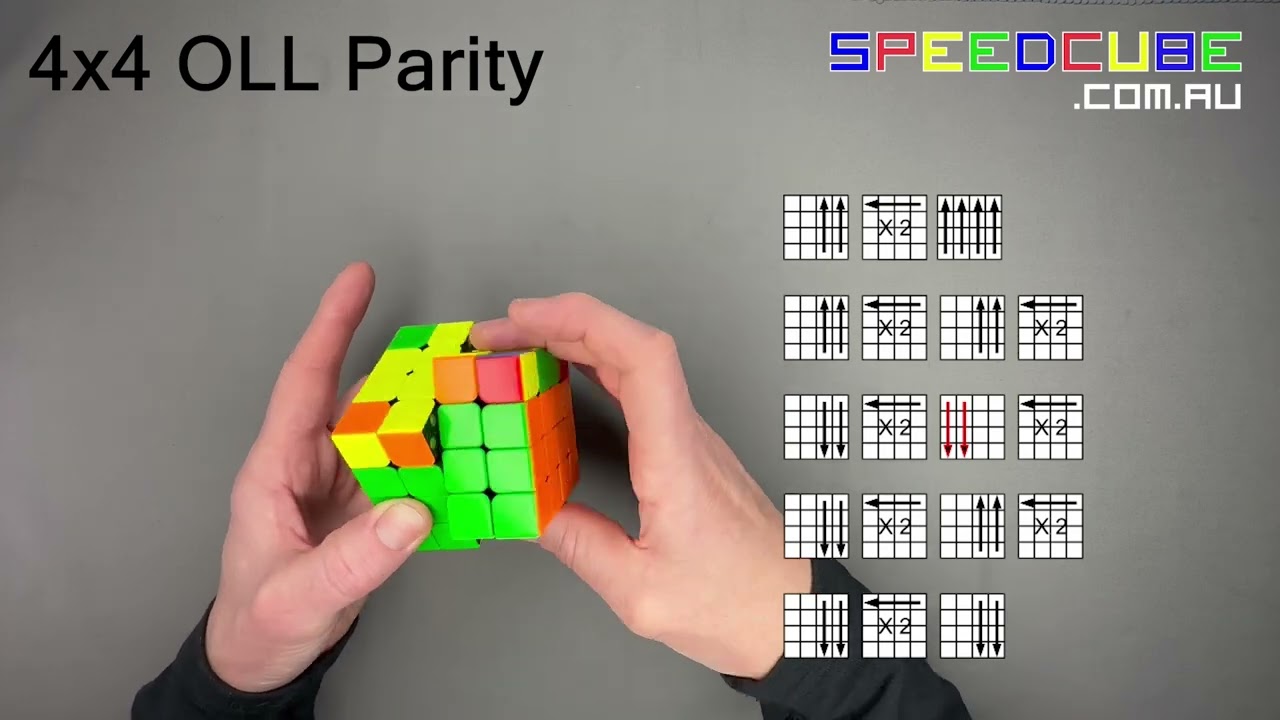
Step-by-Step Execution: The Beginner's Algorithm
Now that you have recognized the problem and set up your cube correctly, it is time to apply the fix. There are several algorithms available, ranging from slow and safe to fast and aggressive. For beginners prioritizing accuracy over speed, we recommend the "Safe Flip" algorithm. This version minimizes risk to other pieces, though it requires slightly more finger tricks.
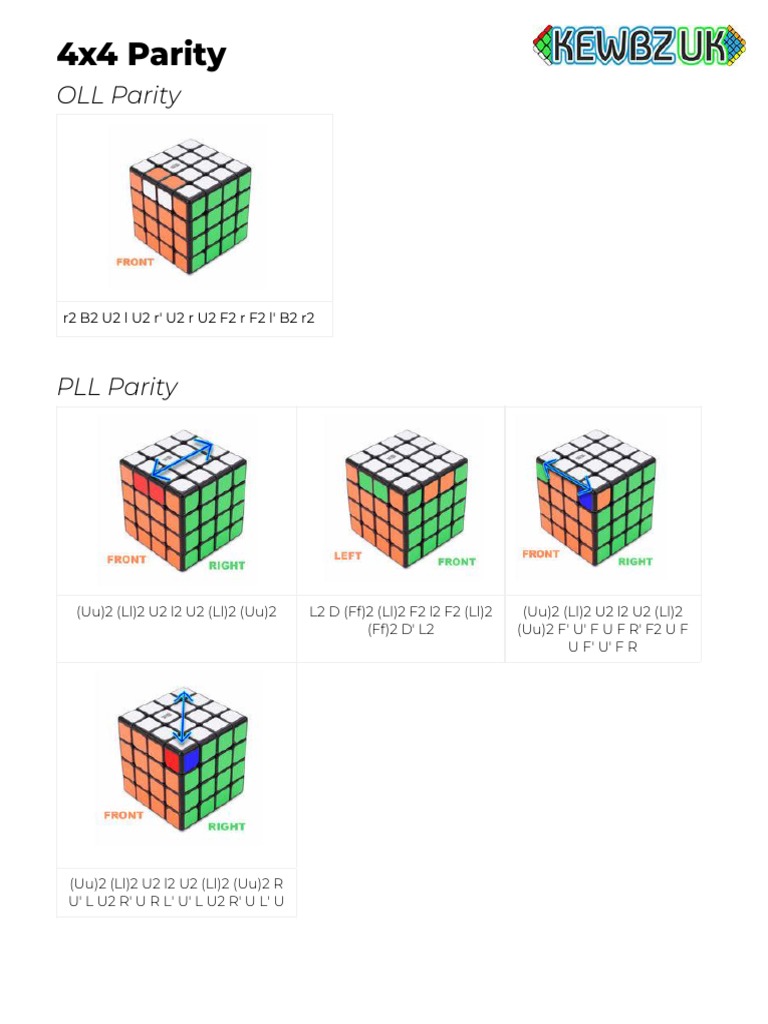
The Primary Algorithm: r2 B2 U2 l U2…
This is the most widely accepted algorithm for beginners because it is reliable and less prone to execution errors compared to wide-move variants.
The Sequence:
r2 B2 U2 l U2 r' U2 r U2 F2 r F2 l' B2 r2
Breakdown of Movements:
To master this, you must understand the notation clearly:
- r: Move only the inner slice of the Right face clockwise. Do not turn the whole right face!
- l: Move only the inner slice of the Left face clockwise.
- r': Move the inner Right slice counter-clockwise.
- B2: Turn the Back face 180 degrees.
- U2: Turn the Up face 180 degrees.
- F2: Turn the Front face 180 degrees.
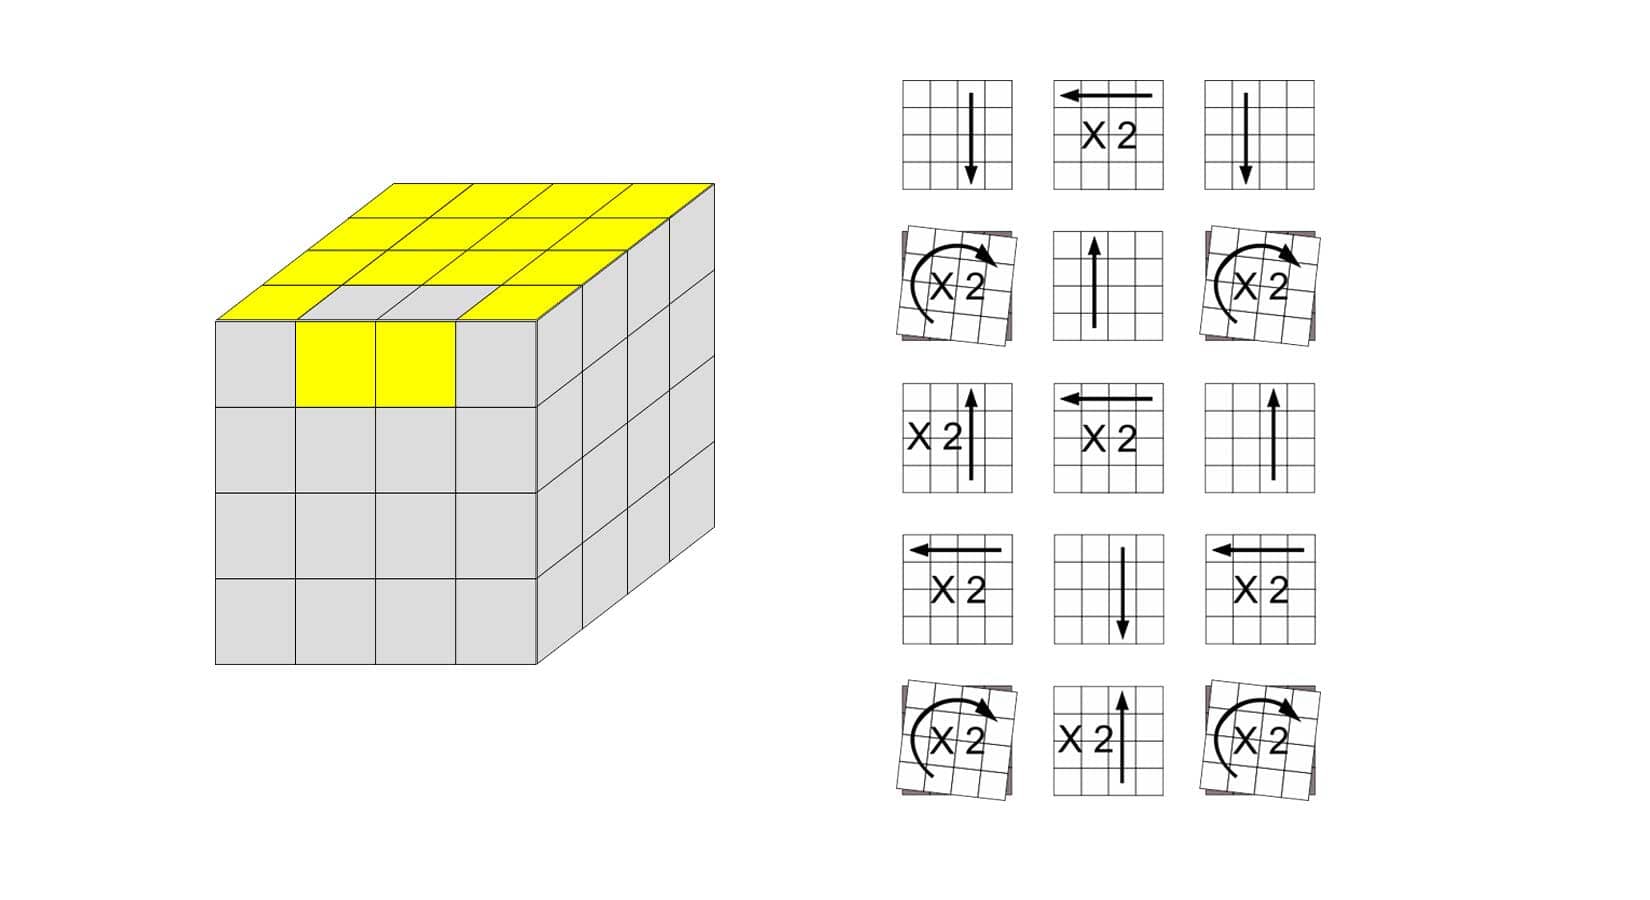
Detailed Step-by-Step Guide
Follow these instructions precisely to avoid losing track of the sequence.
- Setup: Hold the cube with the two flipped edges facing you (Front face). The algorithm assumes the "r" move starts on the right side of the viewer.
- The Opening: Execute
r2. This flips the inner right slice twice. ThenB2, flipping the back twice. ThenU2, rotating the top half twice. - The Left Interaction: Execute
l. This is a critical single turn of the left inner slice. Immediately follow withU2. - The Right Loop: Execute
r'(inner right back), thenU2, thenr(inner right front), thenU2. This complex interaction swaps the edge orientations. - The Face Swaps: Execute
F2(front double), thenr(inner right), thenF2(front double again), thenl'(inner left back). - The Closing: Finish with
B2(back double) andr2(inner right double).
What Happens During the Algorithm?
As you perform these moves, watch the two edges facing you. They will cycle through various states. By the end of the sequence (r2 at the very end), those two edges will be flipped correctly relative to the rest of the cube. Essentially, the algorithm performs a mathematical inversion that changes an odd permutation into an even one, restoring the cube to a solvable 3×3 state.
Pro Tip: Do not rush. The rhythm is important. Try to say the moves aloud ("Right-double, Back-double…") while doing them until your muscle memory takes over. Many cubers find success by grouping the algorithm into chunks: (r2 B2 U2 l U2) then (r' U2 r U2) then (F2 r F2 l' B2 r2).
Advanced Techniques for Speedcubers
Once you have mastered the basic algorithm, you may find yourself wanting to solve faster. In the competitive scene of 2026, efficiency is key. There are alternative algorithms that manipulate fewer pieces or utilize wider turns (wide moves) to reduce execution time. However, these require a higher level of dexterity.
The Wide Move Variant (Rw/Uw)
Some advanced solvers prefer algorithms that involve turning both the outer layer and the inner slice together. This is denoted by capital letters like Rw (Right wide) or Uw (Up wide).
- Example Algorithm:
Rw U2 R2 Uw2 R2 Uw2 - Why use it? It is often faster because you don't have to isolate slices as precisely.
- The Catch: These moves disturb more pieces in the middle layers. If you mess up a wide turn, you might break a previously solved section. For beginners, stick to the slice-only algorithm (
r2...) until you are comfortable with slice isolation.
Predictive OLL Tricks
Experienced cubers know that sometimes you don't need to fix parity at all. If you have three edges oriented correctly before reaching the final step, there might be a shortcut.
- The Logic: Certain OLL cases combined with parity can be resolved by performing a specific setup move, executing the OLL algorithm, and then undoing the setup.
- Application: This requires memorizing specific patterns where the parity interacts favorably with the corner orientation. While fascinating, this is an intermediate concept. For now, always default to the parity algorithm to ensure a clean solve.
Troubleshooting and Common Pitfalls
Even with the best algorithms, things can go wrong. Here is how to handle common issues that arise during 4×4 parity oll explained step by step for beginners attempts.
The Algorithm Didn't Work
If you performed the algorithm and the cube is still scrambled or the edges are still flipped:
- Re-check Orientation: Did you hold the cube correctly? The flipped edges must be on the Front face. If they are on the Top or Bottom, the algorithm will fail.
- Count the Moves: Did you skip a move? Parity algorithms are sensitive; missing one
U2can result in a different outcome. Go back to the beginning and restart slowly. - Was it actually Parity? Re-evaluate your centers. If a center piece is twisted (which can happen if you forced a piece), the cube might look like parity but isn't. Fix the center first.
Breaking Already Solved Layers
A frequent fear is that fixing parity will ruin the rest of the cube.
- The Reality: The OLL parity algorithm specifically targets the last layer edges and corners. It does not touch the centers or the first two layers (F2L) if executed correctly.
- Safety Net: Because the algorithm involves many
U2(half turns) and slice moves, it preserves the integrity of the solved sections. You will only see changes in the last layer.
Practice Drills for Mastery
To build confidence, practice the following drills:
- Deliberate Parity: Intentionally create OLL parity during your edge pairing practice. Pair edges incorrectly on purpose to generate the state, then solve it using the algorithm. This removes the panic factor.
- Muscle Memory Repetition: Set the cube to the parity state 20 times in a row. Focus purely on the hand movements, not the thinking. Aim for under 10 seconds per execution.
- Colorblind Variations: Practice with different color schemes. Parity looks the same regardless of colors, but seeing it on different backgrounds helps reinforce the pattern recognition.
Integrating Parity into Your Solving Workflow
Mastering parity is not just about knowing an algorithm; it's about integrating it into your overall strategy. In a full solve, parity usually appears after you have completed the centers and paired all edges.
When to Expect It
You should anticipate parity roughly 50% of the time when solving random scrambles. It is a statistical inevitability in even-layered cubes. Instead of viewing it as a failure, view it as a required checkpoint in your process.
- Reduction Phase: Spend extra time here ensuring edges are paired perfectly. While this won't prevent parity (since parity is inherent to the cube structure), good pairing reduces confusion later.
- Transition: As soon as you finish pairing and start looking at the last layer, be alert. If the OLL case looks "wrong," stop immediately and diagnose.
- Execution: Apply the fix, then proceed normally to solve the remaining OLL case (if any) and the PLL.
Mental Preparation
Parity can be frustrating. It feels like the universe is conspiring against you. However, maintaining a calm mindset is crucial for speedcubing.
- Acceptance: Acknowledge that this is part of the puzzle. Every world-class solver encounters parity daily.
- Focus: Use the moment to reset your focus. Take a breath, re-grip the cube, and execute the algorithm with precision.
- Learning: Each time you solve parity, you learn more about the cube's mechanics, making you a better overall solver.
The Psychology of Parity: Turning Frustration into Flow
One of the most profound aspects of learning 4×4 parity oll explained step by step for beginners is not the mechanical execution, but the psychological shift that occurs when you finally conquer it. For many new cubers, encountering parity triggers a moment of panic. The cube seems to have broken; the rules they learned on the 3×3 no longer apply, and the solution feels like a magical trick rather than a logical process. This feeling is entirely normal, but it is also a barrier to progress if left unaddressed.
Overcoming the "Glitch" Mentality
When you first see two flipped edges after reduction, your brain screams, "I made a mistake!" This is the natural reaction because, on a 3×3, such a state is impossible. However, understanding the mathematics behind the 4×4 changes this narrative from one of failure to one of discovery. You are not solving a mistake; you are correcting a fundamental property of the puzzle's geometry. By reframing parity as an expected event—a required step in the journey rather than an error—you transform frustration into curiosity. This mindset shift is what separates casual solvers from dedicated speedcubers. It allows you to approach the algorithm with confidence rather than hesitation.
The Rhythm of Recovery
Another psychological hurdle is the fear of breaking the progress you've just made. During the execution of the parity algorithm, the cube looks chaotic. Edges cycle rapidly, centers might seem to shift (though they shouldn't), and the visual order appears to disintegrate. Beginners often freeze during these moments, worrying that they have ruined their solve. To overcome this, you must trust the algorithm. The sequence r2 B2 U2 l U2 r' U2 r U2 F2 r F2 l' B2 r2 is mathematically proven to restore the cube to a valid state. Once you have solved parity ten times, twenty times, a hundred times, the chaos becomes predictable. You learn to anticipate exactly which pieces will move and where they will land. This predictability creates a rhythm, a flow state where your hands move automatically while your mind focuses on the next step of the solve.
Advanced Scenarios: When Parity Gets Complicated
While the standard OLL parity case involving two flipped edges is the most common, advanced solvers and those tackling complex scrambles may encounter variations. Understanding these scenarios ensures you never get stuck, even when the cube presents a seemingly different challenge.
The "Hidden" Parity Cases
Sometimes, parity does not present itself as two adjacent flipped edges. In rare instances, due to the specific nature of the scramble or previous moves, the flipped edges might be opposite each other, or the orientation might appear more complex.
- Opposite Edges: If the two flipped edges are directly across from each other (e.g., Front and Back), the setup changes slightly. You must rotate the entire cube so that these edges align with the Front-Back axis before applying the algorithm. The algorithm remains the same, but the initial rotation (y-move) is crucial.
- Multiple Flips: While theoretically impossible in a standard single-parity scenario, some learners might misidentify multiple edge issues. Always verify that you are dealing with a pure parity case before attempting a fix. If three or four edges look wrong, re-check your center alignment and edge pairing.
Interaction with Other Parity Types
It is vital to distinguish OLL Parity from PLL Parity, as mentioned earlier, but there is also a less common scenario known as Edge Orientation Parity. This occurs if you attempt to orient edges incorrectly during the reduction phase, leading to a situation where more than two edges need flipping. However, in the standard reduction method taught to beginners, we aim to pair edges correctly to avoid this. If you do encounter a complex edge orientation issue, the solution usually involves repeating the edge pairing process carefully rather than using a parity algorithm. Remember: Parity algorithms fix permutation/orientation mismatches created by the reduction logic, not errors made during manual pairing.
The Role of Cube Quality in Parity Execution
In 2026, the quality of the cube you use can significantly impact how easily you handle parity. Budget cubes often have loose tension or sticky mechanisms that make slice isolation difficult. When executing the r and l inner slice moves required for the algorithm, a stiff cube can cause the slices to bind, leading to missed turns or forced moves that disrupt the algorithm's integrity.
- Lubrication: Properly lubing your 4×4 is essential. The inner slices require smooth movement to execute quickly and accurately.
- Tension Adjustment: A cube with adjustable tension allows you to tighten it slightly for faster solves. A tighter cube provides better feedback, helping you feel when a slice has fully turned, which is critical for precision during parity fixes.
- Corner Cutting: High-quality cubes allow for corner cutting, meaning you can tilt the cube slightly to insert pieces without stopping. This is invaluable during parity, where speed of execution matters.
Building Long-Term Muscle Memory
Mastering the algorithm is only the first step; integrating it into your long-term muscle memory is what makes you a true master. Here is a structured approach to ensuring parity becomes second nature.
The Drill Hierarchy
To build robust memory, follow this progression:
- Static Practice: Set the cube to the parity state manually. Execute the algorithm slowly, saying each move aloud. Focus on finger positioning.
- Random Generation: Use a randomizer app or scramble the cube, then intentionally force a parity situation by pairing edges incorrectly. Solve it immediately. Repeat this 50 times.
- Full Solve Integration: Incorporate parity into your full solves. Start with slow solves, allowing yourself time to recognize the pattern and set up. Gradually increase your solve speed as recognition improves.
- Blindfolded Training (Advanced): For the ultimate test, try solving parity blindfolded. This forces you to rely entirely on muscle memory and spatial awareness, removing any visual crutches.
Visualizing the Movement
Beyond physical repetition, visualization is a powerful tool. Before you even touch the cube, visualize the algorithm playing out in your mind. See the right inner slice turning, the back face rotating, the top layer shifting. This mental rehearsal primes your neural pathways, making the physical execution smoother and faster. Many professional cubers spend minutes a day visualizing algorithms without a cube in hand.
Adapting to Different Styles
As you progress, you might find that the "Safe Flip" algorithm feels too slow for your personal style. You may develop a preference for specific finger tricks or wider moves. This is healthy! The goal of this guide was to provide a foundation. Once that foundation is solid, experiment with alternatives like the Rw U2 R2 Uw2 R2 Uw2 variant or even custom algorithms developed by the community. However, always ensure that whatever algorithm you choose maintains the core principle: fixing the odd permutation caused by the reduction method.
Frequently Asked Questions (FAQ)
To round out this comprehensive guide, let's address some of the most common questions beginners ask regarding 4×4 parity oll explained step by step for beginners.
Q: Do I really need to learn parity algorithms? Can't I just avoid them?
A: Unfortunately, no. Parity is a mathematical certainty when solving even-layered cubes like the 4×4 using the reduction method. You cannot pair edges in a way that avoids creating an odd permutation; it is built into the mechanics of the puzzle. Trying to avoid parity is like trying to walk in a straight line on a curved surface—it simply isn't possible. Learning the algorithm is mandatory for completing the solve.
Q: My algorithm works, but it leaves the corners messed up. Is this normal?
A: Yes, this is completely normal. The OLL parity algorithm specifically targets the edge orientation and permutation of the last layer. It is designed to fix the "glitch" so that the rest of the cube behaves like a 3×3. After you fix the parity, you will likely be left with a standard OLL case (like the "H" shape or "dot") that you already know how to solve. The parity fix resets the cube to a solvable state; it does not solve the entire last layer by itself.
Q: I keep forgetting the algorithm after doing it once. How do I memorize it faster?
A: Memorization through rote repetition is effective, but grouping helps. Break the 18-move sequence into three distinct chunks of six moves each. Master the first chunk until it feels automatic, then add the second, and so on. Also, associate the moves with a rhythm or a song beat. Many cubers find that tapping their foot or humming while solving helps lock the sequence into memory. Finally, practice the algorithm in both directions (forward and reverse) to deepen your understanding of the piece movements.
Q: Can parity happen on a 3×3?
A: No, parity cannot happen on a standard 3×3 Rubik's Cube. The 3×3 has fixed centers and an even number of movable pieces in a way that guarantees all permutations remain even. The 4×4 introduces movable centers and paired edges, which creates the possibility of odd permutations. If you encounter a situation on a 3×3 that looks like parity, you have either made a mistake in your solving steps or you are looking at a damaged cube.
Conclusion: Your Journey to Mastery Continues
Solving the 4×4 Rubik's Cube is a rite of passage for any serious puzzler, and mastering OLL parity is the key that unlocks the door to advanced speedcubing. What once seemed like an insurmountable glitch is now a manageable, predictable step in your solving process. By understanding the "why," recognizing the "when," and executing the "how" with confidence, you have equipped yourself with the tools needed to tackle any scramble.
Remember, every world champion started exactly where you are now. They faced the same confusion, the same frustration, and the same double-flipped edges. The difference between them and the rest of us was persistence. They practiced the algorithm until it became muscle memory, analyzed their mistakes, and refined their techniques. In 2026, the community of cubers is larger and more connected than ever, with resources available at your fingertips to help you improve. Whether you are solving for fun, competing for medals, or simply enjoying the meditative state of puzzle-solving, the skill of handling parity will serve you well.
As you continue your journey, keep experimenting with different algorithms, explore the nuances of cube mechanics, and never stop challenging yourself. The 4×4 is just the beginning; once you master it, the 5×5, 6×6, and beyond await. But for now, celebrate this milestone. You have conquered parity. You have proven that you can solve the unsolvable. Go forth, grab your cube, and enjoy the beautiful complexity of the twisty puzzle world. The next solve is waiting, and this time, you are ready.