Welcome to the vibrant world of twisty puzzles in 2026! If you have ever stared at a scrambled Rubik's Cube and felt overwhelmed by the 43 quintillion possible combinations, you are not alone. However, the beauty of this iconic puzzle lies not just in solving it, but in transforming it into a work of art. Whether you are a student in Austin, a professional in San Francisco, or simply someone looking for a brain break at home in Chicago, creating visual patterns is the perfect gateway into cubing culture.
In this comprehensive guide, we will explore 10 easy Rubik's cube patterns anyone can do. These designs require no advanced speedcolving techniques, only a solved cube and a willingness to follow simple algorithms. From the classic Checkerboard to the mesmerizing Snake, these patterns offer a satisfying sense of accomplishment without the frustration of complex memorization. Let's dive into the colorful chaos and discover how you can turn your standard 3×3 cube into a stunning masterpiece today.
![Best Rubik Cube Patterns for Beginners [Step-by-Step Guide]](https://therubbick.com/wp-content/uploads/2026/06/Rubiks-Cube-Patterns-INNER-2-1.jpg)
Why Mastering Cube Patterns Matters in 2026
In an era dominated by digital screens and artificial intelligence, tangible problem-solving skills are more valuable than ever. Learning cube patterns serves multiple purposes beyond mere entertainment. First, it reinforces your understanding of cube notation (the language of moves like R, L, U, D, F, B). Second, it builds muscle memory, which is crucial if you ever decide to attempt speedcolving. Finally, it provides a unique social icebreaker; showing off a perfectly formed pattern in a local coffee shop or a community center can instantly connect you with fellow puzzle enthusiasts.
The community aspect of cubing has exploded in recent years. Events like the World Cube Association (WCA) competitions continue to draw thousands of participants globally. Even outside of official competitions, "pattern days" are becoming popular in schools and libraries across major cities. Creating these designs proves that the cube is not just a math problem but a canvas for creativity. By mastering these ten foundational patterns, you join a long lineage of solvers who appreciate the mathematical elegance hidden within the plastic tiles.
Essential Notation and Tools You Need
Before we start twisting, it is vital to understand the basics. While some sources claim you don't need to know notation, having a basic grasp makes learning significantly faster. The standard notation uses letters to represent the faces of the cube:
- R: Right face clockwise
- L: Left face clockwise
- U: Up face clockwise
- D: Down face clockwise
- F: Front face clockwise
- B: Back face clockwise
If you see an apostrophe (') after a letter, such as R', it means rotate that face counter-clockwise. A number 2 (e.g., U2) means rotate the face twice (180 degrees).
For those who prefer not to memorize these symbols immediately, technology has made life easier. In 2026, there are numerous online Rubik's cube simulators and apps available on Android and iOS that allow you to visualize these moves virtually. You can practice the algorithms on a virtual cube before touching your physical one. This is especially helpful for beginners who want to avoid damaging their cubes while learning.
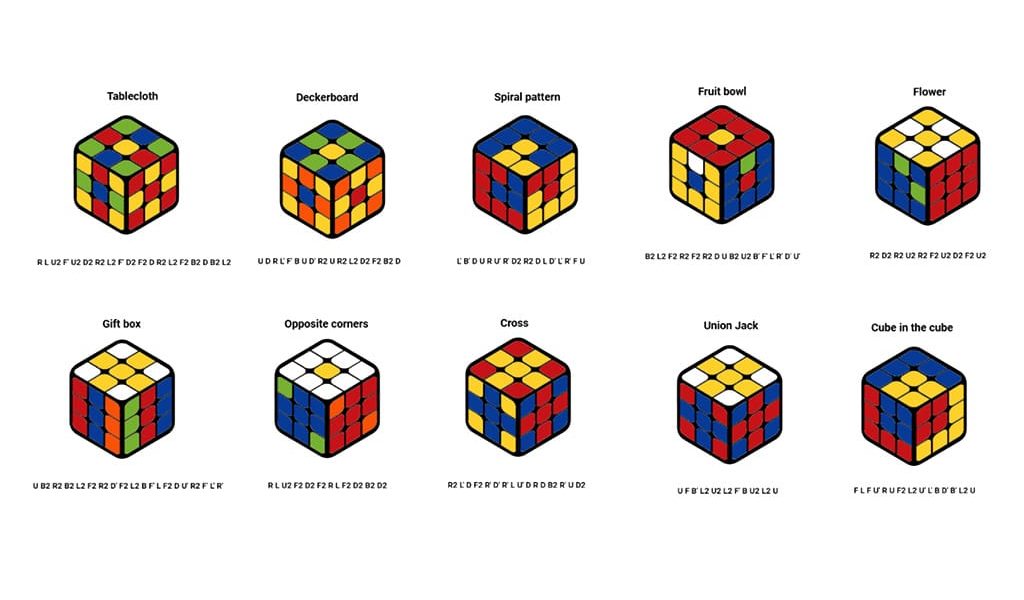
1. The Checkerboard Pattern: Symmetry in Simplicity
The Checkerboard is arguably the most famous and easiest pattern to create. It transforms a solid-colored face into a grid of alternating colors, resembling a chessboard or a checkered flag. This pattern is perfect for beginners because it requires very few moves and looks incredibly impressive due to its high symmetry.
To create the Checkerboard, start with a completely solved cube. The algorithm is deceptively simple: perform a series of half-turns on opposite axes. The sequence involves rotating the Right, Up, Front, Back, Left, and Down faces all by 180 degrees. Specifically, the algorithm is often written as R2 U2 F2 B2 L2 D2.
What makes this pattern so special is its mathematical purity. It creates a state where every edge piece is swapped with another, and every corner is twisted, yet the cube remains in a highly ordered state. Interestingly, the Checkerboard is its own inverse; if you perform the same algorithm again, the cube returns to the solved state. This property makes it a great starting point for understanding how algorithms work and how to reverse them.
When practicing this in your local area, try finding a well-lit spot. The contrast between the colors is striking under natural light. Many cubers in Seattle or Denver use this pattern as a warm-up routine before attempting more complex designs. It teaches you the concept of commutators—sequences of moves that affect specific pieces while leaving others alone.
2. The Cross Pattern: Building Blocks of Complexity
The Cross pattern is a fundamental design that forms a plus sign (+) on every face of the cube. Unlike the Checkerboard, which affects the entire cube uniformly, the Cross focuses on creating a central shape using the edge pieces. This pattern is excellent for learning how to manipulate the middle layer without disturbing the corners.
The algorithm for the Cross is slightly more involved than the Checkerboard but remains accessible. One common variation requires seven moves: M' U M U2 M' U M. Here, the M move represents the middle slice between the Left and Right faces. If you are unfamiliar with M-slice moves, you can achieve a similar effect by focusing on specific layer rotations, though the M-move version is the most efficient.
This pattern is particularly useful for understanding slice moves. In the modern cubing community, mastering slice moves is essential for advanced solving methods like CFOP or Roux. By practicing the Cross, you are essentially training your fingers to execute precise, controlled movements. It is a staple in many beginner tutorials found on platforms like YouTube, where creators demonstrate how to form the cross step-by-step.
Try creating the Cross on a cube with distinct center colors. For example, if your white center is on top, ensure the white edges align to form a perfect cross on the top face, then repeat for the other sides. The visual result is a clean, geometric design that highlights the structure of the puzzle. It is a favorite among educators teaching logic and spatial reasoning in classrooms throughout Boston and New York.
3. Cube in a Cube: The Illusion of Depth
One of the most visually stunning patterns is the Cube in a Cube. As the name suggests, this design creates the optical illusion of a smaller cube nested inside a larger one. It leaves a frame of color around the edges, making it look like a picture frame surrounding a miniature 3D object. This pattern is a favorite among those who appreciate depth and perspective in two-dimensional objects.
Creating the Cube in a Cube requires a specific sequence of 15 moves. The algorithm is: F L F U' R U F2 L2 U' L' B D' B' L2 U. This sequence might look intimidating at first glance, but breaking it down into smaller chunks makes it manageable. Start by learning the first half, then the second half, and finally combine them.
The "Fun Fact" about this pattern is that it was likely discovered accidentally by cubers exploring random algorithms. It showcases the unpredictable nature of the Rubik's Cube; sometimes, the most beautiful designs come from pure experimentation rather than strict theory. In 2026, this pattern remains a testament to the enduring mystery of the puzzle. It demonstrates how recursive nesting is possible within the constraints of a 3×3 mechanism.
When displaying this pattern, hold the cube steady and rotate it slowly. The illusion works best when viewed from directly above or below. Many online communities, such as Reddit's r/Cubers, feature galleries of "Cube in a Cube" photos taken from various angles to emphasize the 3D effect. It is a great pattern to learn if you want to impress friends with something that looks far more difficult than it actually is.
4. The Spiral Pattern: Defying Grid Logic
The Spiral pattern is a mesmerizing design that creates a swirling effect winding around the surface of the cube. It defies the rigid grid structure of the puzzle, making it appear as though the colors are flowing in a continuous loop. This pattern is ideal for those who enjoy fluid motion and dynamic visuals.
To form the Spiral, you need to execute a sequence that rotates layers in a specific diagonal order. A common algorithm involves moves like F U' R U2 L' B D' L D2 R B L2 U F2 D. Notice how the moves alternate between outer layers and inner slices? This alternation is key to creating the twisting path of colors.
The Spiral pattern is often compared to a vortex or a tornado captured in plastic. It requires a good understanding of how different layers interact when turned simultaneously. Practicing this pattern helps improve your finger dexterity and ability to visualize 3D movement. It is a popular choice for speedcubers looking for a "pretty pattern" to display during casual solves or video content creation.
In urban settings like Portland or Miami, where street art and graffiti influence pop culture, the Spiral pattern resonates with the aesthetic of flowing lines and movement. It bridges the gap between traditional puzzle solving and modern artistic expression. Try filming a time-lapse of yourself forming the Spiral; the transformation from a solved state to a swirling vortex is captivating to watch.
5. The Superflip: The Hardest Easy Pattern
The Superflip holds a unique place in Rubik's Cube history. It is a state where every edge piece is flipped while remaining in its correct position. Visually, it looks almost scrambled, yet structurally, it is incredibly organized. What makes the Superflip legendary is that it requires exactly 20 moves to reach from a solved state, which is the maximum distance possible in the quarter-turn metric. Despite being the "hardest" in terms of move count, it is still considered an "easy" pattern for beginners to learn once they understand the algorithm.
The algorithm for the Superflip is a classic: U R2 F B R B2 R U2 L B2 R U' D' R2 F R' L B2 U2 F2. Memorizing this sequence is a rite of passage for many cubers. It serves as a bridge between simple patterns and more complex configurations. Learning the Superflip teaches you about parity and the limits of the cube's mechanics.
Interestingly, the Superflip was proven to be one of the "furthest" positions from the solved state, meaning it takes the most moves to solve from the Superflip back to solved. This fact often surprises newcomers to the hobby. In 2026, the Superflip remains a benchmark for understanding the mathematical depth of the puzzle. It is a must-learn pattern for anyone serious about appreciating the cube's geometry.
If you are struggling to remember the moves, try associating the sequence with a rhythm or a song. Many tutorial videos break down the Superflip move by move, showing exactly which finger executes each turn. Once mastered, you can perform it blindfolded or at varying speeds, adding a new dimension to your cubing repertoire.
6. The Snake (Anaconda) Pattern: Continuous Lines
The Snake pattern, also known as the Anaconda, creates a stripe of color that winds continuously around the entire cube. Imagine a snake slithering over the surface, connecting one side to the next in a seamless loop. This pattern is visually striking because it emphasizes continuity and flow across the six faces.
The algorithm for the Snake is longer than the previous patterns, involving 22 moves: R U R' U' R' F R2 U' R' U' R U R' F' R U R' U R B2 R2. The complexity lies in the repeated sequences that shift the stripe from one face to another. Breaking this down into smaller segments—like the "head," the "body," and the "tail"—can help in memorization.
This pattern is excellent for developing patience and precision. Because the snake requires specific alignment of edge pieces, it forces you to think several steps ahead. It is a favorite among artists who view the cube as a medium for linear design. In tech hubs like Silicon Valley, where innovation and connectivity are celebrated, the Snake pattern symbolizes the interconnected nature of modern systems.
When executing the Snake, pay attention to the orientation of the cube. The pattern only works if you maintain a consistent viewpoint while performing the moves. Practice on a spare cube first, as the sequence can be tricky to get right on the first try. The satisfaction of seeing a single unbroken line wrap around your cube is unmatched.
7. The Flower Pattern: Nature in Plastic
The Flower pattern arranges edge and corner pieces to resemble a blooming flower on each face. Petals radiate from the center, creating a symmetrical and organic design that contrasts with the geometric nature of the other patterns. This pattern adds a touch of softness and natural beauty to the hard plastic of the cube.
To create the Flower, you need to position the edge pieces to form petals and the corners to act as the center or additional details. While the exact algorithm varies depending on the desired complexity, a common approach involves swapping specific edges and corners to achieve the radial symmetry. It often requires a combination of U, R, and F moves executed in a specific order.
The Flower pattern is beloved for its aesthetic appeal. It transforms the cube into something that looks like a piece of jewelry or a decorative ornament. Many people in London or Tokyo incorporate cube patterns into their home decor, and the Flower design fits perfectly into minimalist or nature-inspired interiors. It is also a great pattern for children, as the imagery is recognizable and fun.
Experiment with different color schemes when making the Flower. Using a cube with contrasting center colors can make the petals stand out even more. Some cubers even add stickers or paint the centers to enhance the floral theme. The versatility of this pattern allows for endless creative variations, keeping it fresh even after mastering the base algorithm.
8. The Four Spots Pattern: Minimalist Elegance
The Four Spots pattern creates four distinct colored spots on opposite corners of the cube faces. It is a minimalist design that relies on negative space to create impact. Instead of filling the face with a shape, this pattern highlights specific points, drawing the eye to the corners.
The algorithm for the Four Spots is relatively short: F2 B2 U D' R2 L2 U D'. This eight-move sequence swaps and flips pieces to leave only four corners altered. Its brevity makes it easy to learn and quick to perform, making it a perfect pattern for quick demonstrations.
This pattern demonstrates the power of simplicity. Sometimes, less is more, and the Four Spots prove that a few strategic moves can create a profound visual change. It is often used by magicians and illusionists who rely on sudden changes in appearance to captivate an audience. In a fast-paced environment, being able to flip a cube into a Four Spots pattern in seconds is a cool party trick.
Try performing the Four Spots rapidly to see how quickly the cube transforms. The stark contrast between the solid faces and the isolated spots creates a hypnotic effect. It is a great pattern to master early on, as it builds confidence in handling simple algorithms.
9. The Plus-Minus Pattern: Symbolic Design
The Plus-Minus pattern creates + and – symbols on the faces of the cube, except for two sides. This design plays with mathematical symbols, turning the cube into a canvas for algebraic notation. It is a clever way to blend education with entertainment, making it ideal for STEM-focused environments.
To achieve the Plus-Minus pattern, you perform a sequence that alters the center and edge pieces to form the desired symbols. A typical algorithm involves U2 R2 L2 U2 R2 L2, though variations exist depending on the orientation of the symbols. The key is to ensure that the plus signs are aligned correctly on the visible faces.
This pattern is unique because it incorporates human-made symbols into the mechanical puzzle. It sparks conversations about mathematics and logic, making it a popular choice for teachers and tutors. In academic settings across Cambridge or Oxford, such patterns can serve as engaging tools for teaching spatial awareness and pattern recognition.
The Plus-Minus pattern also has a playful side; you can challenge friends to guess which faces will remain plain. It adds an element of mystery and interaction to the cubing experience. Whether you are solving for fun or for a classroom demonstration, this pattern offers a intellectual twist that sets it apart from purely aesthetic designs.
10. The Gift Box Pattern: Surprise in Every Turn
The Gift Box pattern mimics the appearance of a wrapped present, complete with a bow on top. This charming design turns the cube into a festive object, perfect for holidays or special occasions. It combines the structural integrity of the cube with the whimsical idea of a gift.
Creating the Gift Box involves arranging the edges and corners to look like wrapping paper and a ribbon. While the algorithm is more intricate than the previous examples, it follows a logical progression of moving pieces into place. It often requires a combination of face turns and slice moves to simulate the folds of paper.
This pattern is a hit at parties and family gatherings. Seeing a plain cube transform into a colorful "gift" always elicits smiles and applause. It shows that the Rubik's Cube is not just a toy for geniuses but a source of joy for everyone. In 2026, with the rise of personalized gifts, a custom-patterned cube makes a thoughtful present for any occasion.
You can customize the colors to match the theme of the event. For Christmas, use red and green; for birthdays, use bright pastels. The adaptability of the Gift Box pattern makes it a versatile addition to your pattern collection. It reminds us that behind every complex puzzle lies a simple desire to create something beautiful.
How to Reverse Patterns and Return to Solved State
One of the most common questions beginners ask is, "How do I undo a pattern?" The good news is that reversing any Rubik's Cube pattern is straightforward. To revert a pattern, you simply apply the inverse algorithm. This means writing the original sequence backwards and replacing each move with its opposite rotation.
For example, if your original algorithm was R U R' U', the inverse would be U R U' R'. Note that double turns (2) are their own inverses, so U2 remains U2. This principle applies to all ten patterns discussed in this article. By mastering the concept of inverse moves, you gain the ability to reset your cube anytime, turning a pattern back into a solved state instantly.
Many online simulators offer a "reverse" button that automatically calculates the inverse algorithm for you. However, understanding the manual method empowers you to experiment freely without relying on technology. It deepens your comprehension of how algorithms function as balanced sequences of cause and effect.
Conclusion: Your Journey into Cubing Artistry Begins Now
Mastering these 10 easy Rubik's cube patterns anyone can do opens up a world of creativity and mental stimulation. From the geometric precision of the Checkerboard to the organic flow of the Snake, each pattern offers a unique challenge and reward. In 2026, the Rubik's Cube continues to evolve, serving as both a nostalgic classic and a modern tool for cognitive development.
Remember, the goal is not just to memorize algorithms but to understand the logic behind them. Take your time, practice regularly, and don't be afraid to make mistakes. Every scramble is an opportunity to learn. Whether you are in a bustling city or a quiet suburb, grab your cube and start creating. The only limit is your imagination. So, pick up your cube, follow these guides, and let the colors dance. Happy twisting!
FAQ: Common Questions About Cube Patterns
Q: Do I need a special Rubik's Cube to make these patterns?
A: No, any standard 3×3 Rubik's Cube will work perfectly fine. In fact, using a worn-out cube can sometimes make patterns easier to see if the stickers are faded, though a new cube with high-contrast colors is generally recommended for clarity.
Q: How long does it take to learn these patterns?
A: With consistent practice, most beginners can learn the simpler patterns like the Checkerboard and Cross within an hour. More complex patterns like the Snake or Cube in a Cube may take a few days to memorize comfortably.
Q: Can I make these patterns on a 2×2 or 4×4 cube?
A: You can attempt them, but the results will differ. The 2×2 lacks center pieces, making patterns like the Cross impossible in the traditional sense. The 4×4 has additional mechanics that allow for more complex variations, but the core algorithms for the 3×3 provide a great foundation.
Q: Are these patterns legal in speedcubing competitions?
A: Yes, creating pretty patterns is generally allowed in casual play and even some exhibition events. However, for official WCA competition solves, the cube must be returned to a solved state, and time is stopped only when the solver announces they are finished. Patterns are usually done during warm-ups or breaks.