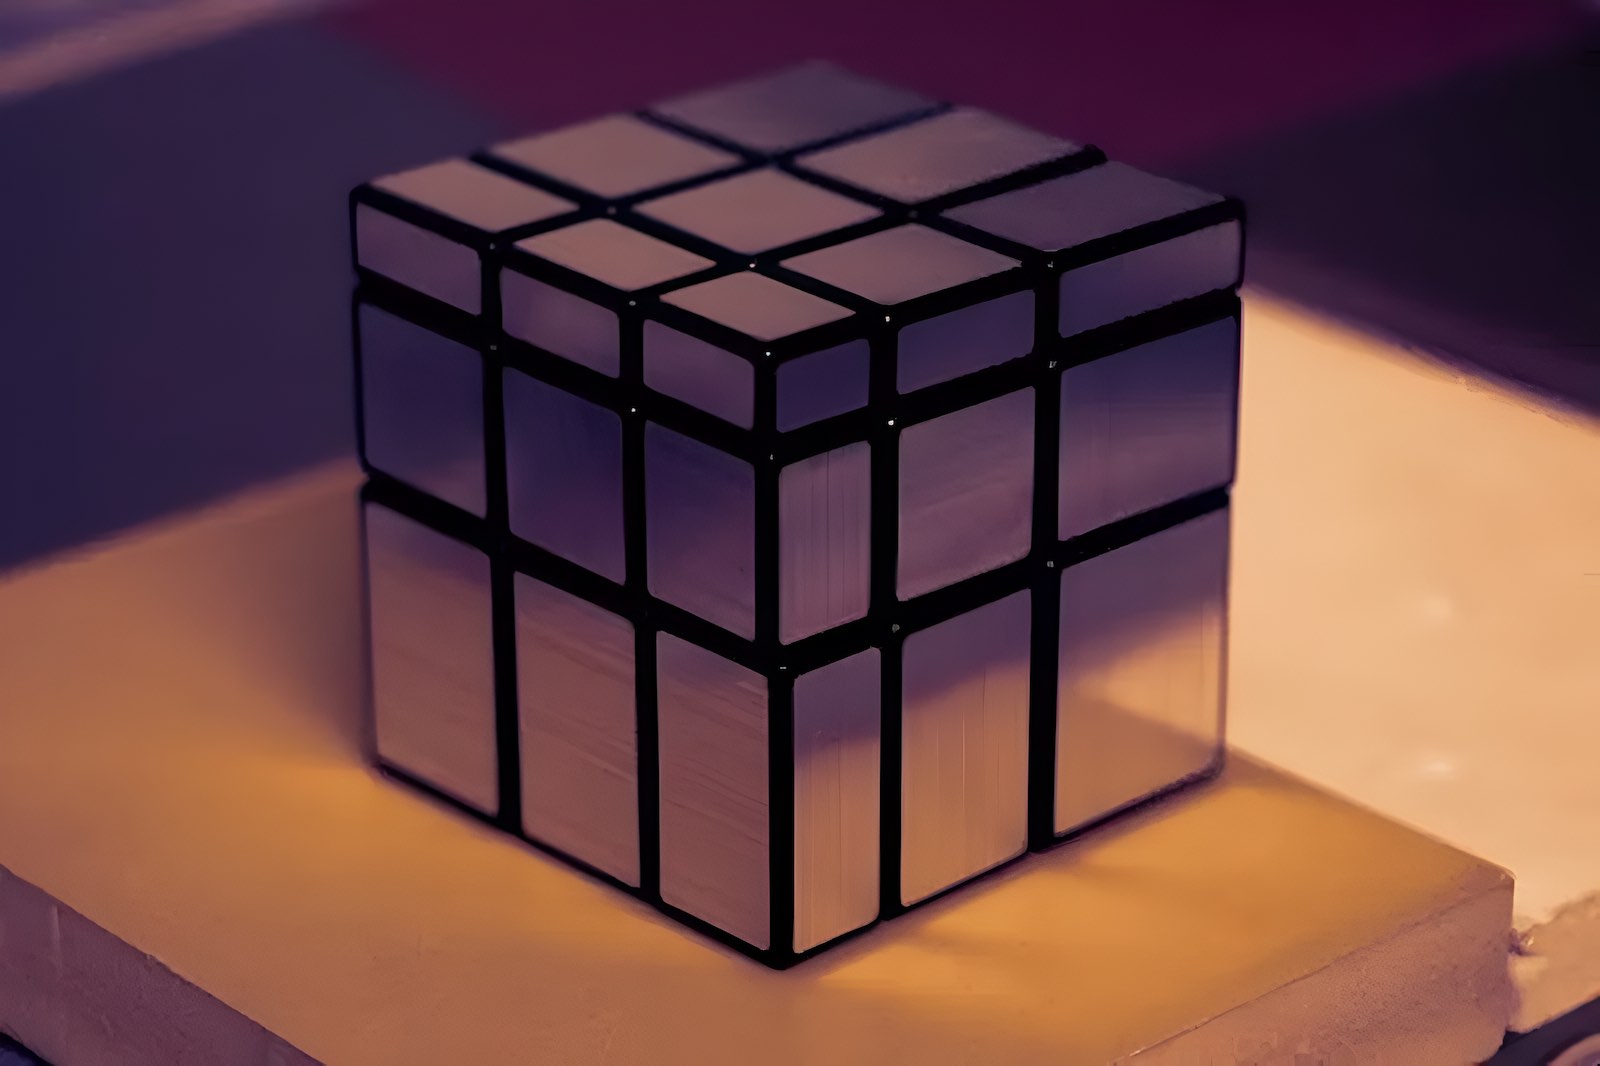
Are you ready to unlock the secrets of one of the most visually deceptive puzzles in existence? In 2026, the Mirror Cube remains a top choice for puzzle enthusiasts who want to challenge their spatial reasoning beyond standard color-matching. If you have ever stared at a jumbled, silver block and wondered, "How do I solve this?" you are in the right place. This comprehensive guide is designed specifically for beginners who want an easy, step-by-step path to mastering the Mirror Cube.
Unlike the classic Rubik's Cube where bright colors guide your eye, the Mirror Cube relies entirely on shape recognition and tactile feedback. It looks intimidating because it shifts into jagged, asymmetrical forms when scrambled, but the internal mechanism is identical to a standard 3×3. By the end of this article, you will understand exactly how to solve mirror cube easily for beginners without needing complex algorithms or years of practice. We will break down the logic, provide visual aids, and share pro tips used by speedcubers today.
Why the Mirror Cube Confuses Beginners (And How to Overcome It)
The primary reason beginners struggle with the Mirror Cube is a psychological barrier known as "color blindness." For over two decades, cubing education has trained our brains to look for Red next to Blue, or Green next to Orange. When you pick up a Mirror Cube, those visual cues vanish. Instead, you see a chaotic mess of silver bumps and dips.
The Psychology of Shape Recognition
When solving a standard 3×3, your brain processes information visually: "That red piece belongs here." With the Mirror Cube, the process must shift to spatial logic: "That tall piece needs to be between the two medium centers." This requires a different type of cognitive engagement. Research into puzzle-solving pedagogy suggests that shifting from visual pattern matching to dimensional analysis actually improves 3D spatial reasoning skills, making the puzzle not just a toy, but a brain-training tool.
The Myth of Difficulty
Many potential solvers abandon the Mirror Cube after one failed attempt, assuming it requires a completely new set of rules. This is a misconception. As noted by leading puzzle educators in 2026, if you can solve a standard 3×3 Rubik's Cube, you already know how to solve the Mirror Cube. The only variable that changes is your method of identification. The algorithms remain exactly the same; you simply apply them while looking at heights instead of stickers.
Understanding this distinction is the first step in your journey. Once you accept that the cube is just a 3×3 wearing a disguise, the fear dissolves, and the solution becomes clear. Let's dive into the mechanics that make this puzzle unique.
Understanding the Mechanics: Centers, Edges, and Corners by Size
To solve any puzzle, you must first understand its anatomy. On a standard cube, pieces are identified by color. On the Mirror Cube, pieces are identified by their physical dimensions. Every single piece on the cube has a unique size relative to its neighbors. There are no two pieces that are exactly the same height or width when the cube is solved.
The Center Pieces: Your Anchor Points
The center pieces are the most critical element of the Mirror Cube. Unlike edge and corner pieces, center pieces never move relative to each other. They define the fixed faces of the cube. However, unlike a standard cube where all six centers are flat and equal, the Mirror Cube centers have varying heights.
- The Largest Center: This is your anchor. It is usually opposite the smallest center.
- The Smallest Center: This sits directly opposite the largest.
- The Medium Centers: There are four centers of equal height, situated between the large and small ones.
Think of these centers as the foundation of a house. You cannot build the walls (edges) or the roof (corners) correctly if you don't know which way is "up." In the Mirror Cube, "up" is defined by the tallest block. When you hold the cube, identify the tallest center first. This will become your reference point for the entire solving process.
Edge Pieces: Tall vs. Short
The edge pieces sit between the centers. Their height tells you exactly where they belong. If you look at the solved state, the edges form a perfect line. When scrambled, they stick out like spikes.
- Tall Edges: These are the longest edge pieces. They must connect the Largest Center and the Smallest Center. If you see an edge that is taller than the medium centers but shorter than the largest, it belongs in the cross layer adjacent to the large/small centers.
- Short Edges: These are the shortest edge pieces. They connect the Medium Centers. There are eight of these in total. They form the bulk of the middle layer.
A common mistake beginners make is trying to match colors. Instead, use your fingers. Run your thumb along the edge. Does it feel flat against the center? Or does it protrude? That tactile sensation is your true guide.
Corner Pieces: The Three-Way Match
Corner pieces are perhaps the most confusing for novices because they interact with three centers simultaneously. Their size is determined by the combination of the three centers they touch.
- Largest Corner: Connects the Largest Center and two Medium Centers.
- Smallest Corner: Connects the Smallest Center and two Medium Centers.
- Medium Corners: Connect three Medium Centers. There are six of these.
Visualizing this can be tricky, but there is a simple rule: The corner size is always intermediate between the centers it touches. If a corner is touching a tall center and a short center, it will be of medium height. Mastering this hierarchy allows you to sort the chaos into order.
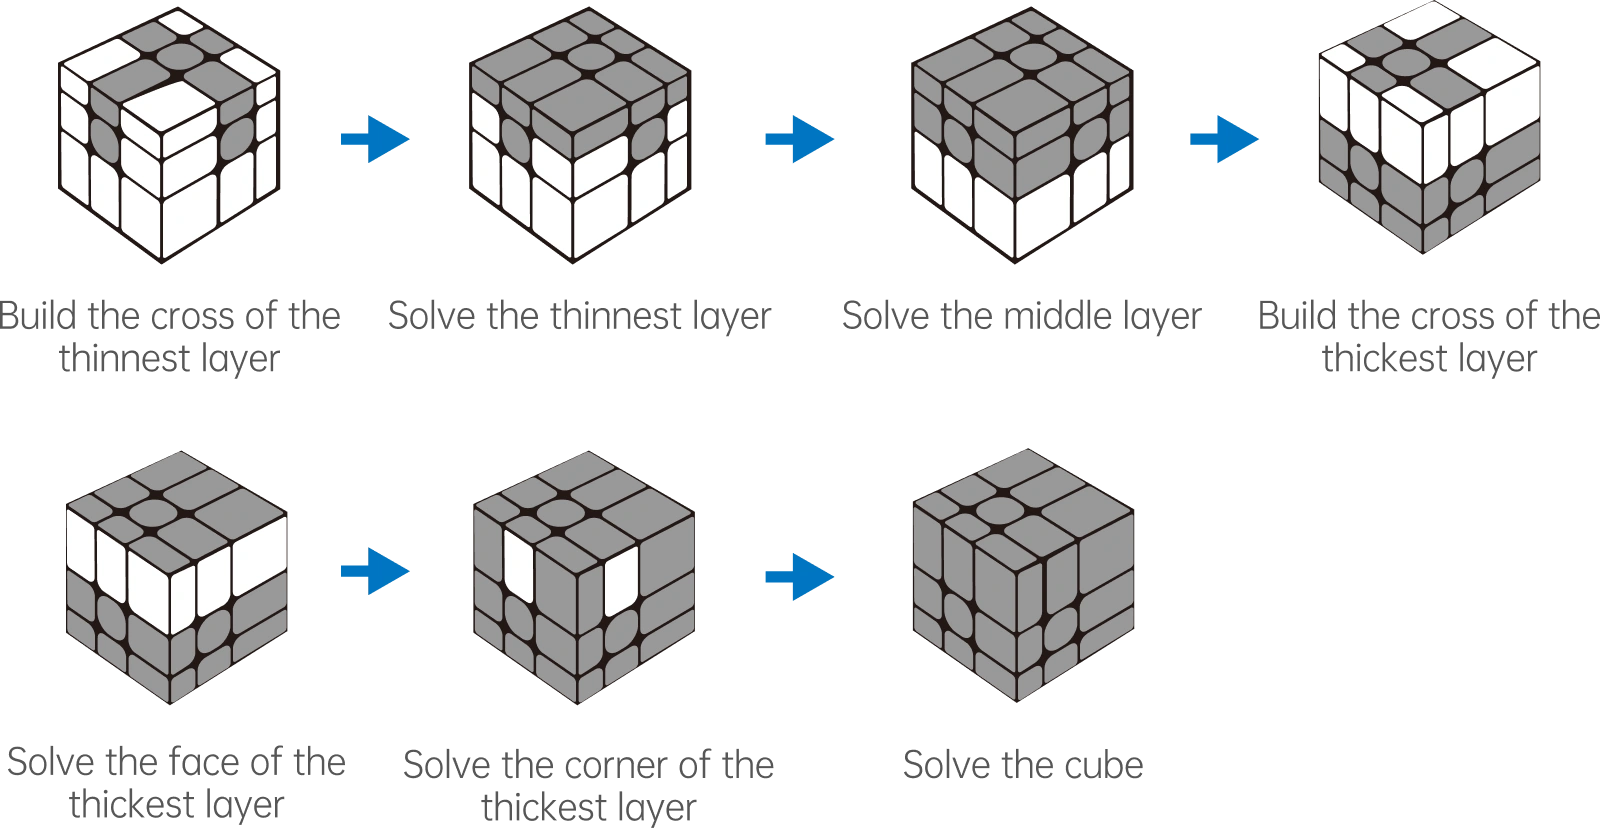
Step 1: Creating the Cross Using Height Logic
The first phase of solving the Mirror Cube is creating the Cross. On a standard cube, you look for white edges next to a white center. On the Mirror Cube, you are building a cross based on height alignment.
Choosing Your Starting Face
The most effective strategy for beginners is to start with the face containing the largest center piece. Why? Because the largest center is the easiest to spot immediately, even when the cube is scrambled. It acts as a lighthouse in a storm of silver shapes.
- Locate the Tallest Center: Hold the cube and find the single center piece that sticks out the furthest. Place this face on the bottom (or top, depending on your preference, but let's say bottom for consistency).
- Find the Matching Edges: You need to find the four edge pieces that connect the largest center to the other centers. These edges should be taller than the medium edges but fit perfectly flush against the largest center.
- Align the Heights: Rotate the layers until the tall edge pieces are positioned above the largest center. They should form a "plus" sign (+) shape when viewed from above.
- Check the Middle Layer: Ensure that the sides of these edge pieces also align perfectly with the medium centers below them. If an edge piece is sticking out sideways, it is in the wrong position.
The "Flatness" Test
A solved cross on a Mirror Cube isn't just about looking right; it feels right. Once you think you have the cross done, press down on the edge pieces. They should be completely flat against the center pieces. If there is any bump or dip where the edge meets the center, the cross is unsolved. This tactile check is crucial because the scrambled shape can sometimes trick your eyes into thinking pieces are aligned when they are slightly offset.
By completing this step, you have effectively solved the bottom layer's edges and established your orientation. You now have a solid base to build upon, just like in the CFOP method for standard cubes, but guided by geometry rather than hue.
Step 2: Solving the First Layer Corners with Tactile Precision
With the cross complete, your next goal is to insert the first layer corners. This completes the entire bottom layer, leaving only the middle and top layers unsolved. The algorithmic moves you use here are identical to the standard beginner method, but the selection process relies on size.
Identifying the Target Corner
Look at your largest center (the one you started with). The corner piece that belongs here must connect the largest center and two medium centers. Furthermore, this corner piece must be the largest corner available.
- Scan the Top Layer: Look for a corner piece that is larger than the medium corners but smaller than the largest center. Wait, that's confusing. Let's simplify: Find the corner that fits snugly between the largest center and the two adjacent medium centers.
- Positioning: Move this corner piece so it sits directly above its destination slot (between the largest center and the two side centers).
- Orientation Check: Before inserting, ensure the corner is oriented correctly. The part of the corner facing you should match the height of the side centers.
Executing the Insertion Algorithm
Once the corner is in the correct position above the target slot, use the standard Right Hand Algorithm to insert it:
R U R' U'
Repeat this sequence until the corner drops perfectly into place. You will feel a distinct "click" or a smooth flush when it locks into the correct slot. Repeat this process for all four corners of the first layer.
Verifying Your Work
After inserting all four corners, check the entire bottom layer. It should now resemble a perfect cube face, but made of varying heights. From the side, the bottom layer should look like a staircase that levels out into a flat plane. If any piece is sticking out, re-evaluate which corner you placed there. Did you pick the wrong size? Sometimes, a medium corner might look like it fits but actually disrupts the flow. Trust your tactile feedback over your vision.
Completing the first layer is a massive milestone. You have essentially solved half the puzzle. The remaining structure—the middle layer and the top layer—will now fall into place using familiar logic, once you adapt your view to the new reality of shapes.
Step 3: Solving the Middle Layer Using Standard Algorithms
Now comes the exciting part. Many beginners panic here, thinking they need new formulas. Stop panicking. The Middle Layer of the Mirror Cube uses the exact same algorithms as a standard 3×3 Rubik's Cube. The only difference is that you must identify which pieces belong in the middle layer based on their short height.
Identifying Middle Layer Edges
The middle layer consists entirely of short edge pieces. These are the edges that sit between two medium centers. They are distinctly shorter than the cross edges you solved earlier.
- Locate a Short Edge: Scan the top layer (the yellow face, if you imagine colors) for an edge piece that is short.
- Match Colors/Sides (Optional): While you can use color to help orient the piece initially, you don't have to. Focus on the shape. Is it short? Yes. Does it connect two medium-height centers? Yes. Then it belongs in the middle layer.
- Positioning: Rotate the top layer until the short edge is aligned with the correct center colors (if you are using color as a secondary guide) or simply positioned above its destination slot.
Applying the Insertion Algorithms
You have two scenarios for inserting the middle layer edge:
Scenario A: The edge needs to go to the Right
If the short edge needs to move to the right side of the middle layer, use the Right Insert Algorithm:
U R U' R' U' F' U F
Scenario B: The edge needs to go to the Left
If the short edge needs to move to the left side, use the Left Insert Algorithm:
U' L' U L U F U' F'
Notice the symmetry? These are the classic F2L (First Two Layers) algorithms. The beauty of the Mirror Cube is that once you recognize a "short" edge, the rest is muscle memory. You aren't learning new math; you are just applying old math to new objects.
Dealing with Misplaced Pieces
Sometimes, a short edge might be stuck in the top layer, or a tall edge might have fallen into the middle layer by mistake. If you encounter a situation where a piece is in the wrong layer entirely, perform one of the insertion algorithms anyway. This will often cycle pieces around until the tall edges rise back to the top and the short edges settle into the middle. Patience is key here. Keep rotating and applying the algorithms until the middle layer clicks into a flat, uniform shape.
Step 4: Mastering the Last Layer with Shape Recognition
The final stage is the most challenging because the cube looks the most chaotic. The top layer (often called the Yellow layer in color cubes) contains a mix of tall, medium, and short edges, plus various corners. Your goal is to restore the cube to a perfect cubic shape.
Step 4a: Forming the Top Cross
Just like the standard cube, you need to create a cross on the top face. However, on the Mirror Cube, the cross pieces will be tall edges.
- Identify the Pattern: Look at the top face. You might see a dot, an 'L' shape, or a line. These patterns are formed by the arrangement of tall edges.
- Orient the Edges: Use the standard F R U R' U' F' algorithm (the cross algorithm) to orient the edges. You may need to repeat this 1 to 3 times.
- The Goal: Get all four top edges to be tall enough to form a cross shape that matches the height of the centers below them. Remember, the centers are fixed, so your cross must align with them.
Step 4b: Permuting the Top Corners
Once the cross is formed, the corners might be in the wrong positions. You need to cycle them until every corner is between the correct centers.
- Find a Matched Corner: Look for two corners that are already in the correct position (even if they are twisted). If none exist, perform the algorithm once to create a match.
- Cycle the Corners: Hold the matched corner in the front-right position and use the Corner Cycle Algorithm:
R U R' U R U2 R' U2 - Repeat this until all corners are in their correct slots. You will feel the cube "snap" into place as the shapes align perfectly with the centers.
Step 4c: Orienting the Final Corners
This is the final hurdle. The corners might be in the right spot, but they might be twisted (rotated incorrectly). On a Mirror Cube, a twisted corner will look like it doesn't fit, creating a bump or a gap.
- Hold a Twisted Corner: Hold a corner that needs twisting in the front-right-top position.
- Apply the Orientation Algorithm: Perform the Corner Twist Algorithm:
R' D' R D(Repeat this 2 or 4 times until the corner is oriented correctly). - Rotate the Layer: Only rotate the top layer (
U) to bring the next misoriented corner to the front-right position. Repeat the algorithm. - Completion: Once all four corners are twisted correctly, the cube will instantly resolve into a perfect square. The jagged shapes will disappear, replaced by a smooth, symmetrical surface.
Pro Tips and Common Pitfalls to Avoid
Even with a clear guide, solving the Mirror Cube presents unique challenges. Here are some expert insights to help you refine your technique and avoid common traps.
Tip 1: Trust Your Hands, Not Just Your Eyes
In the early stages of learning, your eyes will lie to you. A piece might look like it fits but feel wrong when you try to turn it. Develop tactile sensitivity. Close your eyes for a second while holding the cube and feel the contours. Which piece is tallest? Which is shortest? Muscle memory develops faster than visual memory in shape-shifting puzzles.
Tip 2: Don't Forget the Centers
It is easy to get so focused on moving the edges and corners that you lose track of the centers. Remember: Centers never move relative to each other. If your largest center ends up on the side, your whole solution is flipped. Always keep an eye on the fixed faces to maintain your orientation.
Tip 3: Practice "Shape Visualization"
Before you even touch the cube, try to visualize the solved state. Imagine the cube as a pyramid of blocks. Visualize the tallest block at the bottom and the shortest at the top. This mental model helps you predict where pieces should go before you make a move.
Common Mistake: Ignoring the Scramble
Beginners often try to solve the cube layer by layer without considering the scramble. The Mirror Cube scrambles in ways that mix up the height hierarchy. Always take a moment to assess the global shape before starting Step 1. Identify the tallest and shortest centers immediately.
Tip 4: The Importance of Lubrication and Tuning
One often overlooked aspect of mastering the Mirror Cube is the physical maintenance of the puzzle itself. Unlike a standard Rubik's Cube where sticker friction can be managed easily, the Mirror Cube relies heavily on smooth, precise movements because your solving speed depends entirely on how quickly you can transition between shapes. If the cube feels gritty or sticks during a turn, your tactile feedback will be compromised, leading to frustration and errors.
For beginners, it is highly recommended to invest in a high-quality lubricant specifically designed for speedcubing puzzles. Silicone-based lubricants are generally preferred as they do not degrade plastic over time. Apply a small amount to the internal mechanisms and rotating axes. This reduces friction, allowing the layers to spin freely even when the cube is in a complex, jagged configuration. A well-lubed cube feels "alive" under your fingers, making it easier to execute algorithms smoothly without forcing the pieces.
Furthermore, consider tuning your cube. Many modern Mirror Cubes come with adjustable tension screws that allow you to tighten or loosen the core. If the cube feels too loose, pieces might wobble or fall out during aggressive moves. If it feels too tight, turning becomes exhausting and slows down your solve time. Finding the "sweet spot" where the cube turns crisply but holds its shape firmly is crucial for efficient solving. Spend five minutes adjusting your tension before attempting a full solve; the difference in performance will be immediately noticeable.
Advanced Strategy: Recognizing Parity Errors
As you progress from a beginner to an intermediate solver, you may encounter a phenomenon known as parity. In the context of the Mirror Cube, parity occurs when two edge pieces appear to be swapped in a way that cannot be fixed using standard 3×3 algorithms. This happens because the Mirror Cube, being a shape-shifting puzzle, can sometimes get into configurations that mimic a parity error on a color cube, even though the mechanism is identical.
If you find yourself stuck with only two edges swapped in the last layer, do not panic. This is a common occurrence when solving larger shape-shifting cubes. The solution involves a specific parity algorithm that is slightly different from the standard ones used earlier. While the exact formula varies depending on the cube brand (e.g., MoYu, GAN, QiYi), the logic remains consistent: you must perform a sequence of moves that effectively swaps two edges while leaving the rest of the cube intact.
The most common parity algorithm for the Mirror Cube looks like this:
Rw U2 Rw' U2 Rw U2 Rw'
(Note: Rw represents a wide move, turning both the outer right layer and the inner slice together.)
Understanding when and how to apply this algorithm transforms the Mirror Cube from a frustrating obstacle into a manageable challenge. It teaches you that every puzzle has a logical exception, and recognizing these exceptions is what separates a casual solver from a true master. Once you memorize this single sequence, you will never be stuck again, regardless of how scrambled the cube appears.
Troubleshooting: What to Do When You Get Stuck
Even with the best guides and practice, there will be moments when the Mirror Cube seems impossible to solve. This is normal. Every cuber, from world champions to hobbyists, faces plateaus where progress stalls. Here is a troubleshooting framework to help you break through these mental and mechanical blocks.
Scenario A: The Cube Won't Turn
If you try to make a move and the cube refuses to rotate, you likely have a piece caught in an illegal position. This usually happens if you forced a turn earlier in the solve.
- Solution: Stop immediately. Do not force it. Hold the cube firmly and gently wiggle the layers back and forth. Often, a slight misalignment of an edge or corner can jam the mechanism. Once you feel the resistance give way, re-scan the cube to ensure all pieces are seated correctly. If the problem persists, disassemble the cube and reassemble it in the solved state to reset your progress.
Scenario B: The Shape Looks Wrong After an Algorithm
You performed an algorithm, and suddenly the cube looks more chaotic than before. This is often due to misunderstanding which face is which after a rotation.
- Solution: Pause and identify your fixed centers. Did you accidentally rotate the whole cube in your hands, changing your reference point? Remember, the centers define the faces. If the largest center moved from the bottom to the side, your entire coordinate system has shifted. Reset your orientation by placing the largest center back on the bottom and realigning your cross before continuing.
Scenario C: Mental Fatigue and Loss of Focus
Solving the Mirror Cube requires intense concentration. After ten minutes of scrambling and unscrambling, your brain may start to fatigue, causing you to miss obvious shape cues.
- Solution: Take a deliberate break. Step away from the cube for two minutes. Look at something else, stretch your hands, and breathe. When you return, approach the cube with fresh eyes. Often, the solution becomes obvious once you stop staring intensely at the mess and step back to view the overall geometry.
Frequently Asked Questions (FAQ)
To further assist you on your journey to mastering the Mirror Cube, we have compiled answers to the most common questions asked by beginners in 2026.
Q1: Do I need a special cube to learn the Mirror Cube?
A: No, you do not need a specialized "Mirror Cube" to start learning. Any standard 3×3 Rubik's Cube can be converted into a mirror puzzle by removing the colored stickers and replacing them with plain white or silver stickers, or by simply painting over the colors. However, purchasing a genuine Mirror Cube is highly recommended for the long term. These cubes are manufactured with varying piece sizes from the factory, ensuring perfect symmetry and a smoother solving experience compared to DIY modifications.
Q2: Is the Mirror Cube harder than the standard Rubik's Cube?
A: Objectively, no. The difficulty lies purely in the cognitive shift required. If you already know how to solve a standard 3×3, the Mirror Cube is mathematically identical in terms of move count and complexity. The challenge is psychological: breaking the habit of looking for colors and training your brain to recognize height and volume. With practice, most people find the Mirror Cube just as intuitive as the color cube once the initial adjustment period passes.
Q3: How long does it take to learn to solve a Mirror Cube?
A: For a dedicated beginner practicing 30 minutes a day, you can typically solve the Mirror Cube for the first time within one to two weeks. The initial phase of understanding the size hierarchy usually takes a few days. Mastering the speed and fluidity of the solve, however, may take several months. Remember that consistency is more important than duration; solving one cube thoroughly each day is better than solving three cubes haphazardly in one session.
Q4: Can I use standard 3×3 algorithms for the Mirror Cube?
A: Yes, absolutely. In fact, 95% of the algorithms you use for a standard Rubik's Cube work exactly the same way for the Mirror Cube. The only exception is the parity algorithm mentioned earlier, which is specific to shape-shifting puzzles. As long as you understand where a piece belongs based on its size rather than its color, you can apply any standard F2L, OLL, or PLL algorithm directly.
Q5: Why does my Mirror Cube keep falling apart?
A: This is usually due to low quality construction or excessive force. Cheap Mirror Cubes often lack internal stabilizers, causing pieces to pop out when turned quickly. Additionally, if the cube is overtightened, the stress on the plastic can cause cracks. Ensure you are using a cube with a core mechanism designed for shape-shifting, and always turn the layers smoothly rather than snapping them into place. Regular lubrication also prevents wear and tear.
Conclusion: Your Journey Beyond the Silver Block
Congratulations on reaching the end of this comprehensive guide. You have now equipped yourself with the knowledge, strategies, and mindset necessary to tackle the Mirror Cube. By shifting your focus from visual color patterns to spatial shape recognition, you have unlocked a new dimension of puzzle-solving that challenges not just your dexterity, but your fundamental understanding of three-dimensional geometry.
Remember, the Mirror Cube is more than just a toy; it is a testament to the elegance of mechanical design and the power of logical reasoning. Every time you successfully align those jagged edges and watch the chaotic silver block transform into a perfect square, you are reinforcing neural pathways associated with problem-solving and spatial awareness. The satisfaction of solving a Mirror Cube is unique because it feels like magic—the illusion of order emerging from apparent chaos.
As you continue your practice, embrace the frustration. That feeling of confusion when a piece won't fit is actually the sound of your brain growing. It is the friction of learning that leads to mastery. Whether you aim to compete in speedcubing events or simply enjoy the meditative process of solving puzzles at home, the skills you develop with the Mirror Cube will serve you well in many aspects of life.
Start with the basics: locate the tallest center, build your cross, and trust your fingers. Progress at your own pace. There is no rush to be fast; the goal is to understand. Soon, you will find yourself solving the cube without consciously thinking about sizes, relying instead on instinct and muscle memory. That is the moment of true mastery.
So, pick up your Mirror Cube, scramble it up, and begin your journey. The silver block is waiting to reveal its secrets to you. With patience, practice, and the right approach, you too can become a master of the shape-shifters. Happy cubing!
Disclaimer: While this guide provides detailed instructions for beginners, individual results may vary based on cube quality and personal learning style. Always handle puzzles carefully to avoid injury or damage.