Welcome to the definitive guide for how to properly set up and tension a new Rubik's cube in 2026. If you are holding a brand-new speedcube, you likely know that out of the box, it feels either too stiff, like you are turning concrete, or too loose, threatening to pop apart with every turn. This initial state is normal, but it is not optimal. In the competitive cubing landscape of 2026, the difference between a sub-10-second solve and a sub-8-second solve often comes down to one critical factor: customized setup.
Whether you are a beginner looking to enjoy the puzzle without frustration or an aspiring competitor aiming for podium finishes in local tournaments across major hubs like London, Tokyo, or New York, mastering your cube's mechanics is non-negotiable. A well-tuned cube does more than just look good; it reduces physical fatigue, minimizes lock-ups, and maximizes your turns per second (TPS). This article will walk you through the exact steps used by world champions to transform a factory-default puzzle into a high-performance machine tailored specifically to your solving style.
Why Your New Cube Needs Immediate Customization
Most manufacturers ship cubes with a "safe" middle-ground tension. While this prevents popping during shipping, it rarely suits any individual solver perfectly. Every hand size, grip strength, and solving method (CFOP, Roux, ZZ) requires a unique balance of friction and spring force. Ignoring this customization means you are fighting your tool rather than working with it.
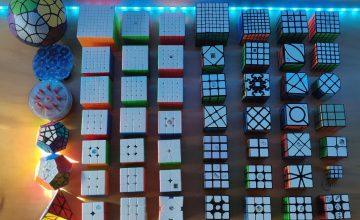
The modern speedcubing ecosystem has evolved significantly. We have moved past the era of simple plastic friction. Today's flagship puzzles feature dual-adjustment systems, magnetic levitation (MagLev), and interchangeable magnet capsules. Understanding how these components interact is the first step in your setup journey. According to industry experts in 2026, proper lubrication and tensioning can improve turning smoothness by up to 40%, directly correlating to faster average times in competitions.
Furthermore, a properly set-up cube lasts longer. Dust accumulation and dry plastic-on-plastic friction cause premature wear on the internal mechanisms. By cleaning and lubricating immediately upon unboxing, you protect your investment. Think of it as tuning a high-performance sports car before you take it on the track; skipping this step leads to poor performance and potential mechanical failure down the line.
Step-by-Step Deep Dive: Cleaning and Preparation
Before you even touch a screwdriver, you must prepare the cube. The phrase "out of the box" implies a cube that has been handled by logistics workers, stored in warehouses, and possibly exposed to varying temperatures and humidity levels. It may contain manufacturing oils, dust, or debris.
Disassembly Protocol
To achieve a truly professional setup, you need full access to the core. Start by removing the center caps. On most modern cubes, these snap off easily, but some older models or specific brands may require gentle prying. Once the caps are removed, you will see the adjustment screws underneath.
Next, carefully unscrew the six tensioning screws. Do not remove them completely unless you intend to swap springs or magnets later; simply loosen them enough to allow the layers to spin freely while you work. Remove all corner and edge pieces. At this stage, you should be left with only the central core structure. Keep these small parts organized in a tray so you don't lose them—a common mistake for beginners.
The Cleaning Process
Cleaning is arguably the most overlooked step in the setup process. Use a microfiber cloth to wipe down each plastic piece. Avoid using tissues or paper towels, as they can leave behind lint and fibers that act as abrasives inside the cube tracks. For hard-to-reach areas, such as the grooves where pieces slide, a soft-bristled toothbrush works wonders.
If you have access to isopropyl alcohol (70% concentration), you can use a cotton swab to clean the internal tracks of the core. This removes old factory grease and grime. However, be cautious; do not soak the plastic, and ensure the alcohol evaporates completely before reassembly. As noted in expert guides from leading puzzle retailers, getting the cube 90% clean is sufficient; perfection is not necessary at this stage, but thoroughness is key.
Mastering the Art of Lubrication
Lubrication is the secret sauce that turns a scratchy, slow-turning puzzle into a fluid, buttery-smooth experience. In 2026, the market offers a vast array of options, ranging from water-based lubes to heavy silicone greases. Choosing the right one depends on your preference for speed versus stability.
Types of Lubricants Explained
- Water-Based Lubricants: These are excellent for beginners. They offer very fast turning speeds initially but tend to dry out or get contaminated with dust quickly. They require frequent reapplication. Brands like Gan Lube or Cubelelo Water Lube are popular choices.
- Silicone-Based Lubricants: These are the gold standard for most speedcubers. They provide a long-lasting, smooth feel and resist dirt better than water-based options. Viscosities range from light (for tight cubes) to heavy (for loose cubes). Common grades include Grade 5 (heavy) and Grade 2 (light).
- Specialized Nanotech Lubricants: In recent years, advanced compounds like Nucleus or Superlube have gained traction. These offer superior durability and a unique "dry" feel that many professionals prefer for high-speed solves.
Application Technique
When applying lube, less is always more. Over-lubrication creates a thick layer of grease that slows the cube down and attracts dust, creating a gunk-like paste over time. Apply a single drop to the core grooves and the contact points of the screws. For the pieces themselves, apply a tiny amount to the ridges and edges that slide against each other.
Focus on the inner tracks of the center pieces and the bearing surfaces of the corners and edges. Rotate the layers manually after application to distribute the lube evenly. If the cube feels sticky after a few minutes, you have applied too much; disassemble and wipe away the excess. Remember, the goal is a thin, invisible film that reduces friction without adding drag.
Understanding Modern Tension Systems: Axis vs. Elasticity
This is where the science of cubing meets art. In 2026, understanding the two distinct pillars of tension—Axis Distance and Elasticity—is crucial for optimizing performance. Many solvers confuse these two concepts, leading to suboptimal setups.
Axis Distance (Center Travel)
Axis distance refers to how far the center pieces can move away from the core before hitting the limit stops. This setting primarily affects your ability to corner cut.
- Loose Axis: Allows the layers to separate further. This is ideal for aggressive corner cutting, allowing you to turn multiple layers at once even if they aren't perfectly aligned. However, if set too loose, the cube feels "floppy," lacks stability, and is prone to popping under pressure.
- Tight Axis: Keeps the centers closer to the core. This increases stability and makes the cube feel solid, reducing the chance of accidental pops. However, it requires precise alignment to turn layers, which can slow you down if you make a slight error.
For most competitors, a slightly loose axis is preferred to facilitate rapid, multi-layer turns, provided the cube doesn't pop.
Elasticity (Spring Compression)
Elasticity determines the force the spring exerts to push the layers back into their square shape after you turn them. This is often adjusted via a clicking nut or gear system on modern cubes.
- Weak Elasticity: The cube feels light and effortless. Turns happen instantly with minimal finger input. This is great for high TPS but can lead to a lack of control, making it hard to stop layers precisely.
- Strong Elasticity: The cube feels "snappy" and resistant. It provides strong feedback, helping you feel when a layer is fully aligned. This improves accuracy but can tire your fingers faster during long solving sessions.
Finding the sweet spot between Axis and Elasticity is a personal journey. What works for a solver in Los Angeles might differ from what works for a solver in Berlin due to different environmental conditions and personal styles.

The Magnetic Revolution: MagLev and Adjustable Magnets
One of the most significant advancements in 2026 is the widespread adoption of magnetic technology. Traditional spring-based tensioning is being supplemented, and in some cases replaced, by magnetic systems.
How MagLev Works
Instead of a steel spring pushing against a screw, MagLev cubes use pairs of opposing magnets. One magnet is fixed to the core, and the other is embedded in the moving layer. When you turn a layer, you are overcoming the magnetic resistance. When you release, the magnets snap the layer back into place.
This system eliminates "spring noise" (that annoying metallic squeak) and removes the mechanical friction of metal-on-metal contact. The result is a cube that feels incredibly fast and smooth, often described as "floating." For solvers in noisy environments or those who prefer silent solving, MagLev is a game-changer.
Tuning Magnetic Strength
While MagLev removes the traditional spring, it introduces magnet strength as a variable.
- Stronger Magnets: Provide better alignment and a satisfying "click" sensation. This helps with recognition and control, especially for blindfolded solving or complex algorithms.
- Weaker Magnets: Allow for quicker, more effortless turns with less finger effort. This is beneficial for solvers who rely on momentum and high speed.
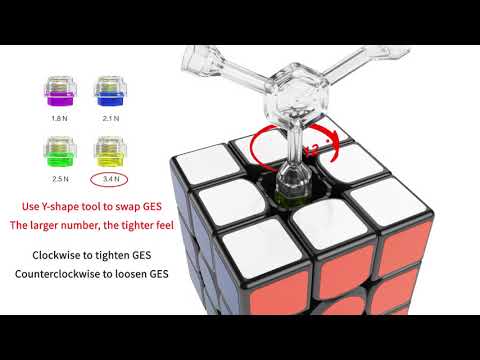
Many flagship cubes now come with interchangeable magnet capsules. This allows you to swap the magnets without taking the whole cube apart. If you find your cube turning too slowly, try swapping to a weaker capsule. If it feels unstable, switch to a stronger one. This modularity gives you unprecedented control over your setup.
Balancing Act: Achieving Uniform Tension Across All Sides
A common pitfall for new tuners is adjusting one side tighter than the others, resulting in a cube that turns unevenly. You might find that the Right face spins smoothly while the Left face feels gritty or stuck. This inconsistency kills flow state.
The Equalization Method
To ensure uniformity, follow this iterative process:
- Start Loose: Loosen all six screws significantly. This gives you a baseline where the cube moves freely.
- Incremental Tightening: Tighten the screws in small increments (quarter-turns or half-turns). Do not overtighten immediately.
- The Pull Test: After adjusting a pair of opposite sides (e.g., Top and Bottom), grab the four corner pieces of those faces with your thumbs and index fingers and pull them apart. The resistance should feel identical on both sides. If one side feels tighter, loosen it slightly until the tension matches.
- The Corner Cut Test: Attempt to corner cut at 45 degrees. The cube should allow the layers to slip past each other effortlessly without popping. If it pops frequently, loosen the axis slightly. If it locks up easily, tighten it.
Repeat this process for all three axes (Top-Bottom, Left-Right, Front-Back). The goal is symmetry. A perfectly balanced cube will feel consistent regardless of which direction you are turning. This consistency builds muscle memory and reduces cognitive load during a solve.
Advanced Tuning for Competitive Solvers
Once you have mastered the basics, you can dive into advanced tuning techniques used by top-tier competitors. These adjustments target specific aspects of performance for maximum efficiency.
Spring Swapping
Some enthusiasts go beyond the stock springs included with the cube. High-quality aftermarket springs, such as those from SpeedCubeShop or Cuber's Haven, offer different wire gauges and coil densities. A thicker spring provides more resistance (stronger elasticity), while a thinner spring offers lighter tension. Swapping springs allows you to fine-tune the cube's feel without changing the screw depth.
Magnet Capsule Customization
As mentioned earlier, many 2026 models allow you to customize magnet strength independently of the axis tension. Some solvers prefer a "hybrid" approach: using stronger magnets for better alignment on the cross and F2L stages, while keeping weaker magnets for the last layer where speed is paramount. Experiment with different combinations to see what yields the best results for your specific method.
Environmental Considerations
Your setup should also account for your local environment. Humidity and temperature affect plastic expansion and lubricant viscosity.
- Hot/Humid Climates (e.g., Miami, Singapore): Lubricants can become too runny, causing the cube to feel sloppy. Consider using a slightly heavier grease or tightening the axis marginally.
- Cold/Dry Climates (e.g., Moscow, Calgary): Plastic becomes brittle, and lubricants thicken. You may need to loosen the tension slightly and use a lighter lube to maintain smoothness.
Regular maintenance is key. Re-lubricate and re-tension your cube every few months, or immediately after dropping it or exposing it to extreme conditions.
Troubleshooting Common Setup Issues
Even with careful setup, issues can arise. Here is how to diagnose and fix the most common problems.
Problem: The Cube Pops Frequently
Cause: The axis is too loose, or the magnets are too weak to hold the layers together under stress.
Solution: Tighten the tension screws incrementally. If using a MagLev cube, try installing stronger magnet capsules. Ensure you are not forcing corners that are misaligned.
Problem: The Cube Feels Stiff and Slow
Cause: The axis is too tight, the lubricant has dried out or is too viscous, or there is debris in the tracks.
Solution: Loosen the screws. Clean the cube thoroughly and reapply fresh lubricant. If the lube is too thick, switch to a lighter grade.
Problem: Inconsistent Turning Between Faces
Cause: Uneven tension settings.
Solution: Perform the "pull test" again on all sides. Adjust until the resistance feels identical in every direction. Check for warped pieces or damaged bearings if the issue persists despite equal tension.
Problem: Excessive Noise
Cause: Metal-on-metal friction in spring-based cubes or dry plastic contacts.
Solution: Apply more lubricant to the contact points. If the noise is a metallic squeak in a spring cube, consider upgrading to a MagLev system or adding a dampening pad under the center caps.
Conclusion: Elevate Your Cubing Experience in 2026
Setting up and tensioning a new Rubik's cube is not just a maintenance task; it is an essential skill that unlocks the full potential of your puzzle. By following the steps outlined in this guide—from thorough cleaning and strategic lubrication to mastering the dual-adjustment systems of modern speedcubes—you can transform a generic toy into a precision instrument.
Remember, there is no single "perfect" setup. The ideal configuration is deeply personal, influenced by your hand size, solving style, and even the weather outside your window. Take the time to experiment. Spend an afternoon tweaking screws, swapping springs, and testing different magnet strengths. The process itself is part of the joy of cubing.
In 2026, the barrier to entry for high-level cubing has never been lower, thanks to innovative technologies like MagLev and modular adjustments. However, technology alone won't win you medals. It is the synergy between your skill and your well-tuned cube that leads to breakthrough moments. Whether you are competing locally in your city or striving for a world record, a properly set-up cube is your greatest ally. So, grab your screwdriver, hit the lubricant bottle, and start tuning. Your fastest solve is waiting just around the corner.
Frequently Asked Questions (FAQ)
Q: How often should I lubricate and tension my Rubik's cube?
A: For optimal performance, it is recommended to lubricate and tension your cube every 3 to 6 months. However, if you solve daily or compete frequently, monthly maintenance is advisable. Always re-lubricate immediately after dropping the cube or exposing it to dust and moisture.
Q: Can I tension a MagLev cube the same way as a spring cube?
A: Not exactly. While you still adjust the axis distance via screws on MagLev cubes, the primary tension control comes from the magnet strength. You cannot replace springs in a pure MagLev system. Instead, you swap magnet capsules to alter the resistance. Always refer to the specific manual for your MagLev model.
Q: My cube keeps popping when I try to corner cut. What should I do?
A: This usually indicates that the axis distance is too loose. Try tightening the tension screws in quarter-turn increments until the popping stops. Alternatively, check if your magnets are too weak (if applicable) and upgrade to stronger ones. Ensure you are not forcing the turn; align the layers as best as possible before attempting the cut.
Q: Is it better to have a loose or tight cube for speedcubing?
A: Most competitive solvers prefer a slightly loose axis for better corner cutting and faster turns, paired with moderate elasticity for control. A tight cube offers stability but can slow you down due to increased friction and the need for perfect alignment. Find the balance that prevents popping while allowing smooth, rapid rotation.