Welcome to the definitive guide on solving the world's most famous puzzle. If you are reading this in 2026, you likely know that while speedcubing has evolved into a high-tech sport with sub-10-second solves, the foundation remains the same: understanding the Rubik's Cube algorithms for beginners explained easy. Whether you bought your first cube at a local shop in Chicago, found one in a thrift store in London, or received it as a gift from a tech-savvy relative, this guide is designed to take you from a scrambled mess to a solved masterpiece in under an hour of practice.
The journey of mastering the 3×3 cube is not about memorizing thousands of complex sequences immediately. It is about understanding logic, pattern recognition, and a specific set of beginner-friendly algorithms that build upon each other. By the end of this article, you will have the tools to solve the cube layer-by-layer, a method that has stood the test of time and remains the gold standard for new solvers today. We will break down every move, explain the notation clearly, and provide the exact steps you need to succeed.
Understanding the Core Concepts Before You Start
Before diving into the specific algorithms, you must understand the anatomy of the puzzle. Many beginners fail because they try to solve "faces" instead of "layers." To master the cube, you need to internalize three fundamental principles that govern every single turn you make.
The Fixed Center Pieces
The most critical rule of the Rubik's Cube is that the center pieces never move. There are six centers (one for each color: white, yellow, red, orange, blue, green). They are attached to the core mechanism. This means if the center piece is white, that entire face will always be white when the cube is solved.
- Why this matters: When you see a white sticker next to a red sticker, you know that edge belongs between the White center and the Red center. You don't need to guess; the centers tell you exactly where colors belong.
- Visual Reference: Imagine the centers as the anchors of a ship. No matter how much the waves (the layers) move, the anchor stays put.
Layer-by-Layer vs. Face-by-Face
A common mistake for newcomers is trying to solve the entire White face first, then the Yellow face, ignoring the sides. This approach almost always leads to frustration.
- The Correct Approach: Solve the cube layer by layer. First, you solve the bottom layer (including the side edges), then the middle layer, and finally the top layer.
- Efficiency: By solving layer by layer, you ensure that once a piece is placed correctly, it stays there. You aren't constantly breaking apart your progress.
The Three Types of Pieces
To navigate the algorithms, you must identify the three types of movable pieces:
- Centers (6): Fixed in position, define the color of the face.
- Edges (12): Two-colored pieces located between centers.
- Corners (8): Three-colored pieces located at the intersections of faces.
Understanding these distinctions helps you predict where a piece will go after you apply an algorithm. For instance, an algorithm that moves corners will rarely disturb the edges unless specifically designed to do so.
Decoding the Language: Rubik's Cube Notation Explained
You cannot learn algorithms without learning the language they are written in. This is called Cube Notation. Think of it as the alphabet of cubing. Every algorithm you will ever learn is a sentence written in this language. If you can read the notation, you can follow any tutorial in the world, regardless of the creator's location—from a speedcuber in Tokyo to a hobbyist in Toronto.
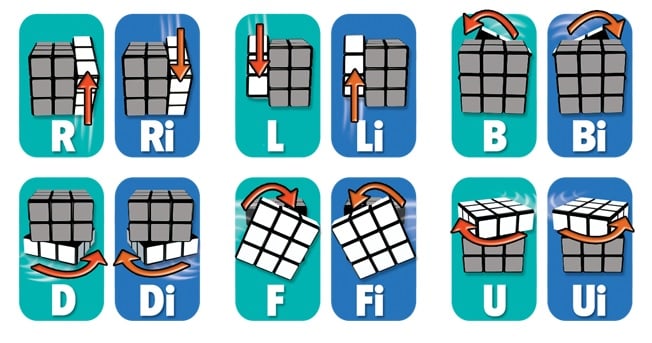
The Six Faces
Each face of the cube is represented by a single letter:
- F = Front (the face you are looking at)
- B = Back (opposite the front)
- R = Right (your right hand side)
- L = Left (your left hand side)
- U = Up (the top face)
- D = Down (the bottom face)
Direction Matters: Clockwise vs. Counter-Clockwise
In standard notation, a letter by itself means a 90-degree clockwise turn. However, sometimes you need to turn a face counter-clockwise. How do we denote that? We use an apostrophe (') or sometimes the number 3 (though the apostrophe is standard in 2026 guides).
- R: Turn the Right face clockwise.
- R': Turn the Right face counter-clockwise.
- U: Turn the Up face clockwise.
- U': Turn the Up face counter-clockwise.
Half Turns
Sometimes you need to spin a face halfway around (180 degrees). This is denoted by the number 2. Interestingly, the direction doesn't matter for a half turn; turning 180 degrees clockwise is the same as turning 180 degrees counter-clockwise.
- R2: Turn the Right face 180 degrees.
- U2: Turn the Up face 180 degrees.
Putting It Together: Reading an Algorithm
Let's look at a simple sequence: R U R' U'.
- R: Rotate the Right face clockwise.
- U: Rotate the Up face clockwise.
- R': Rotate the Right face counter-clockwise.
- U': Rotate the Up face counter-clockwise.
This specific sequence is known as the "Sune" or part of the OLL (Orientation of Last Layer) algorithms. Notice how the moves cancel each other out partially? That is the beauty of algorithms; they move pieces into place without destroying what you've already built.
Mastering this notation is the first step toward fluency. Spend five minutes just rotating your cube according to these letters until the muscle memory kicks in. Your fingers will start to remember that "R" means twisting right, even before you consciously think about it.
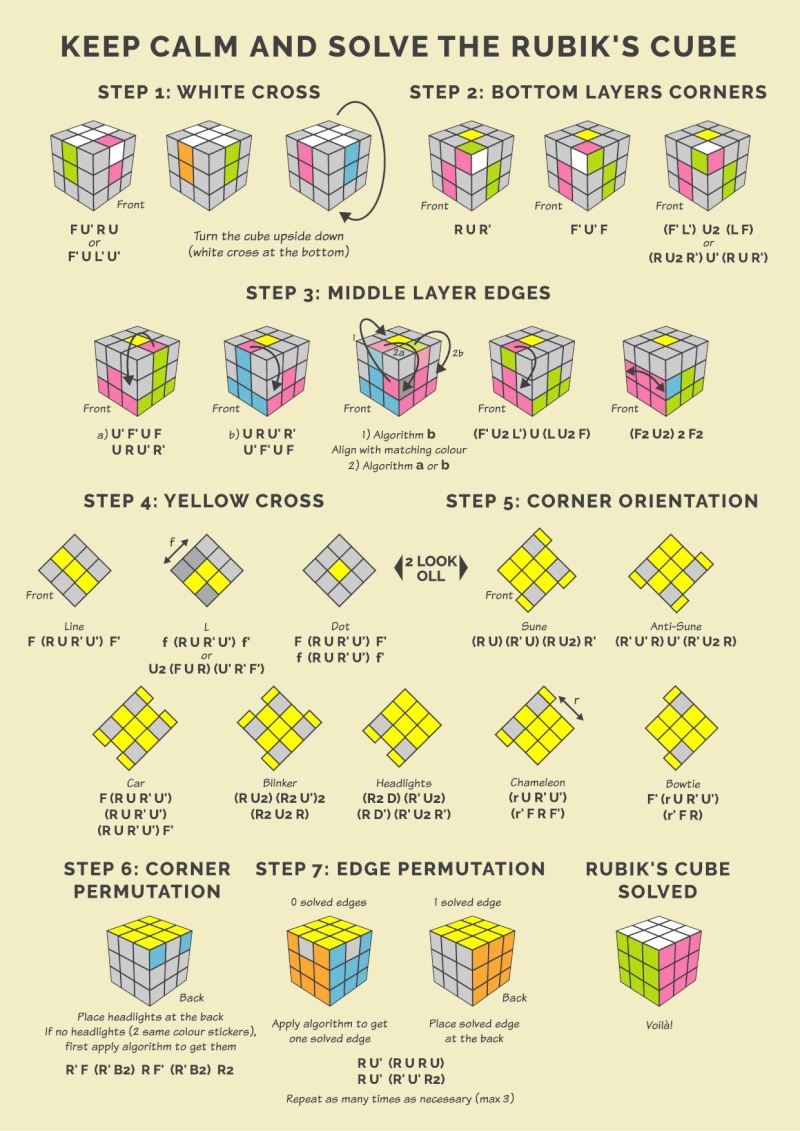
Step 1: Creating the White Cross (Intuitive Solving)
The first stage of the Beginner's Method is creating the White Cross. Unlike later stages, this step requires no algorithms. It relies entirely on intuition and visual matching. The goal is to create a plus sign (+) on the white face, ensuring that the side colors of the edge pieces match the center pieces of the adjacent faces.
Why Start with White?
While you can start with any color, consistency is key. In 2026, the global standard is to start with White on the Bottom. Why? Because it allows you to flip the cube easily when moving to the next stage. If you solve White on the bottom, the Yellow cross will naturally end up on the top, which is where we want it for the final steps.
The Process
- Locate White Edges: Find the four edge pieces that have white on them. These pieces also have a second color (e.g., White-Red, White-Blue).
- Match Centers: Look at the center piece of the face that matches the second color. For example, if you have a White-Red edge, find the Red center.
- Position the Edge: Move the edge piece so it sits between the White center and the Red center.
- If the white sticker is on the side, rotate the bottom layer (D) or middle layer to bring it under the correct spot.
- Once aligned, perform a simple turn to bring it up to the top layer.
- Check Alignment: Ensure the non-white color of the edge aligns perfectly with its corresponding center. If the Red center is on the Right, the Red sticker on the edge must face Right.
Common Mistakes to Avoid
- Breaking the Cross: Do not force a piece into place if it disrupts an already matched edge. Take it back to the bottom layer and try a different angle.
- Ignoring Side Colors: A white cross is useless if the sides don't match. Always check the second color against the center before considering the edge "solved."
Once you have all four white edges forming a cross with matching side colors, you have successfully completed Stage 1. This usually takes less than two minutes for a beginner who pays attention to detail.
Step 2: Solving the White Corners (Completing the First Layer)
Now that the White Cross is done, it's time to fill in the corners to complete the entire White face. This is often the first point where beginners feel stuck, but the algorithm required here is incredibly simple and repetitive.
The Goal
Insert the four corner pieces (which have three colors: e.g., White-Red-Blue) into their correct slots. A slot is the space between three centers. When inserted correctly, the white sticker should be on the bottom (completing the layer), and the other two stickers should match the adjacent side centers.
The Magic Algorithm: R U R' U'
This is the most important algorithm for a beginner. Often called the "Right Hand Trigger" or simply the "Corner Insertion Algorithm," it moves a corner from the bottom layer up to the top layer without disturbing the white cross you just made.
How to Execute:
- Find the Corner: Locate a white corner piece in the bottom (D) layer.
- Position Below: Rotate the bottom layer (D) so the corner is directly below where it needs to go (between the two matching centers).
- Apply the Sequence: Perform the moves R U R' U' repeatedly.
- R: Right face up.
- U: Up face right.
- R': Right face down.
- U': Up face left.
- Repeat: Keep repeating this sequence until the white corner pops into place correctly. You might need to do it 2, 3, or even 4 times depending on the starting orientation.
Visualizing the Movement
Imagine the algorithm acts like a conveyor belt. It lifts the corner out of the bottom layer, twists it into the correct orientation, and drops it back down into the solved position. As long as you keep the white corner below its target slot, this algorithm is safe to use endlessly.
Once all four white corners are inserted, the entire first layer (bottom face + side strips) will be solved. Flip the cube over so the solved white face is now on the bottom, and the unsolved yellow face is on top. You are ready for Stage 3!
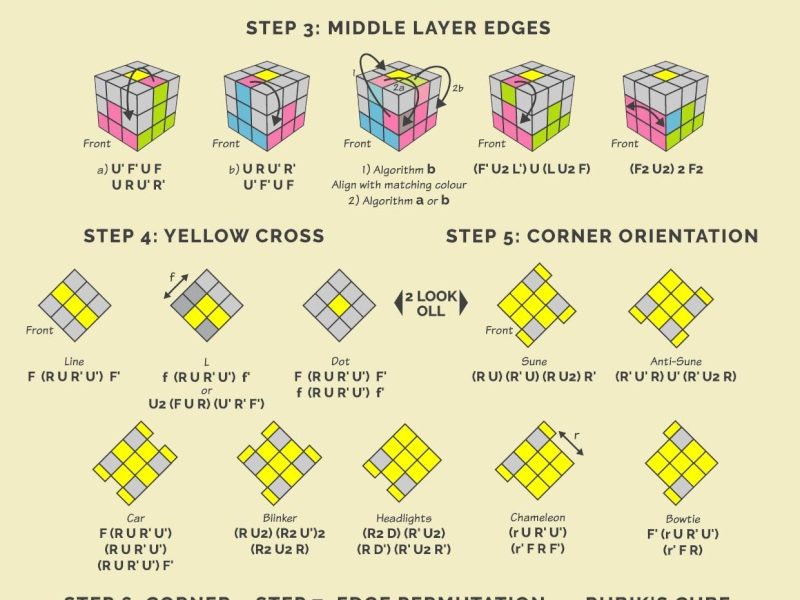
Step 3: Solving the Middle Layer Edges
With the first layer complete, your attention shifts to the Middle Layer. There are four edge pieces remaining in this layer (they were hidden underneath the white corners). Your goal is to insert them between the correct center pieces to form a solid band around the cube.
Identifying the Target
Look at the top (Yellow) layer. Find an edge piece that does not have yellow on it. For example, a Blue-Red edge.
- Check which centers it belongs between. If Blue is on the Left and Red is on the Right, that edge belongs in the middle layer between those two faces.
- Rotate the top layer (U) until the edge piece aligns with its target center color on the side.
The Two Scenarios
Depending on which way the edge needs to go, you will use one of two algorithms. The difference lies in whether the piece needs to move to the Right or to the Left.
Scenario A: Moving to the Right
If the edge piece needs to move from the top layer into the right side of the middle layer:
- Align the piece so the "front" color matches the front center.
- Apply this algorithm: U R U' R' U' F' U F
- This sequence pushes the piece into the right slot while preserving the solved first layer.
Scenario B: Moving to the Left
If the edge piece needs to move into the left side of the middle layer:
- Align the piece similarly.
- Apply the mirror algorithm: U' L' U L U F U' F'
- Notice the symmetry? It's the exact opposite of the right-side algorithm.
Troubleshooting Stuck Pieces
Sometimes, you will find an edge piece in the middle layer that is already solved but flipped the wrong way, or you might find no suitable yellow-free edges in the top layer.
- The Fix: If you can't find a piece, intentionally insert a yellow-edge piece from the top layer into the middle layer using one of the algorithms above. This will "scramble" the middle layer slightly but bring a new, usable edge to the top layer for you to solve. Repeat until all four middle edges are placed.
By the end of this step, you will have two fully solved layers: the White bottom and the colored middle band. The cube will look like a sandwich with the filling exposed on top.
Step 4: Creating the Yellow Cross (Last Layer Orientation Part 1)
Now comes the transition to the final layer. The bottom two layers are done; we only care about the Top (Yellow) face now. The first task is to ignore the corners for a moment and focus solely on the edge pieces to form a Yellow Cross.
There are three possible patterns you might see on the top face before starting:
- The Dot: No yellow edges are connected.
- The Line: Two yellow edges are connected horizontally.
- The L-Shape: Two yellow edges are connected vertically (like an elbow).
The Universal Algorithm
Regardless of which shape you see, you use the same algorithm to progress toward the cross:
F R U R' U' F'
Executing the Steps
- From a Dot: Hold the cube so the dot is in the center. Perform the algorithm once. You will get an L-Shape. Rotate the top layer (U) so the L-shape looks like an elbow pointing to the top-left. Perform the algorithm again. You will get a Line. Rotate the top layer so the line is horizontal. Perform the algorithm a third time, and you will have the Yellow Cross.
- From a Line: Position the line horizontally (left-to-right). Perform the algorithm once to get the Cross.
- From an L-Shape: Position the L-shape so it looks like the top-left corner of a clock (10 o'clock position). Perform the algorithm once to get the Line, then repeat as described above.
Why This Works
This algorithm manipulates the edge pieces of the top layer in a cycle. It effectively swaps edges around the perimeter until they align to form the plus sign. Don't worry about the corners yet; they will fall into place naturally as you refine the edges.
Step 5: Aligning the Yellow Edges (Permuting Last Layer Edges)
Congratulations! You now have a Yellow Cross. However, the colors on the sides of these yellow edges probably don't match the side centers yet. For example, the front edge might be Yellow-Blue, but the center below it is Red. We need to swap the edges until all four match their respective centers.
The Goal
We need to cycle the edge pieces around the top layer until every edge color matches the center color below it.
The Algorithm
Use this specific sequence to permute the edges:
R U R' U R U2 R' U2
(Note: Some beginners prefer the simpler "Sune" variant for edges, but the algorithm above is the standard for the beginner method to ensure stability.)
Execution Strategy
- Check Matches: Look at the top layer. Are any edges already correct?
- If Yes: Hold the cube so the correct edge is at the Back.
- If No: Perform the algorithm once. This will scramble the edges slightly, but when you check again, you will likely find one edge is now correct.
- Repeat: Place the newly correct edge at the back and repeat the algorithm.
- Completion: After 1 or 2 iterations, all four yellow edges will align perfectly with the side centers.
At this stage, the top face should be yellow, and the side colors of the top layer should form a solid ring matching the middle layer. The only thing left is to fix the orientation of the yellow corners.
Step 6: Positioning the Yellow Corners (Permuting Last Layer Corners)
Now we tackle the corners. Even though the yellow face is solid yellow, the corners might be in the wrong spots. For instance, a White-Red-Blue corner might be sitting between the Red and Blue centers, but it's actually the corner that belongs between Green and Orange.
The Goal
Move the corners to their correct locations without worrying about which way they are facing yet. We just want the set of colors to be in the right neighborhood.
The Algorithm
This algorithm cycles three corners clockwise while leaving the fourth alone:
U R U' L' U R' U' L
How to Use It
- Scan for Matches: Look at the top layer corners. Is there any corner that is already in the correct position (even if twisted)?
- If Yes: Hold the cube so that correct corner is at the Front-Right-Up position.
- If No: Perform the algorithm. It will guarantee that at least one corner ends up in the correct spot.
- Align and Repeat: Once you have one correct corner, move it to the Front-Right-Up spot and run the algorithm again.
- Finish: Repeat until all four corners are in their correct geometric positions. The colors should now match the three adjacent centers (e.g., the corner between Red, Green, and Blue centers should actually be there).
This step is crucial because it sets up the final twist. You cannot orient the corners correctly until they are in the right places.
Step 7: Orienting the Yellow Corners (The Final Solution)
You are on the home stretch! The cube looks almost solved, but the yellow stickers on the corners are still facing sideways or down. We need to rotate them so the yellow face is complete.
The "Doggy Ear" Technique
Don't worry about complex names. Just look for a corner that has a yellow sticker facing sideways (not up, not down). This is often called a "doggy ear."
The Master Algorithm
The algorithm to twist corners is deceptively simple but powerful:
R' D' R D
The Process
- Isolate a Corner: Hold the cube so the unsolved corner is at the Front-Right-Up position.
- Twist: Perform R' D' R D repeatedly.
- You will notice the yellow sticker moves: Side -> Down -> Side -> Up.
- Keep doing the sequence until the yellow sticker faces Up.
- Rotate the Layer: Once the yellow is up, only rotate the top layer (U) to move the next unsolved corner to the Front-Right-Up spot. Do not touch the bottom layers!
- Repeat: Twist the new corner until yellow is up. Then rotate U again for the next corner.
- Caution: As you twist the last few corners, you might temporarily mess up the yellow cross or the side colors. This is normal! The algorithm is designed to fix the orientation of one corner at a time while disrupting others, which you then fix in subsequent steps.
The Finish
After twisting all four corners, the cube will magically snap into a fully solved state. The yellow face will be solid yellow, and the side colors will align perfectly with the centers. Congratulations! You have solved the Rubik's Cube using the Beginner's Method.
Advanced Tips for Speed and Consistency
Now that you can solve the cube, you might wonder how to get faster. While the Beginner's Method is great for learning, serious solvers eventually move to methods like CFOP (Cross, F2L, OLL, PLL). However, even within the beginner method, there are ways to improve.
Finger Tricks
Instead of using your whole wrist to rotate layers, try using your index, middle, and thumb fingers.
- R move: Flick the right face with your index finger.
- U move: Use your thumb to push the top layer.
- Practice these isolated movements until they become reflexes. This can cut your solve time in half.
Muscle Memory
Repetition is the mother of memory. Try to solve the cube blindfolded for a few minutes a day (just knowing the algorithm positions, not seeing the cube). This forces your brain to rely entirely on muscle memory rather than visual searching.
Community Engagement
In 2026, the cubing community is more vibrant than ever. Join local meetups in cities like New York, Berlin, or Sydney, or participate in online forums like Reddit's r/Cubing. Sharing tips and watching advanced tutorials can provide fresh perspectives on old problems.
Troubleshooting Common Scenarios and Stuck States
Even with a solid grasp of the algorithms, beginners often encounter specific scenarios that feel like dead ends. These are not failures of logic but rather nuances in the mechanics of the puzzle. Understanding how to handle these "stuck states" is what separates a casual solver from a determined one.
The "Last Layer Only" Paradox
One of the most confusing moments for a new solver occurs when the bottom two layers are perfect, the top face is all yellow, but the side colors do not match the centers. You might think you made a mistake earlier, but in reality, this is a standard permutation state known as PLL (Permutation of the Last Layer). In the beginner method, we usually solve this incrementally, but if you find yourself stuck here after Step 7, double-check your corner orientation. Ensure you twisted every corner until the yellow sticker faced up. If one corner was left sideways, the entire cube will appear scrambled despite having a solid yellow top.
The Two-Swap Edge Situation
Sometimes, during the edge alignment phase (Step 6), you might end up with two edges swapped and two others correct, but they are opposite each other rather than adjacent. This is rare in the strict beginner method but can happen if an algorithm was misapplied. The solution is simple: perform any edge permutation algorithm once. This will break the current configuration, allowing you to re-apply the logic from Step 6 to sort them correctly. Patience is key; forcing a swap rarely works, but cycling the pieces almost always resolves it.
Corner Orientation Loops
When twisting corners in Step 7, some solvers get trapped in a loop where the yellow sticker never seems to face up, no matter how many times they repeat R' D' R D. This usually happens because the corner was inserted into the wrong slot initially. If you find yourself repeating the algorithm 12+ times without success, stop. Rotate the top layer to check if another unsolved corner appears. If all corners seem twisted incorrectly, you may have accidentally flipped a pair of corners earlier in the process. In such cases, performing a random algorithm on the top layer to disrupt the state, then restarting the orientation process from Step 4 is often the fastest reset button.
Frequently Asked Questions (FAQ)
As you delve deeper into the world of cubing, questions naturally arise regarding technique, equipment, and theory. Here are answers to the most common queries beginners face in 2026.
Q: Do I need a special "speed cube" to learn these algorithms?
A: No. You can absolutely learn and solve the Rubik's Cube using a standard $20 retail store cube or even a vintage thrift store find. However, modern "speed cubes" (available widely in 2026) offer significant advantages for learning. They feature internal mechanisms that allow layers to turn smoothly without sticking, which reduces frustration during practice. They also have magnetic cores that help snap pieces into place, providing tactile feedback that reinforces muscle memory. While not strictly necessary, investing in a decent beginner speed cube (priced around $10-$15) can accelerate your learning curve by making the physical act of turning less tedious.
Q: Why does my cube keep coming apart or popping out?
A: This is a common issue with cheaper cubes or those that have been over-tightened. If a piece pops off during an algorithm execution, it usually means the tension screws inside the core are too tight, or the cube has simply worn down. To fix this, locate the screw in the center of each face (usually hidden under stickers on older models, or visible on modern ones) and loosen it slightly. Additionally, ensure you are not applying excessive force to the layers; algorithms should flow, not be forced. If a piece falls out during a move, simply re-insert it; the mechanism is designed to hold pieces securely once aligned correctly.
Q: Can I solve the cube without memorizing the algorithms?
A: Technically, yes, but it would take an incredibly long time and rely on pure trial and error. The beauty of the Beginner's Method lies in its efficiency; it reduces a problem with billions of possible states to a series of four distinct, repeatable steps. While intuition plays a role in Step 1 (the White Cross), the subsequent steps rely on algorithms to guarantee a solution regardless of the scramble. Memorizing these sequences is akin to learning grammar before writing poetry; it allows you to express complex solutions clearly and reliably. Once you master these basics, you will find that your brain naturally starts recognizing patterns, making the "memorization" feel more like understanding.
Q: What is the difference between the Beginner's Method and CFOP?
A: The Beginner's Method, which this guide covers, solves the cube layer-by-layer: Bottom Layer, Middle Layer, then Top Layer. It is intuitive and requires fewer algorithms (approx. 7-10). CFOP (Cross, F2L, OLL, PLL), developed by Jessica Fridrich, is the industry standard for speedcubing. It combines the first two layers into one step (F2L) and splits the last layer into two large groups of algorithms (OLL for orientation, PLL for permutation). CFOP requires memorizing over 70 algorithms but allows for much faster solves (sub-20 seconds) once mastered. For a beginner in 2026, mastering the method in this article is the essential foundation before attempting the complexity of CFOP.
Conclusion: Your Journey Has Just Begun
Solving the Rubik's Cube is more than just a party trick or a test of patience; it is a profound exercise in spatial reasoning, pattern recognition, and perseverance. When you hold that scrambled 3×3 in your hands, it looks like an insurmountable wall of chaos. But through the logical application of the Rubik's cube algorithms for beginners explained easy, that chaos transforms into order.
You have now equipped yourself with the knowledge to turn a jumbled mess into a masterpiece. From understanding the fixed centers to executing the final corner twists, every step you've learned builds upon the last. The journey from your first failed attempt to your first successful solve is a rite of passage for cubers worldwide. Remember, every world record holder started exactly where you are now: holding a scrambled cube, unsure of where to begin.
In 2026, the culture of cubing continues to evolve with augmented reality guides, AI-assisted solving apps, and global communities connecting enthusiasts instantly. Yet, the fundamental joy remains unchanged: the satisfying click-clack of a solved layer and the euphoria of seeing all six faces align perfectly. Whether you aim to compete in local tournaments or simply enjoy the mental workout, the skills you acquire today will serve you well.
Keep practicing. Make mistakes; they are part of the process. Celebrate small victories, like solving just one layer or finally nailing that tricky corner twist. As you gain confidence, you'll find that the algorithms stop feeling like foreign language and start feeling like second nature. The cube is waiting for you to unlock its next level. So, grab your cube, shuffle it up, and let the journey begin. The world of possibilities is yours to solve.
Final Thought: The Rubik's Cube teaches us that complexity can be broken down into manageable parts. Life, much like the cube, often presents seemingly impossible challenges. But with the right approach, patience, and a few well-placed moves, anything can be solved. Happy Cubing!