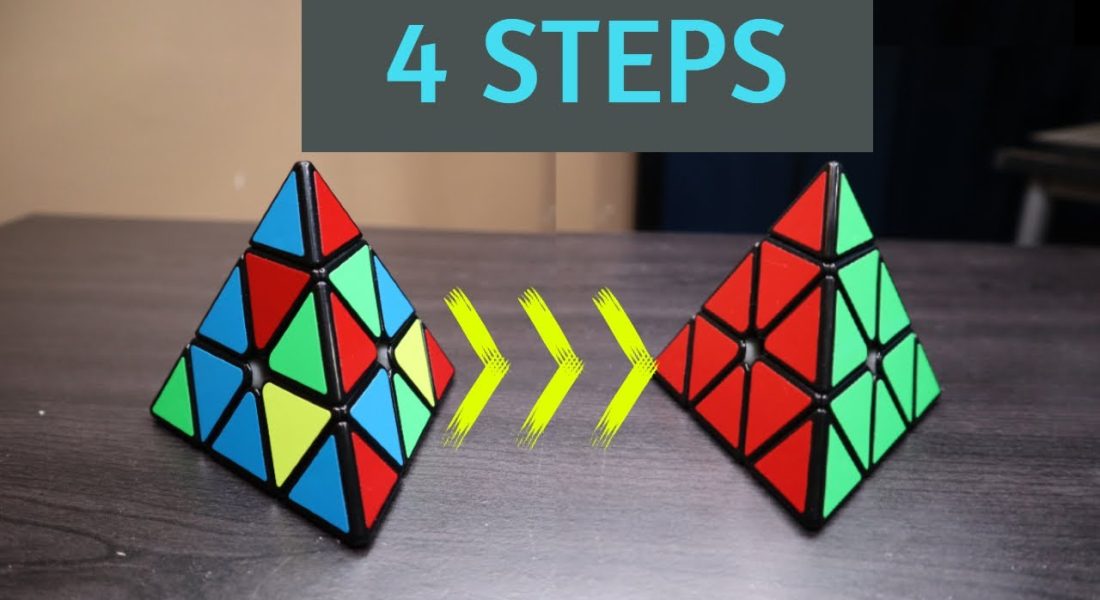
If you have ever picked up a pyramid-shaped puzzle and felt overwhelmed by its unique geometry, you are not alone. Many enthusiasts mistakenly believe that the Triangle Rubik's Cube, officially known as the Pyraminx, is significantly harder than the standard 3×3 cube. However, the reality of the 2026 cubing landscape is quite different. With only 933,120 possible permutations compared to the 3×3's 43 quintillion, the Pyraminx is mathematically one of the easiest twisty puzzles to master. In fact, with the right guidance, most beginners can learn to solve it in under an hour, and speedcubers regularly achieve times under two seconds.
This comprehensive guide is designed to take you from a complete novice to a confident solver using the easy Pyraminx method. Whether you are in a bustling café in New York, a quiet library in London, or a community center in Sydney, this step-by-step tutorial will equip you with the logic, algorithms, and intuition needed to conquer the tetrahedron. We will break down the complex-looking mechanics into simple, digestible layers, ensuring that by the end of this article, you will understand exactly how to align tips, match centers, and execute the final layer algorithms with precision.
The year 2026 marks a new era for puzzle solving, where accessibility and speed are paramount. Modern magnetic Pyraminx cubes have made turning smoother than ever, reducing friction and allowing for faster execution of the methods described below. By following this structured approach, you aren't just memorizing moves; you are learning the underlying logic that makes the Pyraminx such a satisfying and logical puzzle. Let's dive into the world of the triangle cube and unlock your potential as a solver.
Understanding the Anatomy of the Pyraminx
Before we attempt to solve the puzzle, it is crucial to understand what we are holding. Unlike the standard cube, which has six faces and a fixed center mechanism, the Pyraminx is a tetrahedron with four triangular faces. Each face is divided into nine smaller triangles, but unlike the 3×3, not all pieces move independently. To master the how to solve triangle rubiks cube easy pyraminx method, you must first identify the three distinct types of pieces that make up the puzzle.
The Three Key Piece Types
The Pyraminx consists of Tips, Centers, and Edges. Recognizing these components is the foundation of your solving strategy.
- Tips (Corners): These are the four pointy ends of the pyramid. They are the outermost pieces and can be rotated independently of the rest of the puzzle. While they look intimidating, they are actually the simplest part to solve because they do not affect the position of other pieces. You simply twist them until their color matches the center piece directly beneath them.
- Centers: Located directly under the tips, there are three center pieces on each of the four faces, totaling twelve centers. These pieces define the color of the face. Crucially, while they can rotate around the core axis, they cannot swap positions with centers on a different face during a standard turn. Solving the centers early creates a solid reference frame for the rest of the solve.
- Edges: These are the pieces situated between the centers. There are six edge pieces in total, each featuring two colors. These are the "meat" of the puzzle. Solving the edges correctly is the primary challenge, as they are the only pieces that change relative positions to one another during the solve.
Understanding the interaction between these pieces is vital. When you turn a layer of the Pyraminx, you are moving a tip, a center, and an edge simultaneously in a synchronized motion. This mechanical linkage is what makes the puzzle solvable through intuition rather than brute-force memorization. In 2026, with the prevalence of magnetic Pyraminx cubes, the tactile feedback when these pieces align is incredibly satisfying, helping solvers feel when a piece is correctly oriented even before visually confirming it.
Why the Pyraminx is Easier Than the 3×3
Many newcomers hesitate to try the triangle cube because it looks more complex than the square one. However, statistical analysis reveals the opposite. The 3×3 Rubik's Cube has approximately 43,252,003,274,489,856,000 possible states. In contrast, the Pyraminx has a mere 933,120 distinct possibilities. This massive difference means that a computer could theoretically check every single possible scramble of a Pyraminx in a fraction of a second.
Furthermore, the Pyraminx can be solved from any random position in less than 12 moves if one uses the optimal God's Number algorithm. While the beginner method we will teach requires a few more moves, it remains vastly simpler than the hundreds of moves often required for a 3×3. The logic relies heavily on intuition; once you align the tips and centers, the remaining steps often reveal themselves naturally without needing to memorize dozens of complex algorithms. This accessibility has made the Pyraminx the second best-selling puzzle toy in the world, trailing only the original Rubik's Cube.
Mastering the Notation System
To communicate solutions effectively, the global cubing community uses a standardized notation system. If you plan to watch video tutorials, join local clubs in cities like Chicago or Berlin, or read advanced guides, understanding this language is non-negotiable. The good news is that Pyraminx notation is intuitive and mirrors the logic of the puzzle's geometry.
The Basic Moves: R, L, U, and B
The notation refers to the four corners of the pyramid. Imagine holding the puzzle with one tip pointing up and one facing you. The moves are defined as follows:
- R (Right): Rotate the right corner clockwise (120 degrees).
- R' (Right Prime): Rotate the right corner counter-clockwise.
- L (Left): Rotate the left corner counter-clockwise. Note: In some older systems, L was clockwise, but the modern WCA standard generally defines L based on the perspective of the left face moving away or towards, but for beginners, think of L as rotating the left axis.
- L' (Left Prime): Rotate the left corner clockwise.
- U (Up): Rotate the top layer (the entire top section including the tip, center, and edges below it) clockwise.
- U' (Up Prime): Rotate the top layer counter-clockwise.
- B (Back): Rotate the back corner. This is used less frequently in beginner methods but essential for advanced techniques.
It is important to distinguish between rotating a single tip and rotating a whole layer. In the notation above, a single letter usually implies rotating the entire section associated with that corner. However, in the very first step of our method, we only rotate the tiny tip itself, which doesn't strictly require notation as it is purely intuitive.
When reading algorithms, you will see sequences like R U' R'. This means: Turn Right clockwise, turn Up counter-clockwise, then turn Right counter-clockwise. These sequences are designed to move specific edge pieces into place without messing up the parts of the puzzle you have already solved. In 2026, many digital solvers and apps use this exact notation to generate solutions, so becoming fluent in it now will future-proof your skills.
Visualizing the Layers
A common mistake beginners make is confusing the depth of the turn. The Pyraminx has shallow turns (just the tip) and deep turns (the tip plus the two layers beneath it). In the beginner method, almost all moves after the initial setup are deep turns. When you perform a 'U' move, you are slicing through the entire top third of the pyramid. Visualizing these slices is key to executing the algorithms smoothly. Practice holding the cube loosely and performing slow, deliberate turns to feel how the internal mechanism shifts the centers and edges together.
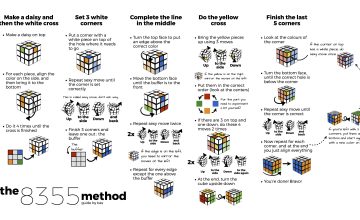
Step-by-Step Guide to Solving the Pyraminx
Now that we understand the pieces and the language, let's get to the actual solving process. The easy Pyraminx method is broken down into four logical stages. Do not rush; focus on accuracy first, and speed will come naturally with practice. This method is widely taught in cubing communities from Tokyo to Toronto and is the standard entry point for all new solvers.
Step 1: Aligning the Tips
This is arguably the easiest step in the entire process, yet it is often overlooked by eager beginners who jump straight to the edges. The goal here is simple: twist each of the four tips so that their color matches the center piece directly underneath them.
Since the tips rotate independently, you can do this without affecting any other part of the puzzle. Simply hold the pyramid, look at a tip, and rotate it until the three colors on the tip match the three colors of the adjacent centers. Repeat this for all four corners. Once completed, every tip should blend seamlessly into the rest of the face.
Why is this step critical? Because in later stages, you will be looking at the centers to determine where edges belong. If the tips are misaligned, your visual references will be wrong, leading to confusion and errors. Think of this as calibrating your instrument before playing a song. In competitive settings, solvers inspect the cube during the 15-second inspection period and often solve the tips mentally before the timer even starts.
Step 2: Solving the Centers
With the tips aligned, the next objective is to solve the centers. On each face, there are three center pieces. Your goal is to rotate the layers of the pyramid until all three centers on a specific face share the same color. Typically, solvers choose Yellow as their bottom face to start, but you can choose any color you prefer.
Hold the pyramid with your chosen color (e.g., Yellow) on the bottom. Look at the bottom face. Are the three center pieces all yellow? If not, you need to rotate the layers. Remember, rotating a corner (like 'R' or 'L') moves the centers on that side. You may need to perform a sequence of moves to cycle the centers into the correct position. A common technique involves bringing a mismatched center to the front, rotating the layer to swap it, and then restoring the rest of the cube.
Once the bottom centers are solved, check the other three faces. Ideally, the centers on the side faces should also align with their respective tip colors. If the bottom is Yellow, the side centers should form a consistent pattern relative to the tips. This step establishes the "skeleton" of your solution. With the tips and centers solved, the puzzle is effectively reduced to solving just the six edge pieces. This reduction in complexity is what makes the Pyraminx so approachable.
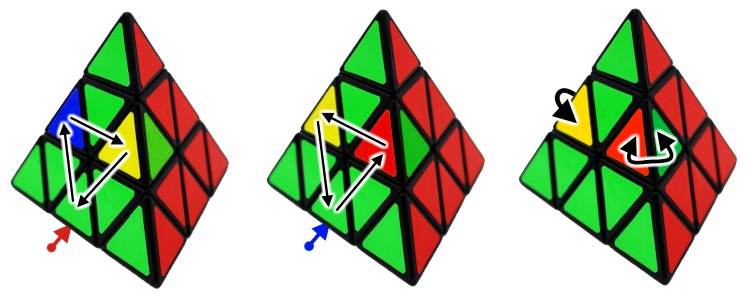
Step 3: Solving the First Layer Edges
Now we move to the edges. We will start by solving the three edges surrounding our bottom face (the Yellow face in our example). This step relies on two fundamental algorithms that are mirror images of each other. These algorithms allow you to insert an edge piece from the top layer down into the bottom layer without disturbing the centers or tips you just solved.
Identify an edge piece in the top layer that belongs in the bottom layer. For instance, if you have a Yellow-Red edge piece in the top layer, and the bottom front slot needs a Yellow-Red piece, you need to position the cube so that the target slot is in the front-right or front-left position.
The Right Algorithm: Use this when the edge needs to go to the right slot.
- Sequence:
R U R' U'(or variations likeR U' R'depending on orientation). - Logic: This moves the edge down into the slot while temporarily displacing a piece, which is then returned to its original spot by the final move.
The Left Algorithm: Use this when the edge needs to go to the left slot.
- Sequence:
L' U' L U(orL' U L). - Logic: This is the exact mirror of the right algorithm.
Repeat this process for all three edges of the bottom layer. If an edge is already in the bottom layer but flipped incorrectly or in the wrong slot, simply use the algorithm to pop it out into the top layer, reorient the cube, and insert it correctly. By the end of this step, your entire bottom layer (tips, centers, and edges) should be completely solved, forming a solid base of one color.
Step 4: Solving the Last Layer
You have reached the final hurdle! With the bottom layer complete, you only have three edges left to solve on the top layer. There are a few scenarios you might encounter here, but don't worry; they are all manageable with a small set of rules.
Scenario A: One Edge is Solved
If one of the top edges is already in the correct position (even if flipped), hold the cube so that this solved edge is at the back. Look at the remaining two edges. If they need to swap places, you can use a specific swapping algorithm.
- Algorithm:
R' L R L' U' L' U L(This cycles the edges). - Often, simply repeating the insertion algorithms from Step 3 (
R U R'orL' U' L) while keeping the solved edge at the back will naturally resolve the others.
Scenario B: No Edges are Solved
If none of the top edges are in the correct position, perform the edge-swapping algorithm once from any angle. This will likely result in Scenario A (one edge solved), after which you can proceed as described above.
Scenario C: Edges are in the right place but Flipped
Sometimes the edges are in the correct slots, but the colors are flipped (e.g., Red is facing Blue). To fix this, you need a "flip" algorithm.
- Flip Algorithm:
R' L' R L' U' L' U L(Variations exist, but the principle is to cycle and flip). - Alternatively, many solvers find it easier to simply undo the last step slightly, re-insert the edge with the correct orientation using the Step 3 logic, and re-solve the minor disruption.
In 2026, many speedcubers use the LL (Last Layer) method which optimizes these steps into a single lookahead, but for the beginner, recognizing the case and applying the simple fix is the most reliable path. Once these last three edges are aligned, give the tips a final check to ensure they haven't been knocked loose during the intense final maneuvers. Congratulations, your Triangle Rubik's Cube is solved!
Advanced Tips and Speedcubing Insights for 2026
Once you have mastered the basic method, you might wonder how people solve this puzzle in under 2 seconds. The gap between a 30-second solve and a 2-second solve lies in efficiency, equipment, and advanced techniques. As we navigate through 2026, the standards for speedcubing continue to evolve, driven by better hardware and refined methodologies.
The Importance of Hardware
Your equipment plays a massive role in your solving speed. In the past, stiff, non-magnetic Pyraminx cubes made fast turning difficult and prone to locking up. Today, the market is dominated by magnetic Pyraminx cubes. Brands like MoYu, QiYi, and GanCube produce puzzles with built-in magnets that provide a satisfying "snap" into place. This magnetic tension prevents over-turning and gives the solver precise tactile feedback.
If you are serious about improving your times, investing in a mid-range magnetic Pyraminx is the best upgrade you can make. Models like the MoYu RS3 M or the QiYi QiMing S3 are affordable yet offer performance that rivals high-end custom cubes. A well-lubricated, magnetized cube allows for fluid execution of the R U R' algorithms, enabling you to perform them in rapid succession without hesitation.
Lookahead and Finger Tricks
Speed isn't just about moving your hands fast; it's about thinking ahead. Lookahead is the skill of planning your next move while executing the current one. Instead of solving an edge, stopping to look for the next one, and then moving, a speedcuber solves the current edge while their eyes are already scanning for the next target. This eliminates pauses and creates a continuous flow of motion.
Finger tricks are also essential. Instead of using your whole hand to grip and turn the cube, learn to flick the layers using your fingertips. For example, the U move can be done with a quick flick of the index finger, and R moves can be executed with the thumb or ring finger depending on your grip. Practicing these dexterity exercises will significantly reduce your move execution time. In major competitions held in cities like Los Angeles and Paris, the difference between winning and placing second often comes down to milliseconds gained through superior finger trick proficiency.
Transitioning to Advanced Methods
For those who want to push beyond the beginner method, advanced techniques like the One-look LL (Last Layer) or CFOP-style Pyraminx methods are available. These methods involve memorizing more algorithms to solve the last layer in fewer steps. For instance, instead of orienting and permuting edges separately, an advanced solver might recognize a specific pattern and execute a single algorithm to finish the cube instantly. While this requires more memorization, it drastically reduces the total number of moves and solve time. However, for the vast majority of casual solvers and even intermediate hobbyists, the easy method outlined in this article is more than sufficient to achieve impressive sub-10-second times.
Frequently Asked Questions About the Pyraminx
As you embark on your journey to solve the triangle cube, you likely have several questions. Here are answers to the most common queries from the 2026 cubing community.
Q: Is the Pyraminx harder than the 3×3 Rubik's Cube?
A: No, the Pyraminx is significantly easier. It has far fewer possible combinations (under 1 million vs. 43 quintillion) and can be solved in fewer moves. The logic is more intuitive, making it an excellent starting point for beginners who find the 3×3 daunting.
Q: How long does it take to learn the Pyraminx?
A: Most people can learn the basic method in under an hour. With a bit of practice, achieving a solve time of under 30 seconds is very realistic within a few days. Reaching sub-10 seconds usually takes a few weeks of consistent practice.
Q: Do I need to buy a special cube to solve it?
A: No, any Pyraminx puzzle will work. However, for a better experience and faster solving, a magnetic Pyraminx is highly recommended. Older, non-magnetic versions can be stiff and frustrating, potentially hindering your learning progress.
Q: Can I solve the Pyraminx without memorizing algorithms?
A: largely, yes. The first three steps (Tips, Centers, First Layer) are almost entirely intuitive. Only the final layer requires a couple of simple algorithms, and even those can often be figured out through logic if you understand how the pieces move.
Q: What is the world record for the Pyraminx in 2026?
A: The world record continues to drop as techniques improve. As of early 2026, the record stands at 0.73 seconds, held by Simon Kellum. This incredible feat showcases the peak of human dexterity and puzzle optimization.
Conclusion
Solving the Triangle Rubik's Cube is a rewarding journey that blends logic, dexterity, and pattern recognition. By following the easy Pyraminx method detailed in this guide, you have unlocked the secrets to conquering this tetrahedral puzzle. From aligning the tips and centers to mastering the edge insertion algorithms, each step builds upon the last to create a seamless solving experience.
Remember, the key to mastery is practice. Don't be discouraged if your first few attempts are slow or if you make mistakes. Every twist and turn brings you closer to fluency. Whether you are solving for fun at home, competing in a local event, or aiming for world records, the Pyraminx offers a unique challenge that is accessible to everyone. With the advancements in cube technology and the wealth of knowledge available in 2026, there has never been a better time to pick up a Pyraminx and start solving. So, grab your cube, align those tips, and enjoy the satisfaction of completing your very first solve!
References
- Cubelelo — How to Solve a Pyraminx (Triangle Cube): Step-by-Step Guide, 2026
- WikiHow — How to Solve a Pyraminx: 7 Steps with Pictures, 2025
- Ruwix — Pyraminx Puzzle: Overview And The Easiest Solution, 2026
- SpeedCube Australia — How to Solve a Pyraminx: Easy to Follow Beginners Steps, 2026
- Rubikverse — How to Solve the Pyraminx/Triangle Cube: Terminologies and Methods, 2026
- Cube Solver — From Beginner to Expert: Mastering the Pyraminx Quickly, 2026
- Speedcubing.org — How to Solve the Pyraminx: Full Written Tutorial, 2026
- GANCUBE — Pyraminx Cube Solving Guide: Official Tutorial, 2026