When Sarah first picked up a scrambled 3x3 Rubik's cube at her kitchen table, she thought it was an impossible puzzle designed only for mathematical geniuses. Like many beginners, she tried twisting random faces in frustration, only to mix up the colors even further and leave the toy gathering dust on her bookshelf for months. However, solving a Rubik's cube is not about raw intelligence or memorizing hundreds of complicated finger tricks all at once. Instead, it is a mechanical process built on simple, repeatable sequences of turns called algorithms that anyone can master with a bit of patience and practice.
Many people assume that you must solve a Rubik's cube face by face, but that is actually the biggest misconception holding beginners back from success. Professional speedcubers and casual solvers alike know that the cube must be solved layer by layer, beginning with the white cross and working your way up to the final top layer. Once you understand the fundamental anatomy of the puzzle—such as how center pieces never move, edge pieces have two stickers, and corner pieces have three—the mystery quickly dissolves into a logical sequence of predictable physical movements.
The Journey from Frustration to Your First Solved Layer
Sarah decided to give the puzzle another try after watching a young teenager solve it in under a minute at a local community center. She realized that instead of guessing, she needed a structured method that broke the massive puzzle down into bite-sized, manageable steps. Her first milestone was learning how to build a solid white cross on the bottom face, ensuring that the side colors matched the adjacent center pieces perfectly. This initial foundation acts as the anchor for everything else you do, making it crucial to get right before moving on to more advanced maneuvers.
After conquering the white cross, Sarah tackled the white corners, which officially completed the first layer of the cube. She learned that every corner piece had to be slotted precisely between its corresponding center pieces using simple intuitive movements rather than complex formulas. By observing how each turn shifted the surrounding pieces, she built spatial awareness that would later make algorithms feel natural rather than like rote memorization. This phase transformed her from a complete novice into someone who could reliably inspect a scrambled cube and visualize the first major victory.
Anatomy of a Rubik's Cube and Standard Notation
Before diving into the actual solving steps, you must familiarize yourself with standard cube notation so you can read algorithms accurately without getting confused. Every face of the cube is represented by a single capital letter, and adding an apostrophe means turning that face counterclockwise. Without this universal language, learning advanced tutorials online becomes an exercise in frustration. Here is a breakdown of the basic notation terms you need to know:
- F (Front): The side of the cube directly facing you as you hold it.
- B (Back): The side of the cube opposite to the front face.
- U (Up): The top face of the cube pointing toward the ceiling.
- D (Down): The bottom face of the cube resting on your table or palms.
- L (Left): The face on the left side of your primary view.
- R (Right): The face on the right side of your primary view.
- Prime (') symbol: Turning the specified face 90 degrees counterclockwise.
Comparing Beginner Methods vs. Speedcubing Techniques
When starting out, you should never attempt advanced speedcubing methods like Friedrich (CFOP) or Roux, as they require recognizing dozens of complex cases instantly. Instead, sticking to the Layer-By-Layer (LBL) method provides a stable foundation that builds muscle memory gradually. To understand the differences, review this handy comparison table outlining the primary solving approaches available to modern puzzle enthusiasts:
| Method Name | Difficulty Level | Algorithms Needed | Average Solve Time |
|---|---|---|---|
| Beginner LBL | Easy | 5 to 7 | 1 to 3 minutes |
| CFOP (Fridrich) | Advanced | 119 | 10 to 20 seconds |
| Roux Method | Advanced | 40+ | 12 to 25 seconds |
| ZZ Method | Expert | 50+ | 15 to 30 seconds |
Step 1: Building the White Cross on the Bottom
Your journey to a solved cube always begins by creating a white cross on the bottom face, keeping the yellow center opposite to it on top. Look for the four edge pieces that contain white stickers and bring them down to surround the white center piece. The most important rule during this phase is that the secondary sticker on the edge piece must match the color of the adjacent center piece. If your white-red edge is paired with the green center instead of the red center, your entire alignment for the subsequent steps will be thrown off.
- Locate any edge piece on the cube that features a white sticker alongside another color.
- Rotate the outer layers of the cube to bring that edge piece into the middle or top layer without disturbing other solved pieces.
- Align the non-white sticker of that edge piece so it matches the corresponding center color on the side.
- Rotate that face twice so the white sticker drops down to join the white center, completing one arm of the cross.
- Repeat this exact process for the remaining three edge pieces until you have a clean white cross on the bottom.
- Check your work by confirming that the side colors of the cross match the red, blue, orange, and green centers.
Step 2: Inserting the White Corners to Complete Layer One
With your white cross firmly established, the next milestone is solving the four white corner pieces to finalize the first horizontal layer. Find a corner piece in the top layer that contains a white sticker, then position it directly above the target slot where it belongs on the bottom layer. Pay close attention to the other two colors on that corner piece to ensure it goes between the correct center pieces. You will perform a short, rhythmic sequence of turns repeatedly until the corner drops neatly into place with the white side facing downward.
- Search the top layer for any corner piece that includes white as one of its three visible colors.
- Turn the top layer until this corner is positioned directly above its correct home between two specific center pieces.
- Hold the cube so the white cross remains on the bottom and your target corner is in the front-right-up position.
- Execute the classic right-hand trigger sequence: R, U, R', U'.
- Repeat this four-move trigger anywhere from one to five times until the corner piece sits in the bottom layer with white facing down.
- Move on to the next corner and repeat the sequence until the entire first layer is completely uniform.
Step 3: Solving the Middle Layer Edge Pieces
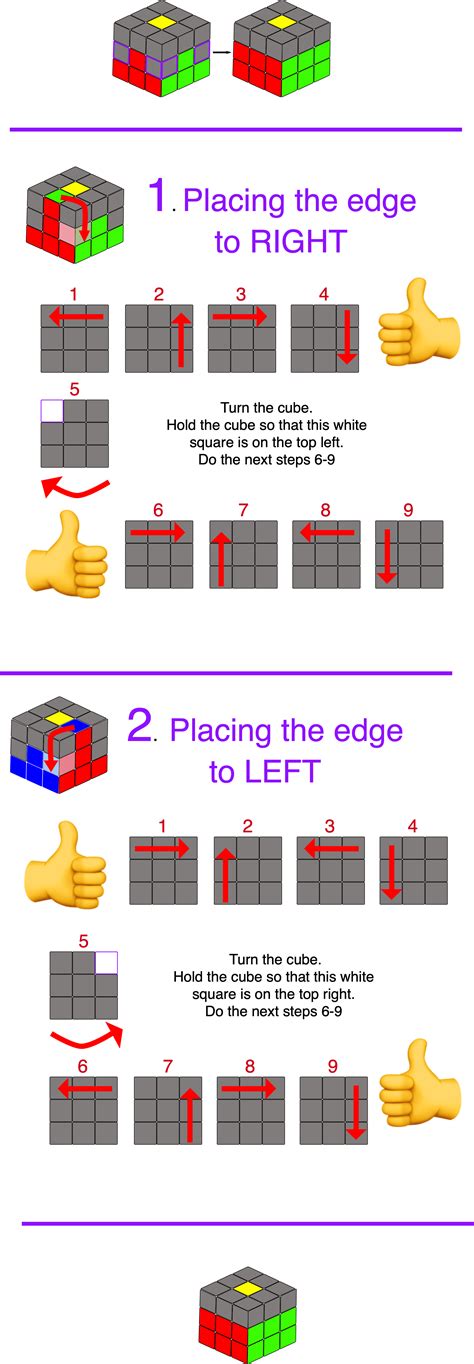
Now that your bottom layer is solid and the white face is completely solved, flip your entire cube upside down so the yellow face is now on top. This perspective shift places your hard work safely at the bottom while you focus on slotting the four middle layer edge pieces into place. Look at the top layer for any edge piece that does not contain yellow, as these are the pieces that belong in the middle tier. By aligning the front color of the edge with its matching center, you set up a simple algorithm that shifts the piece smoothly into its lateral home.
- Scan the top layer for an edge piece that has no yellow stickers on it.
- Rotate the top layer until the front sticker of that edge matches a side center color, forming a large vertical T-shape.
- Examine the top sticker of that edge piece to see whether it needs to move to the left slot or the right slot.
- If the edge needs to move to the right, use the right-hand algorithm: U, R, U', R', U', F', U, F.
- If the edge needs to move to the left, use the left-hand mirror algorithm: U', L', U, L, U, F, U', F'.
- Repeat this process for all remaining middle layer edges until the bottom two tiers of your cube are fully solved.
Step 4: Crafting the Yellow Cross on the Top Face
With two-thirds of the puzzle finished, your attention shifts entirely to the final top layer, where you will first form a yellow cross. Unlike the white cross at the beginning, you do not flip the cube over; instead, you work with the yellow face pointing directly toward the ceiling. Depending on how the top layer currently looks, you will see one of four common patterns: a single dot, an L-shaped corner, a horizontal line, or a fully completed cross. You will apply a specific front-and-right algorithm to transition through these patterns until the cross appears.
“Patience is your greatest tool when learning Rubik's cube algorithms; trust your fingers to build the muscle memory over dozens of slow, deliberate repetitions.”
To move from a dot to an L-shape, or from a line to the cross, hold your cube so the line is horizontal or the L-shape points to the top-left corner. Then, perform the foundational algorithm: F, R, U, R', U', F'. If you started with just a single dot in the center, you may need to run this sequence twice to get the line, and a third time to achieve the complete yellow cross. Always keep your yellow face pointing upward throughout this entire phase to avoid losing your orientation.
Step 5: Permuting the Yellow Edge Pieces
Once your yellow cross is visible on the top face, your next objective is to make sure the side colors of those edge pieces match their respective lateral centers. Spin the top layer around and check how many edge pieces align properly with the red, blue, orange, and green centers below them. You will typically find either zero, two, or all four edges matching up correctly. If only two adjacent edges match, hold the cube so the matching faces are in the back and on the right before executing a standard edge permutation algorithm.
- Position the one correct edge in the back and another correct edge on the right side of your view.
- If no edges match, perform the algorithm from any angle to establish at least two adjacent matching edges.
- Execute the standard edge swap algorithm: R, U, R', U, R, U2, R'.
- Give the top layer a final twist to align all four side edge colors with their corresponding center pieces.
- Double-check that your yellow cross remains intact and undisturbed after completing the algorithm sequence.
- If the edges still do not align properly, repeat the sequence once more while maintaining the correct starting orientation.
Step 6: Positioning the Final Top Corners
You are now in the home stretch, with only the four top corners remaining to be positioned and oriented before the puzzle is fully solved. First, you must check if any of the four top corners are already in their correct positional spot, even if their yellow stickers are pointing sideways instead of upward. If you find one correct corner, hold it in the front-right position and use an algorithm to cycle the remaining three incorrect corners until every single one rests in its proper geographical home.
- Inspect all four top corners to see if any piece is located between its correct adjacent center colors.
- If you find one correct corner, hold the cube so that specific corner is in the front-right-up position.
- If no corners are correct, perform the corner cycle algorithm from any angle to place at least one corner correctly.
- Execute the corner positioning algorithm: U, R, U', L', U, R', U', L.
- Check if the remaining three corners have rotated into their correct positions.
- Repeat the algorithm once more if the corners are still not aligned in their proper slots.
- Hold the cube with the solved white layers facing downward and the yellow face pointing upward.
- Bring an unsolved top-right corner into the front-right-up position.
- Repeatedly perform the simple trigger sequence: R, U, R', U'.
- Keep repeating this four-move loop until the top sticker of that specific corner turns yellow.
- Rotate only the top layer to bring the next unsolved corner into that exact same front-right-up position.
- Never tilt the entire cube during this step, as doing so will ruin your progress and force you to restart.
- Peeling off stickers: Never cheat by removing and gluing stickers back on; it ruins the challenge and leaves telltale marks on the plastic tiles.
- Rotating the whole cube: Changing your primary view mid-algorithm completely alters your orientation and ruins your progress.
- Rushing the turns: Speed comes naturally through muscle memory; focus entirely on accuracy and smooth turning when starting out.
- Ignoring center pieces: Always remember that center pieces are fixed anchors that never move relative to one another on a standard 3x3.
- vForgetting finger placement: Keep a relaxed, flexible grip on the cube so you can execute turns without straining your wrists or locking up the mechanism.
- Lubricate your cube: Apply a specialized silicone-based puzzle lubricant to reduce internal friction and make turning effortless.
- Practice finger tricks: Learn to use your index fingers and thumbs to flick layers instead of rotating your entire wrist for every move.
- Look ahead: Train your eyes to scan for the next piece you need while your hands are still finishing your current algorithm.
- Time your solves: Use a dedicated cubing timer to track your daily progress and identify which specific steps take you the longest.
- Keep it clean: Regularly wipe dust and grime off your puzzle stickers or tiles to maintain a firm, reliable grip during fast solves.
Step 7: Orienting Final Corners to Finish the Cube
This final step is where most beginners panic because the cube often looks completely scrambled right before it solves itself magically. Bring your partially solved cube to a stable surface or hold it firmly, keeping the white layers on the bottom and yellow on top. You will focus on one unoriented corner at a time in the front-right-up position, repeating the simple four-move right-hand trigger until that specific corner shows yellow on top. It feels counterintuitive, but trusting the process will snap the entire puzzle into place.
Common Mistakes Beginners Make and How to Avoid Them
Even with a clear guide, beginners often run into frustrating roadblocks due to a few common physical and mental oversights. Learning what not to do can save you hours of wasted effort and prevent you from having to pull your puzzle apart or start from scratch. Read through these frequent pitfalls so you can spot them early:
Essential Tips to Improve Your Solving Speed Over Time
Once you successfully complete your very first solved cube using the beginner method, you will likely feel an incredible rush of accomplishment. Naturally, you will want to get faster, smooth out your turning, and impress your friends with quicker solve times. Implementing a few deliberate practice habits will help you transition from a two-minute solver to a confident sub-one-minute cuber without feeling overwhelmed.