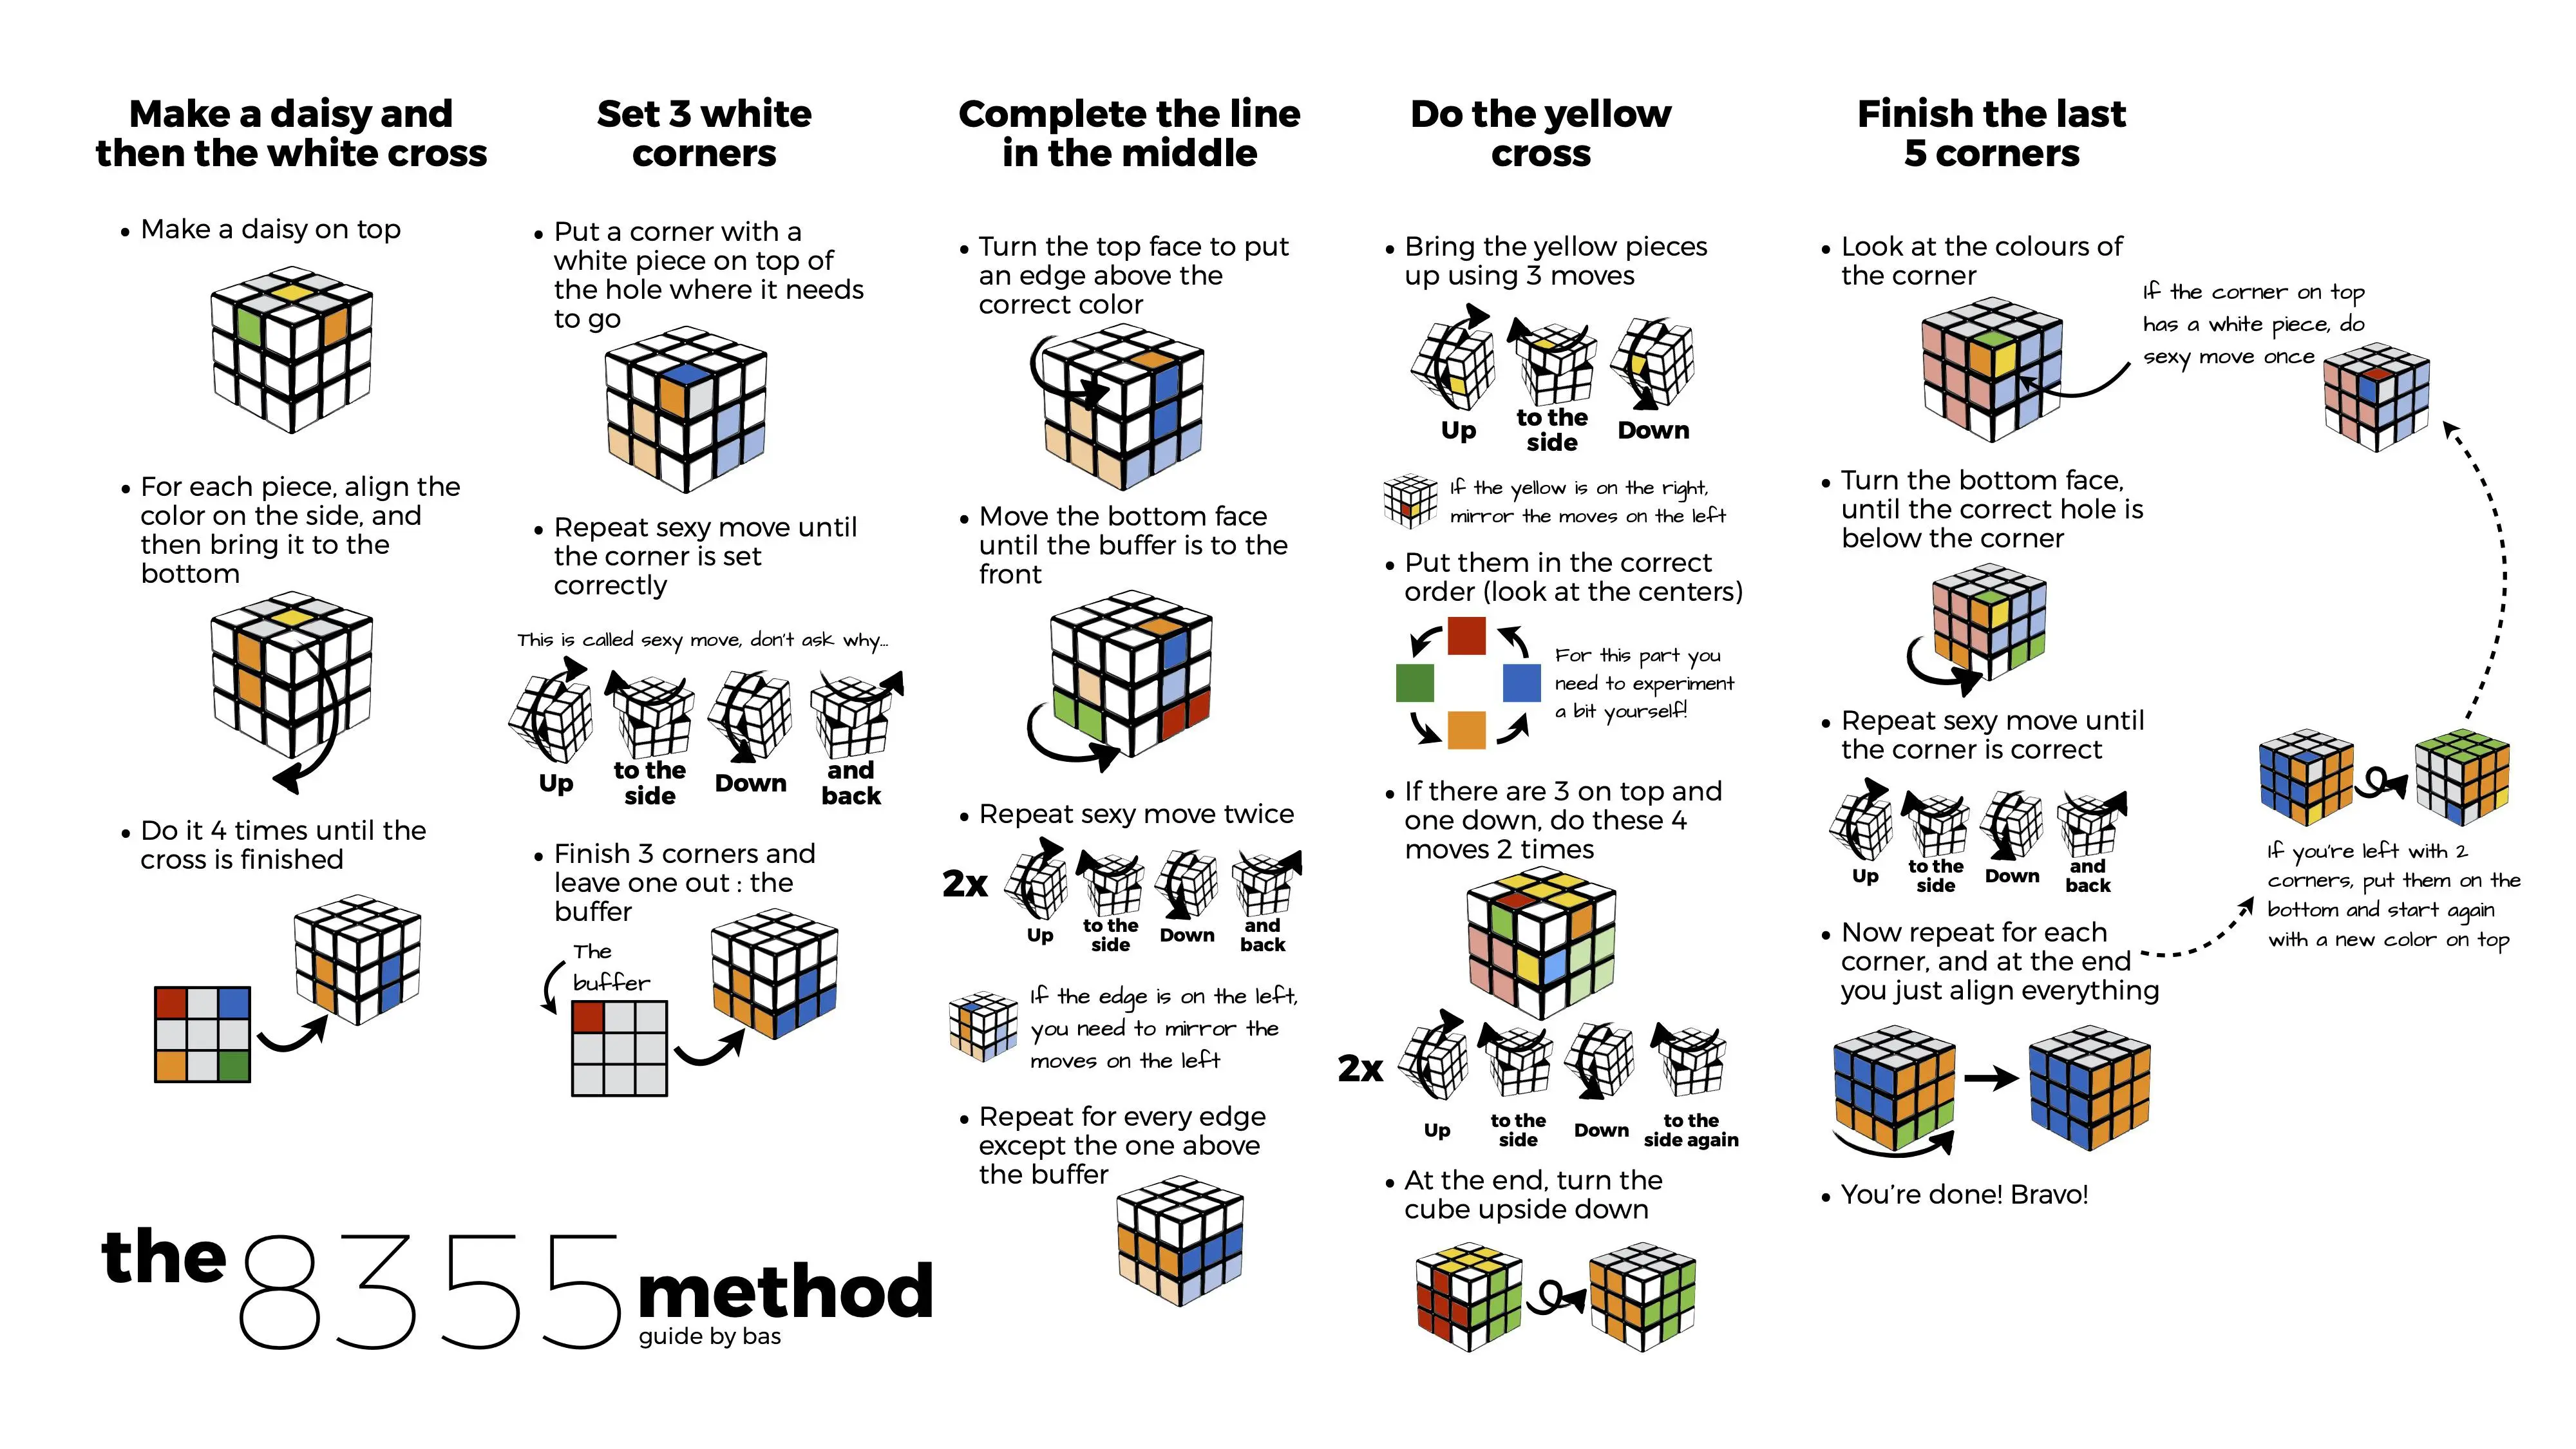
Understanding the Anatomy of Your 3x3 Cube
Before you dive into the mechanics of solving a Rubik's Cube, it is essential to understand that the puzzle is not just a collection of colored stickers. It is a precise mechanism consisting of three distinct types of pieces: center pieces, edge pieces, and corner pieces. The center pieces are fixed in place relative to each other; they define the color of the entire face. This means that if you see a white center, that side will always be the white side.
Edge pieces have two colors and sit between the corners, while corner pieces feature three colors and occupy the vertices of the cube. Recognizing these pieces is the first step toward building your intuition. Many beginners mistakenly try to solve for a specific color first without realizing that the center pieces act as the anchor points for the entire process. By observing how the pieces move in relation to the static centers, you gain the spatial awareness required to manipulate the cube effectively.
The Core Notation You Need to Know
To follow any tutorial, you need to understand the standard notation used for cube moves. Each letter represents a 90-degree clockwise turn of a specific face. Learning these basic movements will allow you to execute the algorithms provided later in this guide without confusion. If you see a letter followed by an apostrophe, that indicates a counter-clockwise turn, often called an inverted move.
- R (Right): Rotate the right face clockwise.
- L (Left): Rotate the left face clockwise.
- U (Up): Rotate the top face clockwise.
- D (Down): Rotate the bottom face clockwise.
- F (Front): Rotate the front face clockwise.
- B (Back): Rotate the back face clockwise.
- R' (Right Prime): Rotate the right face counter-clockwise.
- U' (Up Prime): Rotate the top face counter-clockwise.
Building the White Cross: The Foundation
The first major milestone in solving the cube is creating a white cross on the top face. This is not just about getting four white edge pieces to the top; they must also align with the side color centers. For example, the white-red edge piece must be placed so that the white side is on top and the red side touches the red center piece.
- Locate the white edge pieces on the cube.
- Bring them to the top layer by rotating the faces carefully.
- Align the side color of each edge piece with its corresponding center piece.
- Ensure the cross is formed correctly before moving to the next phase.
- If an edge is flipped incorrectly, use a simple sequence to reorient it.
Solving the First Layer Corners
Once your white cross is complete, your next objective is to insert the four corner pieces into the first layer. This will complete the white face and the first row of colors on all four sides. Hold the cube so that the white cross is on the bottom. You are looking for pieces in the top layer that contain white.
The secret to solving the cube is not to look at the whole puzzle at once, but to isolate specific pieces and move them into their designated home positions using repetitive sequences.
To place a corner, align it directly above where it needs to go. Then, perform the "Right Trigger" move: R U R' U'. Repeat this sequence until the white corner is facing downward and the colors match the adjacent center pieces. This technique is the breadcrumb trail that leads to a full solve.
The Second Layer: Inserting the Middle Edges
Now that the bottom layer is finished, you need to solve the middle layer edges. You will look at the top layer for edges that do not have yellow on them. Align the front color of the edge piece with its matching center to form a vertical line. Depending on whether the piece needs to move to the left or right, you will use a specific algorithm.
| Direction | Algorithm |
|---|---|
| Move to Right | U R U' R' U' F' U F |
| Move to Left | U' L' U L U F U' F' |
| Edge is Flipped | R U R' U' R' F R F' |
The Yellow Cross: Reaching the Final Stage
With the first two layers complete, you are halfway there. Now, focus on the top face, which is currently yellow. You want to form a yellow cross, regardless of the side colors. You may have a dot, an L-shape, or a horizontal line. If you have the L-shape, hold it so the pieces are at the back and left positions, then perform F R U R' U' F'.
This algorithm effectively rotates the edges to form the cross. If you started with only a dot, performing this move will create the L-shape. Once you have the L-shape, perform it again to get the horizontal line, and one final time to complete the yellow cross. This is often the most satisfying part of the process for beginners.
Aligning the Yellow Cross Edges
Now that you have a yellow cross, the edges must match the side colors of the second layer. Rotate the top layer until two edges match their side centers. If they are adjacent, hold the cube so one is at the back and one is at the right. Use the algorithm R U R' U R U2 R' to swap them into the correct spots.
If the matching edges are opposite each other, perform the move once to bring them into an adjacent position, then perform it again. This step ensures that the yellow cross is correctly oriented with the rest of the cube's structure. Consistency is key here; do not rush these moves or you might lose your progress on the first two layers.
Positioning the Final Corners
We are now in the home stretch. You need to put the yellow corners in their correct spots, even if they are twisted the wrong way. Look for a corner that is already in the correct position. If none are, perform the algorithm U R U' L' U R' U' L. This cycle moves pieces around without disturbing your solved layers.
Keep repeating this until all four corners are in their correct locations. It is helpful to check the colors on the side of each corner piece to verify they match the centers of the three faces they touch. Once this is done, you are ready for the final, most crucial step of the entire solve.
Orienting the Corners: The Final Twist
This is where most beginners get nervous, but it is actually quite simple. Hold the cube with the yellow face on top. Pick an unsolved corner in the top-right position. Perform R' D' R D repeatedly until that specific corner is solved with yellow facing up. Do not panic if the bottom of the cube looks scrambled; it will fix itself.
Once the first corner is fixed, rotate only the top layer to bring the next unsolved corner into that same top-right slot. Repeat the R' D' R D sequence. Continue this until all corners are oriented correctly. The rest of the cube will snap into place automatically as you finish the final corner.
Common Beginner Mistakes to Avoid
Learning to solve a cube is a test of patience. Many beginners fail because they rush the algorithms or lose their place in the sequence. Another common mistake is trying to learn too many complex moves at once rather than mastering one layer at a time. Refer to Wikipedia's guide on the cube mechanics to understand the underlying geometry better.
- Do not force the pieces if they seem stuck, as it may damage the core.
- Avoid turning the cube in your hands while performing an algorithm.
- Keep the same face pointed toward you throughout each specific step.
- Double-check your alignment before starting a long sequence of moves.
- Use a timer only after you have fully memorized the basic moves.
The Role of Practice and Muscle Memory
Solving the cube is less about intelligence and more about building muscle memory. Your fingers need to learn the sequences so your brain can focus on identifying the next step. Spend ten minutes a day practicing the individual algorithms without even looking at the cube. This repetition turns abstract moves into fluid, subconscious actions.
Many world-class speedcubers started exactly where you are, struggling to understand the basic notation. By focusing on consistency rather than speed, you will naturally get faster. You will eventually stop thinking about the letters and start seeing patterns, which is the hallmark of a true cuber.
Choosing the Right Training Cube
Not all cubes are created equal. If you are using an old, stiff cube, it will make learning much harder. Look for a modern speed cube, which has internal magnets and better corner-cutting abilities. You can find excellent resources on equipment through the World Cube Association website to see what the pros use.
- Look for adjustable tension settings.
- Ensure the cube has a smooth, lubricant-friendly interior.
- Choose stickerless models to avoid the frustration of peeling stickers.
- Pick a size that fits comfortably in your hands.
- Read reviews to ensure the cube has good "corner cutting" performance.
Why You Should Keep Trying
It is perfectly normal to feel overwhelmed during your first few attempts. The Rubik's Cube is a complex puzzle, and the satisfaction of solving it for the first time is worth the effort. Every time you fail, you learn something new about how the pieces interact. Remember that the cube is a physical object governed by logic, not luck.
The Psychological Benefits of Cubing
Beyond the puzzle itself, cubing improves fine motor skills and spatial reasoning. It encourages you to break down large, complex problems into smaller, manageable tasks. This mindset is highly applicable to many other areas of life, from programming to project management. Keep your cube on your desk; just fidgeting with it can help clear your mind.
Advanced Tips for Faster Times
Once you have mastered the beginner method, you might want to look into more advanced techniques like CFOP. This method involves solving the first two layers simultaneously, which drastically reduces the number of moves required. However, do not jump into advanced methods until you can solve the cube consistently with your eyes closed.
- Learn how to recognize patterns faster by practicing "look-ahead."
- Keep your cube clean and apply silicone lubricant to maintain speed.
- Record yourself solving to spot where you are wasting time.
- Join local cubing communities to learn from experienced solvers.
- Stay relaxed; tension in your hands slows down your finger speed.