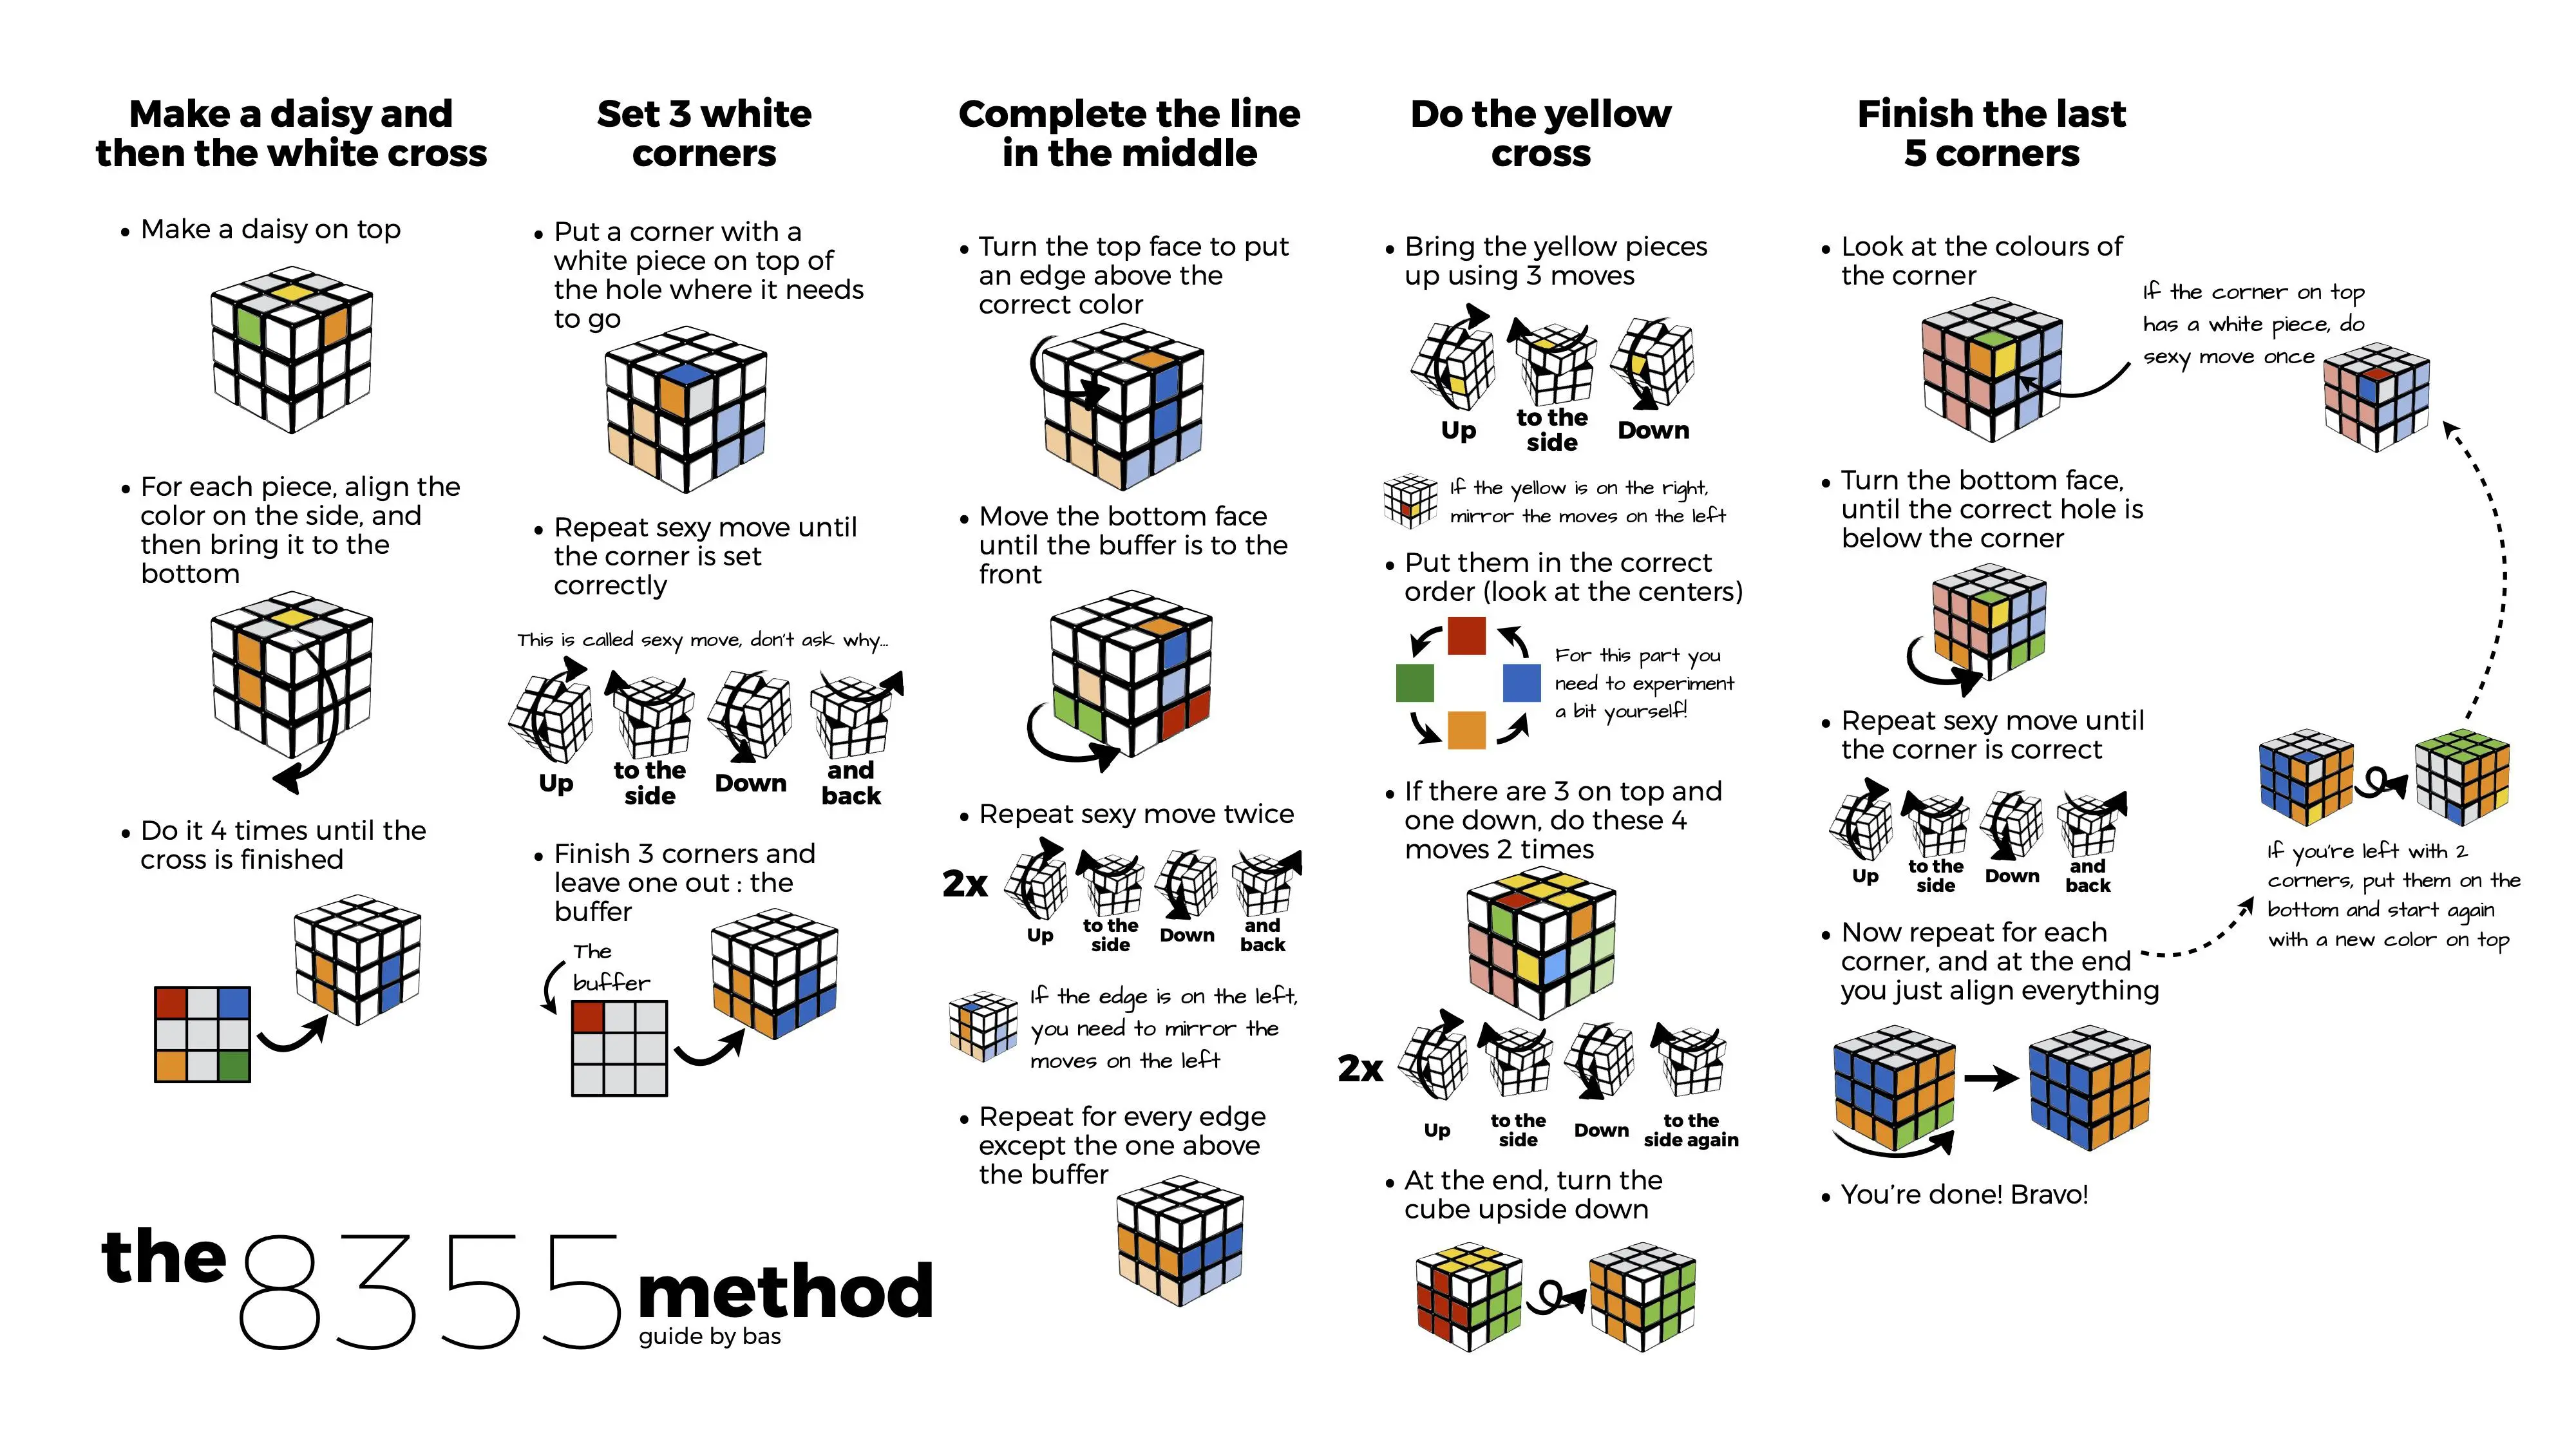
Staring at a scrambled 3x3 puzzle can feel like facing an unbeatable opponent. Invented by Erno Rubik in 1974, the Rubik's Cube has challenged minds for decades with its quintillion possible permutations. However, you do not need to be a mathematical genius to conquer this iconic toy. By learning beginner rubik's cube algorithms step by step, you can transition from random, frustrating twists to a systematic, guaranteed triumph. This guide utilizes a tactical "war game" approach to help you identify common mistakes, deploy defensive strategies, and execute the exact sequences needed to crack the code.
The Blue Team Goal: Securing Your First Successful Rubik's Cube Solve
In our structural training, the Blue Team represents your ultimate objective: achieving a fully solved, pristine 3x3 cube. The mission is to align all six faces so that each displays a single, solid color. To accomplish this, we break down the cube into three distinct layers rather than trying to solve it face-by-face. If you have struggled in the past, reading a comprehensive guide on how to solve a 3x3 Rubik's cube step by step will help lay the groundwork for this layered strategy.
Our blueprint focuses on building muscle memory through highly repetitive, simple sequences. By treating each layer as a defensive perimeter that must be secured before moving to the next, you minimize the risk of scrambling your hard work. Let us look at the common disruptions that threaten this goal.
Red Team Attack 1: The Chaos of Unstructured Rotations
The Red Team represents the chaotic forces—frustration, random twists, and memory lapses—that seek to disrupt your solve. The first common attack is the intuitive, unstructured rotation pattern that beginners often default to when they get stuck.
Attack Method: Turning layers randomly without tracking the fixed center pieces or maintaining a consistent grip on the puzzle.
- Impact on Solve: You completely scramble the pieces you have already solved on the bottom layer.
- Impact on Progress: It resets your mental mapping, forcing you to start the entire process over from scratch.
- Impact on Motivation: It creates the false impression that solving the cube is purely a matter of luck.
- Impact on Speed: It adds unnecessary moves, blowing past the optimal beginner turn count.
Red Team Attack 2: The Infamous Second-Layer Edge Deselection
Once you secure the first layer, the Red Team launches a targeted strike on your middle layer. This is where many beginners abandon their attempts out of sheer frustration.
Attack Method: Executing the second-layer edge insertion algorithms from the wrong starting angle or using the incorrect mirror sequence.
- Impact on Solve: The target edge piece inserts upside down, or worse, the solved first-layer corners are ejected into the top layer.
- Impact on Progress: You must pause to re-solve the white corners, losing momentum.
- Impact on Muscle Memory: Executing incorrect moves repeatedly trains your fingers to perform the wrong sequences.
Red Team Attack 3: The Yellow-Face Orientation Collapse
The final and most devastating Red Team attack occurs at the very end of the solve. The final layer requires strict adherence to specific algorithms, and even a single misplaced turn can ruin the entire cube.
Attack Method: Forgetting to execute the final corner-orientation algorithm (the repeating four-move sequence) to completion before rotating the top face.
- Impact on Solve: The entire cube scrambles instantly, destroying all three layers of progress.
- Impact on Progress: It forces you to return to the white cross phase, undoing minutes of careful work.
- Impact on Confidence: This is the number-one reason beginners give up, believing their cube is somehow broken.
Defensive Matrix: Countering Algorithm Execution Failures
To defend against these Red Team attacks, we must establish a clear control matrix. The table below outlines the primary threats, the corresponding algorithmic controls, and how to handle residual risks during your practice runs.
| Threat Vector | Algorithmic Control | Residual Risk Mitigation |
|---|---|---|
| Losing track of center piece orientation | Always keep the white center on the bottom and yellow center on top | Choose a fixed front face color (e.g., green) and do not rotate the whole cube mid-algorithm |
| Inserting second-layer edges incorrectly | Use the Left or Right edge-insertion algorithm family | Verify that the front color of the edge piece matches the center column before starting |
| Scrambling the bottom during final corner twists | Strictly repeat the R' D' R D cycle until the yellow tile faces up |
Never turn the entire cube to reach the next corner; only rotate the U (Up) layer |
Purple-Team Lesson 1: Cracking the Code of Cube Notation
To implement our defenses, we must learn the universal language of speedcubing. Cube notation uses single letters to represent 90-degree clockwise turns of specific faces. A prime symbol (') indicates a counter-clockwise turn.
Understanding Face Rotations
Before moving on, familiarize yourself with these core movements. Practice them on a solved cube to see how they interact.
- R (Right): Turn the right-hand layer 90 degrees clockwise (away from you).
- R' (Right Prime): Turn the right-hand layer 90 degrees counter-clockwise (toward you).
- L (Left): Turn the left-hand layer 90 degrees clockwise (toward you).
- U (Up): Turn the top layer 90 degrees clockwise (to the left).
- F (Front): Turn the front face facing you 90 degrees clockwise.
Purple-Team Lesson 2: Establishing the White Cross Foundation
Our first active defensive maneuver is to create a white cross on the bottom face, ensuring that the side colors of the cross edges match their respective side center pieces perfectly.
- Hold the cube with the yellow center piece facing up.
- Locate white edge pieces in the middle or bottom layers and bring them to the top layer around the yellow center (creating the "Daisy").
- Look at the front-facing color of one of your white edges on the top layer.
- Rotate the top layer (
U) until that color matches its corresponding side center piece. - Turn that matching face 180 degrees (execute
F2) to send the white edge down to the white center on the bottom. Repeat for all four edges.
Purple-Team Lesson 3: Embedding the First Layer Corners
With the cross secured, we must now place the four white corner pieces into their correct slots to complete the entire first layer.
- Find a corner piece in the top layer that has white on it. Note its other two colors (e.g., red and green).
- Rotate the top layer until that corner is positioned directly above its target destination (between the red and green centers).
- Hold the cube so that the target slot is on the bottom-right-front side.
- Execute the "Right-Hand Trigger" algorithm:
R U R' U'. - Repeat this sequence until the white corner is settled on the bottom face with its side colors perfectly aligned.
Purple-Team Lesson 4: Aligning the Middle Layer Edges
To secure the middle layer, we must insert non-yellow edge pieces from the top layer into their correct positions. This requires executing specific Rubik's Cube algorithms for beginners to slide the pieces sideways without disturbing our completed white bottom layer.
- Find an edge piece in the top layer that does not contain any yellow.
- Rotate the top layer until the front-facing color of that edge matches its side center, creating a vertical line of three matching blocks.
- If the edge piece needs to go to the right slot, execute:
U R U' R' U' F' U F. - If the edge piece needs to go to the left slot, execute:
U' L' U L U F U' F'. - If a piece is stuck in the middle layer but oriented incorrectly, insert any random yellow edge to kick it out, then repeat the steps above.
Purple-Team Lesson 5: Creating the Yellow Cross
Now we transition our attention to the top face. Our goal is to form a yellow cross without altering the two completed bottom layers.
Navigating the Four Yellow States
When you look at the top face, you will see one of four patterns of yellow edges. Ignore the corners for this step.
- The Dot: Only the center yellow piece is visible. Execute
F R U R' U' F'to create the L-shape. - The L-Shape: Two yellow edges form a small backwards "L". Position it in the top-left corner of the upper face, then execute
F R U R' U' F'to get the horizontal line. - The Line: A horizontal bar of yellow edges. Hold it horizontally and execute
F R U R' U' F'to complete the yellow cross. - The Cross: Your yellow cross is already complete. Move directly to the next phase!
Purple-Team Lesson 6: Positioning the Yellow Corners Correctly
Before orienting the yellow corners so that they face up, we must place them in their correct physical positions (even if they are twisted or facing the wrong way).
- Examine the four corners of the top layer. A corner is in the "correct position" if its three colors match the three center pieces surrounding it.
- Rotate the top layer to see if you can get exactly one corner into its correct position.
- If you have only one correct corner, hold it in the front-right-top position and execute the Niklas algorithm:
U R U' L' U R' U' L. - If all four corners are in their correct spots, proceed to the final step. If none or two are correct, execute the Niklas algorithm once from any angle to scramble them, then repeat the alignment check.
Purple-Team Lesson 7: Orienting the Final Layer Corners
This is the final stretch. We will twist the yellow corners so that the yellow tiles face up, completing the solve. You must pay absolute attention to the warning below to avoid scrambling your entire progress.
CRITICAL WARNING: During this final step, the bottom layers of your cube will look completely scrambled. Do not panic! As long as you complete the full algorithm cycles and do not rotate the entire cube, the bottom layers will magically re-solve themselves on the very last turn.
Hold the cube so that a twisted yellow corner is in the front-right-top position. Execute R' D' R D. Repeat this four-move cycle until the yellow tile of that corner faces upward. Once it is correct, rotate only the top layer (U) to bring the next unsolved corner into the front-right-top slot. Repeat the R' D' R D cycle. Once all corners are yellow-side up, simply turn the top layer to align the colors and celebrate your victory!
The Speedcuber’s Daily Drill Schedule for Muscle Memory
To truly master these steps and learn to solve a Rubik's cube faster, you must transition from conscious thinking to subconscious muscle memory. According to speedcubing organizations like the World Cube Association, consistent, daily repetition is far more effective than marathon weekend sessions. Follow this structured daily drill routine:
- Day 1 & 2: Focus exclusively on the White Cross and White Corners. Practice solving the first layer under 60 seconds without looking at any guides.
- Day 3: Drill the second-layer edge insertion algorithms. Practice both the left-handed and right-handed versions 20 times each.
- Day 4: Practice transition states. Scramble the top layer and drill the Yellow Cross algorithm (
F R U R' U' F') until you recognize the states instantly. - Day 5: Master the Niklas corner positioning algorithm. Focus on keeping track of your reference corner.
- Day 6: Practice the final
R' D' R Dorientation step. Do this slowly to ensure you do not miss the finalDturn of each cycle. - Day 7: Put it all together! Run full, timed solves to build confidence and fluid transitions.
The Ultimate First-Solve Verification Checklist
Before you declare your training complete, run through this quick quality-assurance checklist to ensure your solve is clean, reproducible, and ready for advanced speedcubing techniques.
- Solid Centers: Do all outer layer colors align perfectly with their corresponding center pieces?
- No Twisted Corners: Are all corner pieces physically oriented correctly without manual twisting?
- Algorithm Fluency: Can you execute the "Sexy Move" (
R U R' U') in under two seconds? - No Reference Materials: Can you complete a solve from start to finish without looking at a cheat sheet?
- Mental Focus: Are you staying calm during the final layer corner-orientation step without panicking?