Solving a pocket cube might seem like a trivial task compared to its larger 3x3 sibling, but without a structured approach, it can quickly turn into a frustrating loop of scrambled colors. The 2x2 rubik's cube beginner method is designed specifically to break down this complex spatial puzzle into manageable, repeatable steps. By mastering a few simple sequences, anyone can transform a chaotic mix of plastic squares into a perfectly solved cube.
If you have ever stared at a scrambled mini-cube wishing it would just click into place, you are not alone. Many beginners assume that fewer pieces mean fewer headaches, only to discover that the 2x2 still possesses over 3.6 million possible permutations. This guide will walk you through the entire process, taking you from complete confusion to confident, muscle-memory execution. Let's dive into the mechanics and turn you into a pocket cube master.
The Frustrating Reality of a Scrambled Pocket Cube
Before learning a structured method, trying to solve a 2x2 cube is often a chaotic cycle of trial and error. You might successfully align one side, only to scramble it the moment you try to fix the remaining pieces. This unstructured approach leads to several common pain points that leave beginners feeling defeated.
- Accidentally destroying a completed side while trying to solve the opposite layer.
- Getting stuck in endless loops where the same three pieces keep swapping places.
- Failing to recognize how corner orientations affect the rest of the puzzle.
- Relying entirely on luck rather than predictable, algorithmic movements.
- Experiencing hand fatigue from executing dozens of unnecessary, random rotations.
To illustrate just how inefficient the unstructured approach is, let's look at the baseline performance metrics of an untrained solver compared to someone using a standard method:
| Metric | Unstructured Solver | Trained Beginner |
|---|---|---|
| Average Solve Time | 10+ minutes (or never) | Under 60 seconds |
| Move Count | 150+ random turns | 30 to 40 efficient turns |
| Frustration Level | Extremely High | Very Low (Calm & Systematic) |
Essential Anatomy of the 2x2 Pocket Cube
To solve the puzzle efficiently, you must understand that the 2x2 cube (historically known as the Pocket Cube on Wikipedia) consists entirely of corner pieces. Unlike the standard 3x3 cube, there are no fixed center pieces to guide your color choices. This means you must define the color of each face based on the relationship between the corner pieces themselves.
Understanding the Standard Color Scheme
On a standard Western cube, the color layout is highly predictable. White is always opposite yellow, green is opposite blue, and red is opposite orange. If you hold the cube with white on top and green facing you, red will be on your right. Memorizing these opposite pairs is crucial because it helps you determine where pieces belong even when the cube is completely scrambled.
Decoding Basic Cubing Notation
Cubing notation uses letters to represent 90-degree clockwise turns of specific faces. A prime symbol (') indicates a counter-clockwise turn.
- R (Right): Turn the right layer clockwise (away from you).
- R' (Right Prime): Turn the right layer counter-clockwise (toward you).
- U (Up): Turn the top layer clockwise.
- U' (Up Prime): Turn the top layer counter-clockwise.
- F (Front): Turn the front layer clockwise.
- F' (Front Prime): Turn the front layer counter-clockwise.
Your Step-by-Step Recovery Blueprint
To transition from random twisting to systematic solving, you need a reliable intervention plan. The beginner method breaks the solve down into three distinct, sequential phases. By focusing on one layer at a time, you eliminate the risk of undoing your progress.
- Phase 1: Solve the First Layer. Position and orient four matching corner pieces on the bottom of the cube, ensuring their side colors match as well.
- Phase 2: Orient the Top Layer (OLL). Bring all yellow stickers to the top face, regardless of whether their side colors align.
- Phase 3: Permute the Top Layer (PLL). Swap the remaining top corners into their correct final positions to complete the entire cube.
- Practice and Drill: Repeat the algorithms until your hands execute them without conscious thought.
Step 1 - Building the First White Layer
The journey begins by creating a solid foundation. Choose any corner piece that contains a white sticker to be your starting point. We will solve this first layer on the bottom of the cube.
- Find a white corner piece and place it in the bottom-left-front position, with the white sticker facing down.
- Look for another corner piece in the top layer that has a white sticker and matches one of the side colors of your first piece.
- Position this second piece directly above its target slot on the bottom-right-front.
- Execute the "sexy move" algorithm:
R U R' U'. Repeat this sequence (usually 1, 3, or 5 times) until the white sticker faces down and the side colors align perfectly. - Rotate the entire cube to bring a new empty slot to the bottom-right-front, and repeat the process for the remaining white corners.
Ensuring Side Color Harmony
A common rookie mistake is solving a white face where the side colors do not match. For example, you might have a fully white bottom, but the sides display mismatched red and orange stickers. To avoid this, always make sure that neighboring corners share the same side color. If you need a refresher on basic concepts, check out this guide on how to solve a Rubik's cube for beginners.
Step 2 - Orienting the Yellow Top Layer
Once the white layer is complete, flip the cube over so the solved white face is on the bottom. Your next goal is to make the entire top face yellow. We do this using a classic algorithm known as the Sune.
- Inspect the top face to see how many yellow stickers are already facing up. There are seven possible states.
- If you have exactly one yellow corner facing up, position it in the bottom-left-front of the top layer.
- If you have two yellow corners facing up, position them on the left side (or look for a yellow sticker on the front-left face).
- If no yellow corners are facing up, position the cube so a yellow sticker on the left side faces toward the left.
- Execute the Sune algorithm:
R U R' U R U2 R'. Repeat this process until the entire top face is yellow.
Understanding the Sune Algorithm
The Sune algorithm is a cornerstone of Rubik's cube algorithms for beginners. It cycles three top-layer corners while rotating them, leaving the bottom layer completely undisturbed. Understanding how this sequence manipulates the pieces will build your confidence for more advanced techniques later on.
Step 3 - Permuting the Last Layer Corners
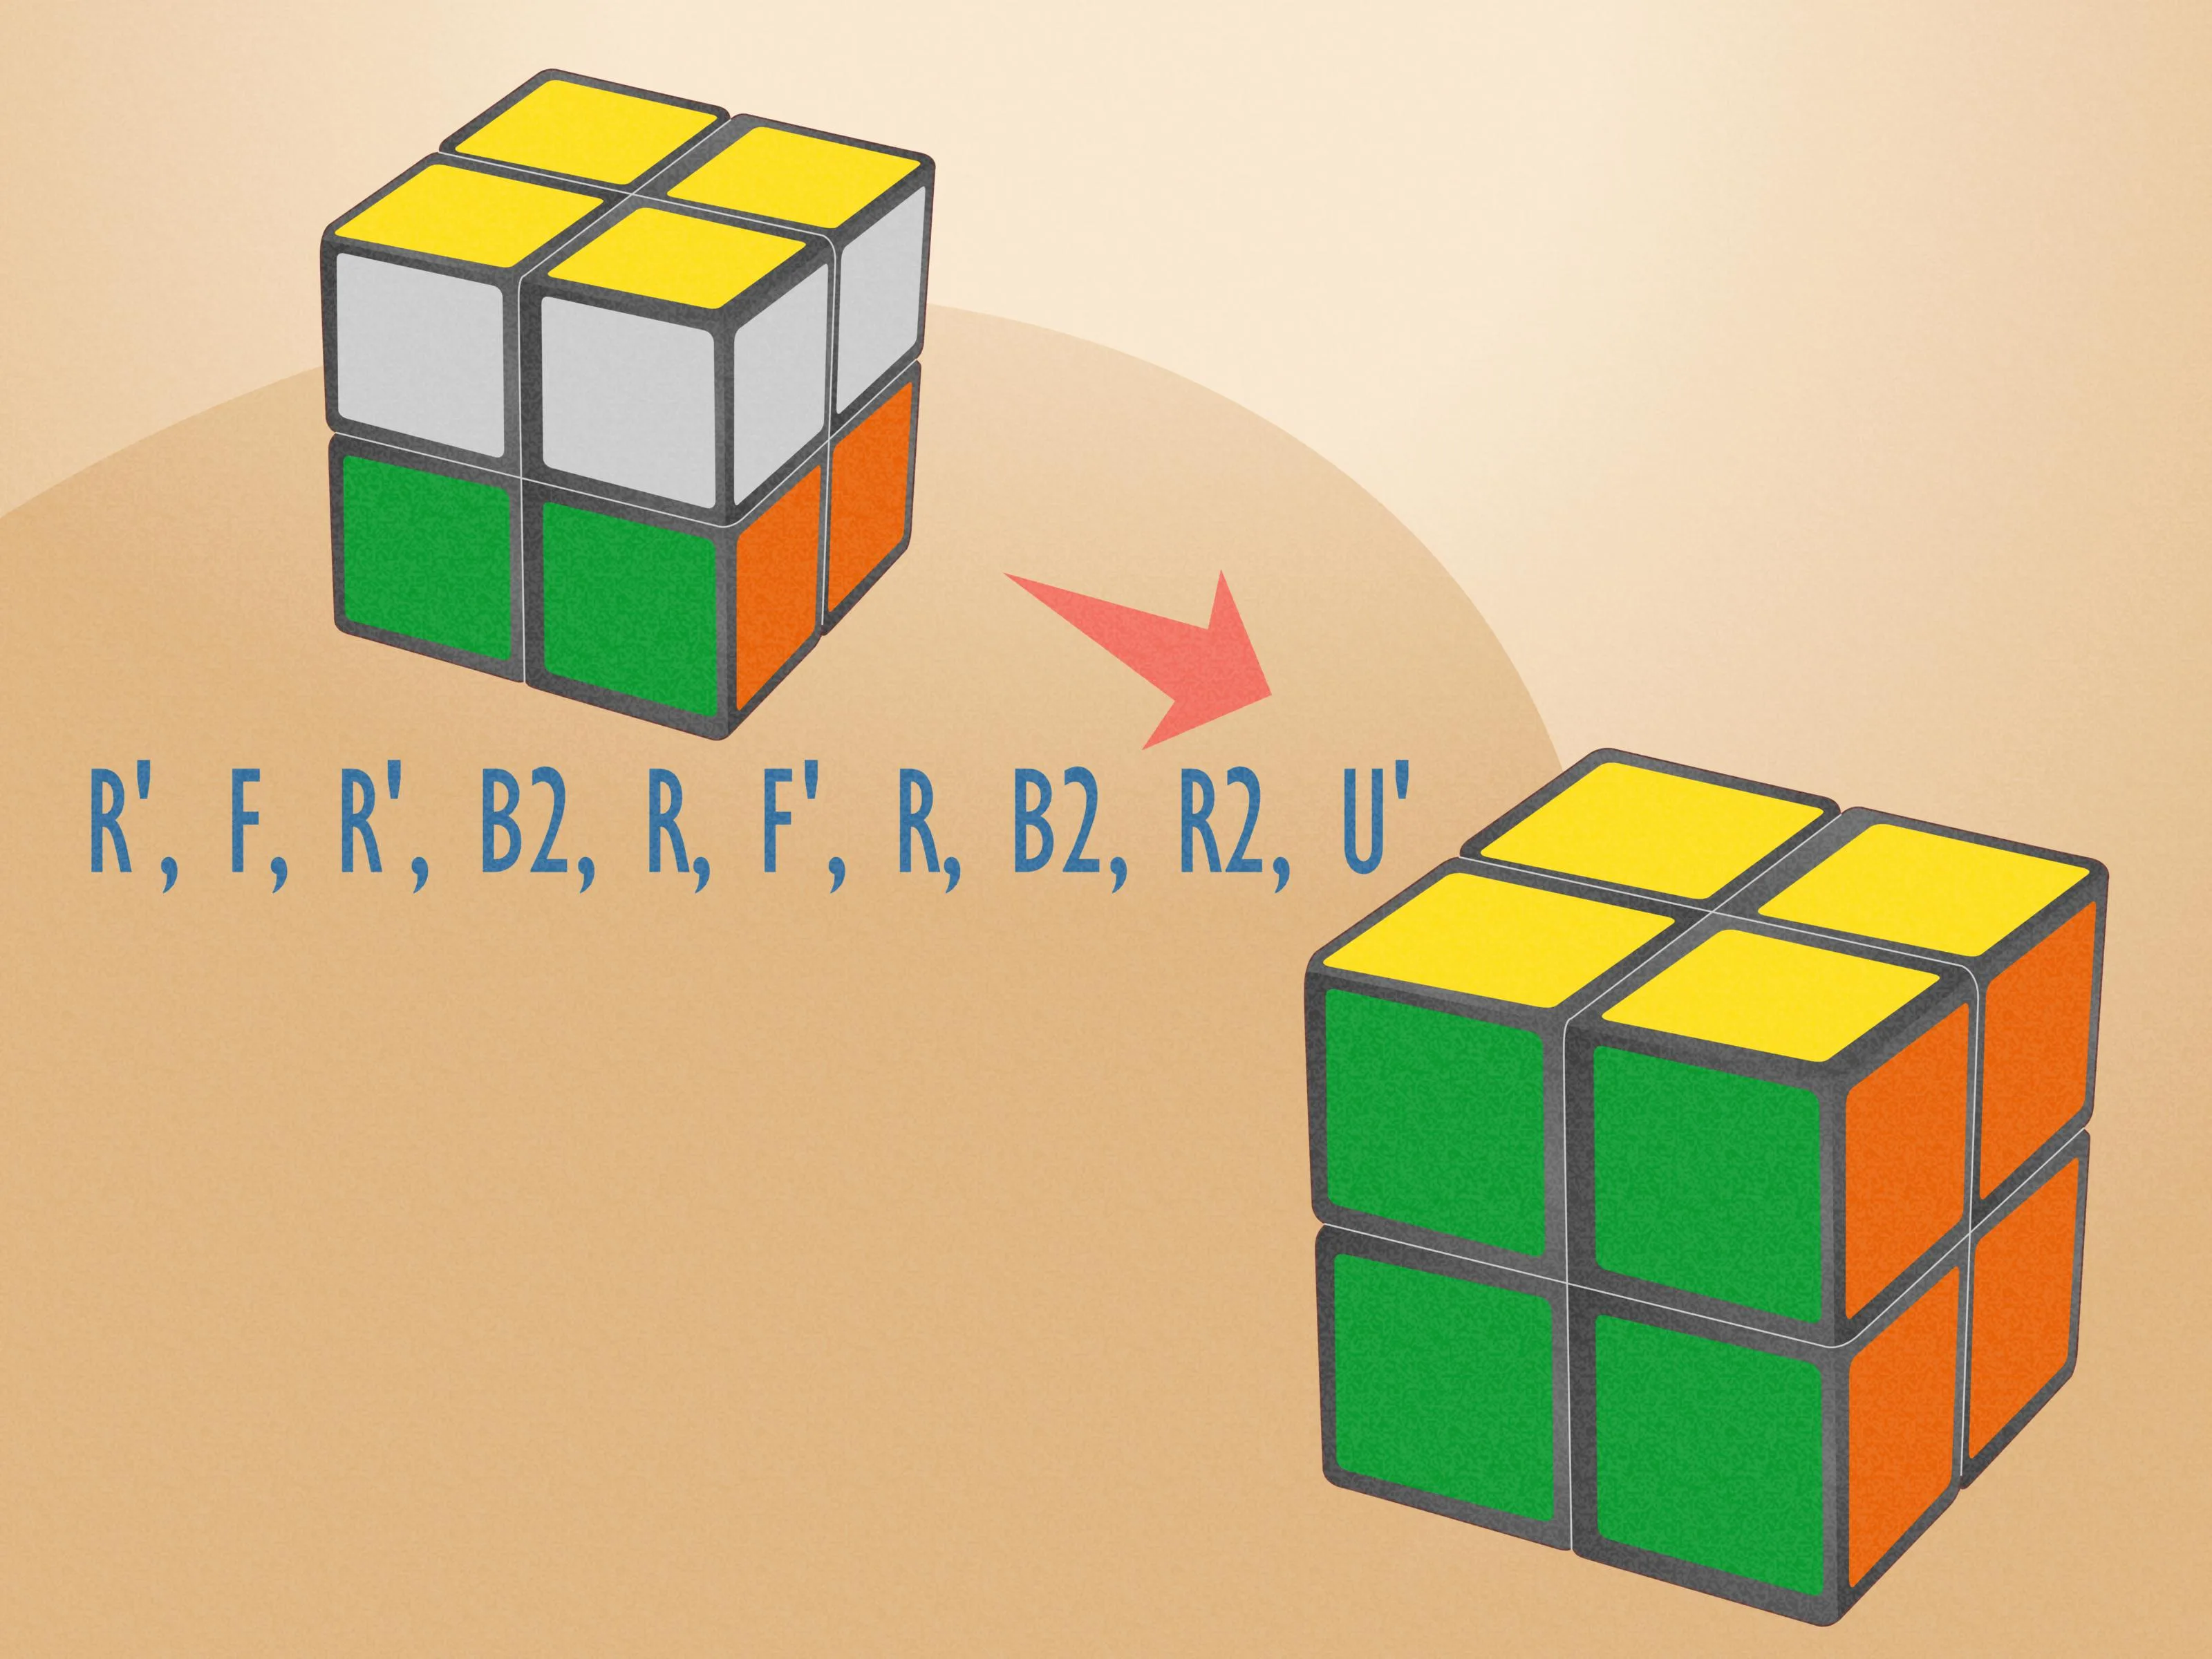
With the bottom layer solved and the top face entirely yellow, you are just one step away from victory. Now, you must arrange the yellow corners so their side colors match up with the bottom layer.
- Look around the top layer for "bars"—two adjacent corners that share the same side color.
- If you find a bar, match it with its corresponding color on the bottom layer, and rotate the cube so this completed bar faces away from you (on the Back face).
- Execute the following permutation algorithm:
R' F R' B2 R F' R' B2 R2. - If you do not have any bars, execute the same algorithm once from any angle. This will create a bar. Then, align the bar, face it away from you, and run the algorithm one more time.
- Perform a final U or U' turn to align the top layer with the bottom layer, completing the solve.
The Power of Muscle Memory
The permutation algorithm can feel long and intimidating at first. The key is to break it down into smaller triggers. For instance, notice how your right hand moves back and forth while your left hand coordinates the double back-face turns (B2). Practice this sequence slowly until your fingers remember the flow.
Pitfalls and Speedbumps During Your First Solves
Learning any new puzzle involves a learning curve, and the 2x2 is no exception. Recognizing common mistakes early on will save you hours of frustration.
- Misinterpreting Prime Turns: Turning a face clockwise when the algorithm calls for a counter-clockwise (prime) turn is the number one cause of scrambled cubes.
- Losing Cube Orientation: Accidentally rotating the entire cube in your hands mid-algorithm will scramble your progress. Keep your grip steady and maintain your front face.
- Ignoring Mismatched Bottom Sides: Solving the white face without matching the side colors makes it mathematically impossible to solve the top layer correctly.
- Flipping Corners Manually: Physically twisting a corner piece to "fix" it can ruin the physical mechanism and make the cube unsolvable. Always use algorithms to orient pieces.
- Rushing the Execution: Trying to turn too quickly before memorizing the finger tricks leads to lockups and dropped cubes.
Transitioning From Chaos to a Solved State
The shift from random, frantic turning to structured, intentional moves is a profound experience for any aspiring cuber. It marks the transition from seeing the cube as a chaotic toy to viewing it as a structured mathematical system.
"The magic of the Rubik's cube isn't in how fast your fingers move, but in how clearly your mind organizes the chaos. Once you trust the algorithms, the puzzle solves itself."
As you practice these steps, you will notice that your brain begins to recognize patterns before you even start turning. This spatial awareness is a skill that transfers directly to larger puzzles, including the classic 3x3 cube.
The After State: What Mastery Looks Like in Numbers
Once you have integrated the 2x2 rubik's cube beginner method into your daily routine, your relationship with the puzzle changes dramatically. You are no longer guessing; you are executing a precise sequence of moves.
- Sub-30 Second Solves: With consistent practice, your average solve time will easily drop below 30 seconds.
- Zero Scramble Anxiety: You can hand your cube to anyone, let them scramble it as much as they want, and know with 100% certainty that you can solve it.
- Muscle Memory Integration: Your fingers will begin executing the algorithms automatically, allowing you to solve the cube while having a conversation or watching television.
- Algorithmic Literacy: You will find it much easier to learn advanced methods like Ortega or CLL, as your brain is already accustomed to reading cubing notation.
Side-by-Side Comparison: Before vs After Learning the Method
Let's look at a structured comparison of how your solving experience transforms once you transition from an unstructured approach to the official beginner method.
| Feature | The Scrambled "Before" State | The Mastered "After" State |
|---|---|---|
| Primary Strategy | Random twisting and hoping for the best | Structured, three-phase algorithmic approach |
| Solve Rate | Less than 5% success rate | 100% guaranteed success on every scramble |
| Time Investment | Hours of unproductive frustration | Under a minute of calm, satisfying execution |
| Mental Load | High stress, constant second-guessing | Relaxing, meditative flow state |
How to Track Your Personal Cubing Evolution
Measuring your progress is one of the most rewarding aspects of cubing. To see how far you have come, follow this simple tracking routine.
- Establish a Baseline: Scramble your cube and try to solve it without looking at any guides. Record your time, even if you do not finish.
- Use a Dedicated Cubing Timer: Download a mobile app or use an online timer (like CSTimer) to get accurate solve times and track your averages.
- Track your "Average of 5" (Ao5): Individual solves can be lucky or unlucky. Your Ao5 is a much better indicator of your actual skill level.
- Analyze Your Transitions: Notice where you pause during a solve. Are you spending too much time searching for pieces after completing the first layer? Work on minimizing these pauses.
Basic Notation Every Beginner Must Memorize
To make sure you never get lost in an algorithm, let's review the precise movements required for each notation symbol. Think of these as the vocabulary of your hands.
- R (Right): Turn the right-hand layer clockwise. If you look at the right side directly, this is clockwise.
- R' (Right Prime): Turn the right-hand layer counter-clockwise.
- U (Up): Turn the top layer clockwise. If you look at the top face from above, this is clockwise.
- U' (Up Prime): Turn the top layer counter-clockwise.
- F (Front): Turn the front-facing layer clockwise.
- F' (Front Prime): Turn the front-facing layer counter-clockwise.
Moving Beyond the Basics to Advanced Speedcubing
Once you can comfortably solve the 2x2 cube in under 45 seconds using this beginner method, you might feel the itch to go even faster. The beginner method is the perfect stepping stone to advanced speedcubing techniques.
If you want to push your limits, you can transition to the Ortega Method, which allows you to solve the bottom face first, orient the top face, and then permute both layers simultaneously. To learn how to optimize your finger tricks and look-ahead strategies, explore our comprehensive guide on how to solve a Rubik's cube faster. This will set you on the path to competitive speeds and official tournaments.
Final Checklist Before Your Next Scramble
Before you scramble your cube and start practicing, run through this quick checklist to ensure your environment and mindset are optimized for success.
- Is your cube clean and properly lubricated? A smooth-turning cube prevents lockups and finger strain.
- Do you have your algorithm cheat sheet nearby? Keep it handy until your muscle memory takes over.
- Are you holding the cube with a relaxed grip? Tense hands make more execution mistakes.
- Are you practicing in a well-lit room? Good lighting is essential for fast color recognition.
- Remember to have fun! Every scramble is a new opportunity to perfect your technique.