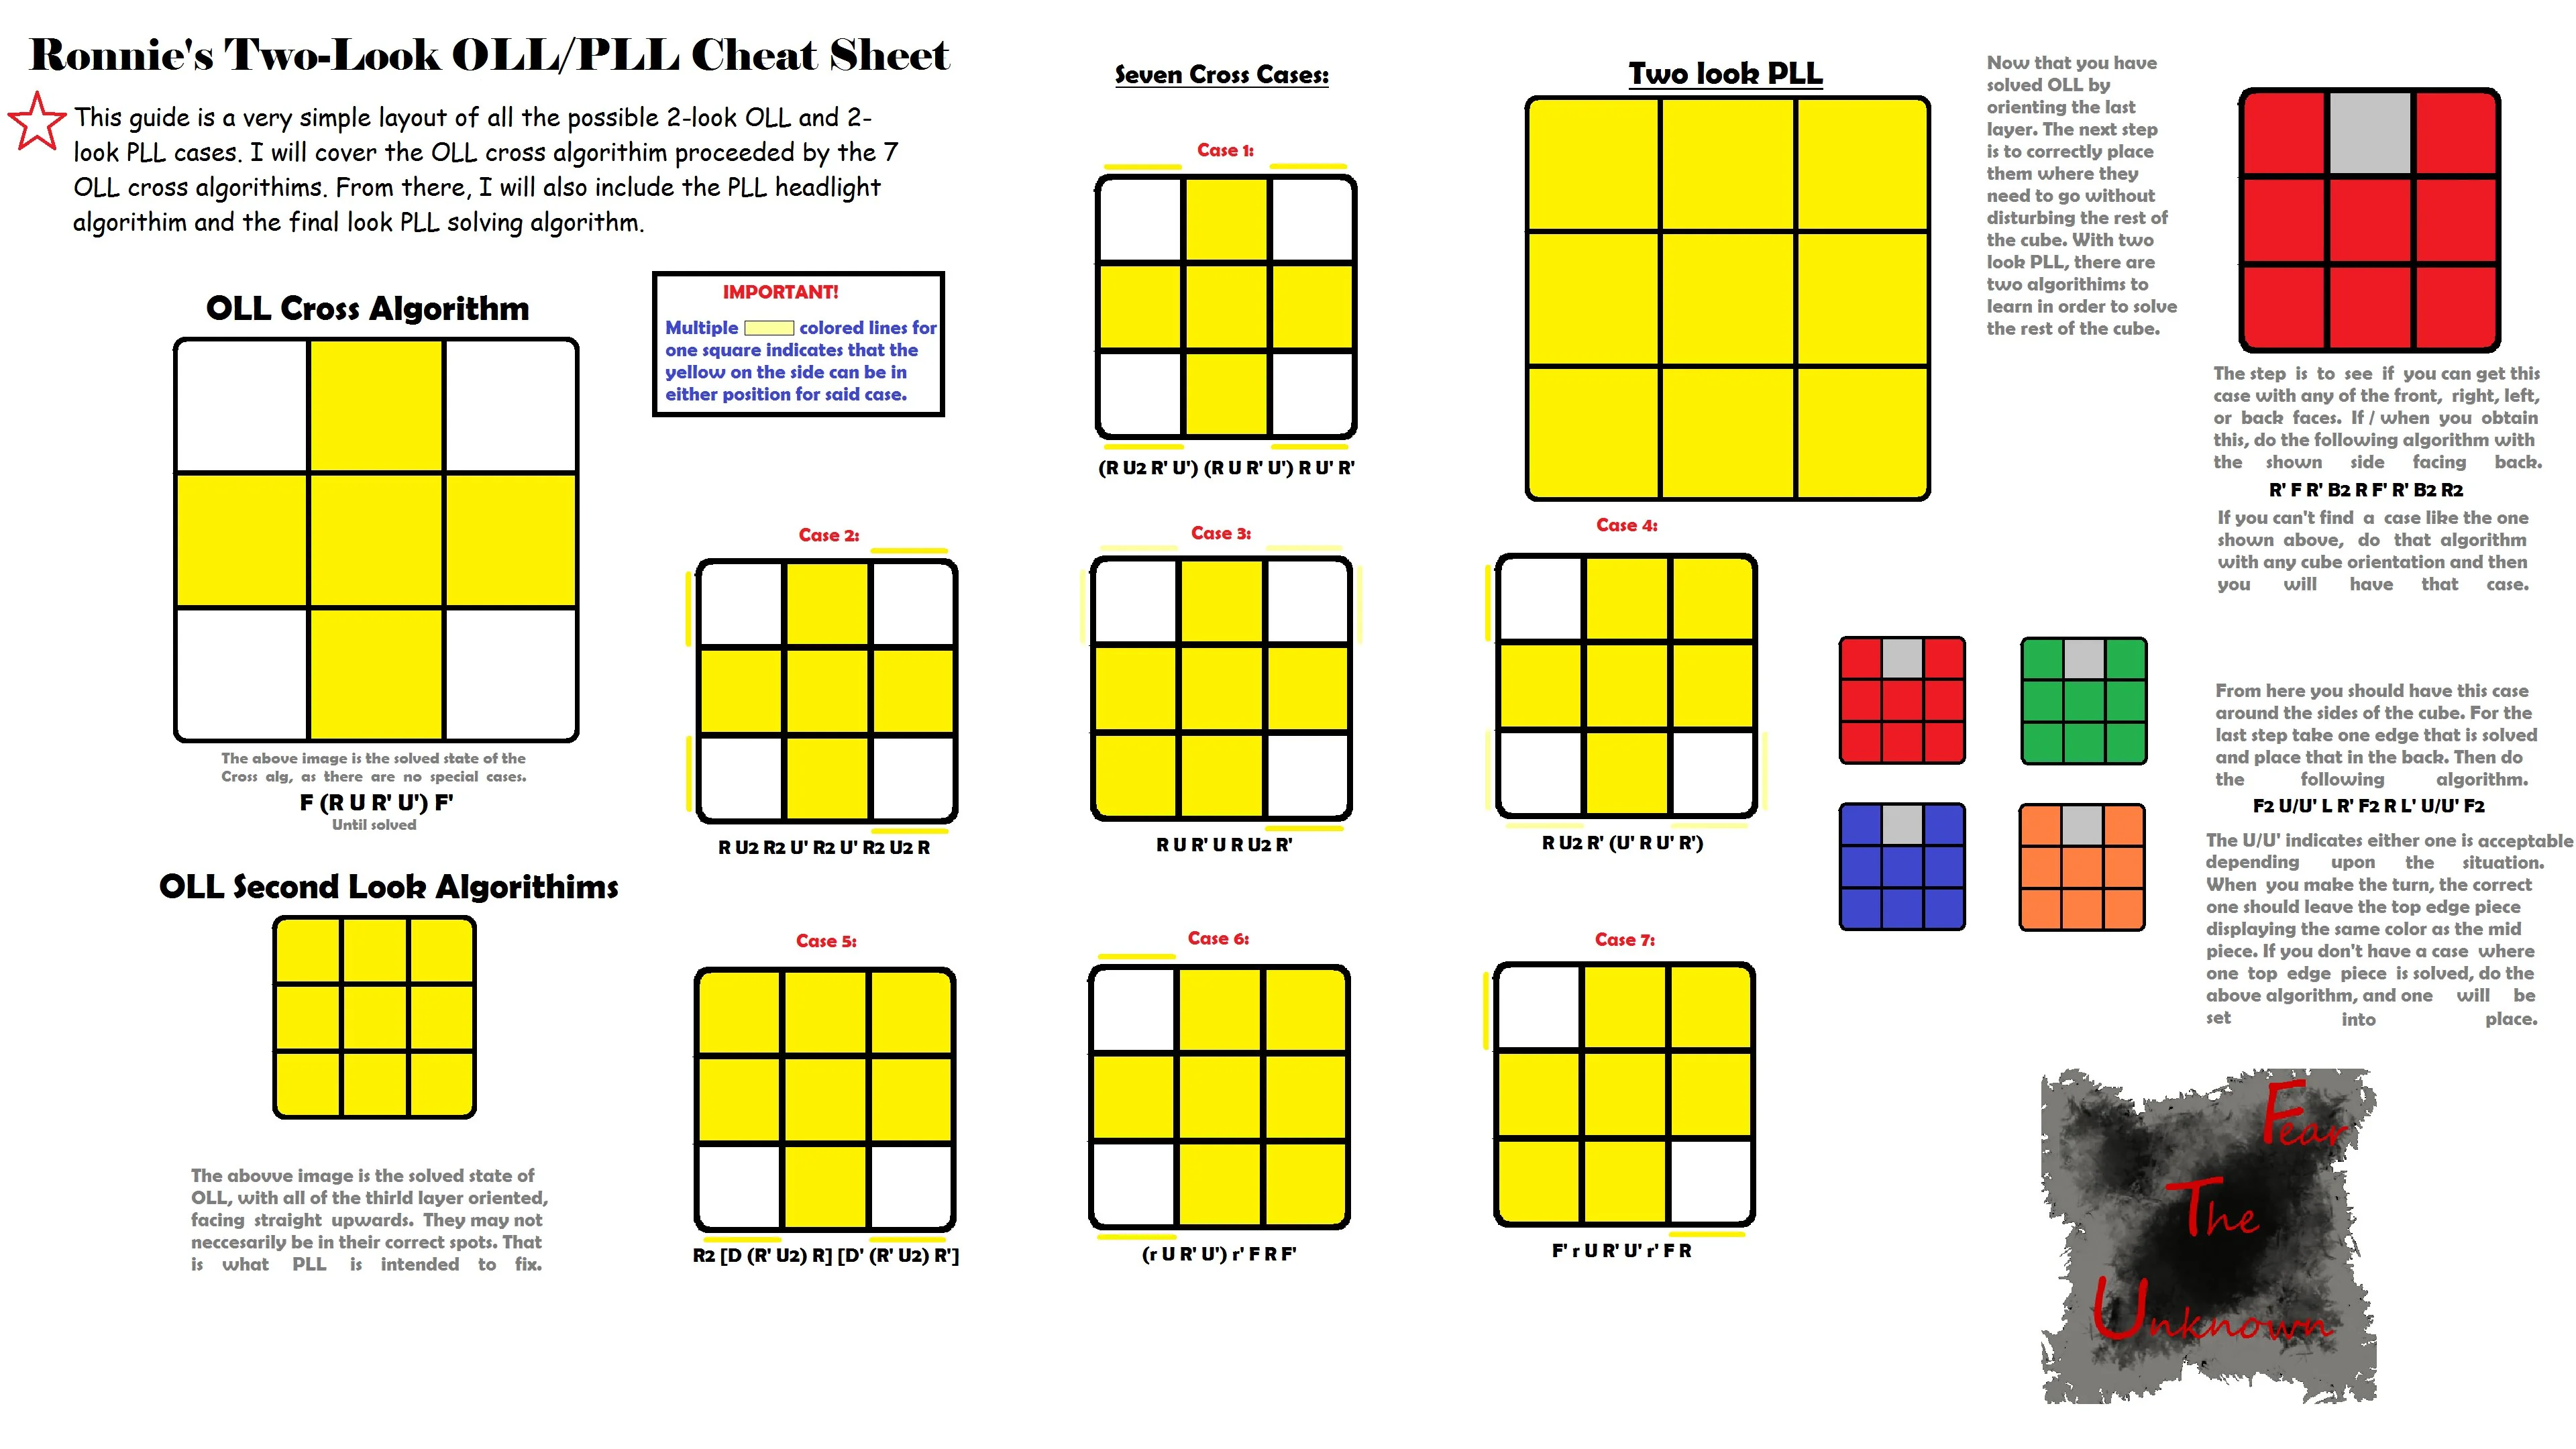
Solving the Rubik's Cube can feel like magic, but transitioning from a casual solver to a speedcuber requires a structured approach to the last layer. If you are looking to level up your speeds, learning rubik's cube oll algorithms for beginners is the single best milestone you can reach. OLL, which stands for Orientation of the Last Layer, is the third step of the CFOP (Cross, F2L, OLL, PLL) method. While the full OLL set contains 57 different algorithms, beginners can achieve incredible speeds using a simplified system called 2-Look OLL, which reduces the required algorithms to just ten easy-to-learn sequences.
By breaking down the last layer into two distinct looks, you eliminate the overwhelming memorization process while still cutting your solve times in half. This tutorial will walk you through the entire transition from slow, intuitive methods to fast, muscle-memory-driven algorithms. Whether you are using a basic budget cube or a high-end magnetic speedcube, mastering these ten algorithms will pave the way for competitive-level solving.
Identifying Your Current Last-Layer Speed Bottlenecks
Before diving into new algorithms, it is crucial to recognize why your current last-layer method is holding you back. Most beginner methods rely on repeating the same short sequence over and over again to orient yellow pieces. This process is highly inefficient, prone to execution errors, and adds valuable seconds to your times.
If you find yourself experiencing the following symptoms during your solves, you have reached the limits of the standard beginner's method:
- You rotate the entire cube multiple times to find where yellow stickers are located.
- You repeat the same four-move sequence up to six times just to flip a single corner piece.
- You frequently lose track of your progress, accidentally scrambling the bottom layers of your cube.
- Your last-layer phase takes more than 20 seconds to complete, even when the rest of the solve went smoothly.
- You rely purely on visual intuition rather than structured, predictable muscle memory.
To give you a clearer picture of where you stand, let us look at the typical baseline metrics of a beginner compared to someone who has just started implementing basic OLL sequences:
| Solving Metric | Beginner Layer-by-Layer | 2-Look OLL Beginner |
|---|---|---|
| Average Last-Layer Time | 25 - 45 seconds | 8 - 15 seconds |
| Number of Rotations | 4 - 8 rotations | 0 - 2 rotations |
| Algorithm Count | 2 - 3 simple loops | 10 specific algorithms |
| Execution Style | Visual tracking of pieces | Pure muscle memory |
Master the Language of the Cube First
To successfully memorize and execute these algorithms, you must first understand standard cubing notation. If you are already familiar with basic movements, this will be a quick refresher. If not, taking a moment to learn these letters will save you hours of confusion later.
Before proceeding, make sure you understand the following execution steps for basic notation:
- Identify the faces:
Ris Right,Lis Left,Uis Up (top layer),Dis Down (bottom layer),Fis Front, andBis Back. - Understand direction: A single letter like
Rmeans a 90-degree clockwise turn of that face as if you are looking directly at it. - Spot the primes: A letter followed by an apostrophe, such as
R'(pronounced "R-prime"), means a 90-degree counter-clockwise turn. - Double turns: A letter followed by a 2, such as
U2, means a 180-degree turn of that face in either direction.
If you need a deeper dive into these movements, check out our comprehensive guide on Rubik's Cube Notation Explained for Beginners to build a rock-solid foundation.
The Step-by-Step 2-Look OLL Training Strategy
The core philosophy of 2-Look OLL is splitting the orientation of the top layer into two manageable steps. Instead of orienting all edges and corners simultaneously (which requires 57 algorithms), you solve them sequentially. First, you orient the yellow edges to form a cross. Second, you orient the yellow corners to complete the entire yellow face.
This structured intervention plan will help you systematically transition your solve style:
- Step 1: Identify the Edge State. Look at the top layer and ignore the corners. Determine if you have a Dot, an L-shape, a Line, or an already completed Cross.
- Step 2: Apply the Edge Algorithm. Execute the specific sequence designed to transform your edge pattern into a completed yellow cross.
- Step 3: Identify the Corner State. Examine the positions of the yellow corner stickers relative to your completed cross. There are exactly seven possible layouts.
- Step 4: Apply the Corner Algorithm. Execute the corresponding algorithm to orient all corners, completing the entire yellow face.
- Step 5: Transition to Permutation. Once the yellow face is fully oriented, you are ready to transition directly into the final step of the solve.
By breaking the process down this way, you only need to memorize 3 algorithms for the edges and 7 algorithms for the corners. This is the exact method used by intermediate speedcubers worldwide to transition from beginner statuses.
Step 1 - Orienting the Edges: Crafting the Yellow Cross
When you finish the first two layers (F2L), your top layer will have one of four edge patterns. Your goal is to get a yellow cross on top. If you already have a cross, you can skip this step entirely. Otherwise, you will use variations of the classic "Sextuple Move" or "Sexy Move" (R U R' U') to orient the edges.
The Three Edge Scenarios
Depending on your top layer, apply one of the following sequences to create your yellow cross:
- The Line: Keep the line horizontal relative to your view. Execute
F (R U R' U') F'to instantly create the cross. - The L-Shape: Position the two yellow edges so they point to the back and to the left (forming an backward 'L'). Execute
f (R U R' U') f'(using a double-layer front turn). - The Dot: When no edges are oriented, combine both moves. Execute
F (R U R' U') F', perform aU2, and then executef (R U R' U') f'.
If you are still working on your overall solving flow, reading Rubik's Cube Algorithms for Beginners can help you contextualize how these edge orientations fit into the broader solving process.
Step 2 - Orienting the Corners: The Seven Crucial Corner Cases
Once your yellow cross is complete, you will face one of seven possible corner configurations. To solve these, hold the cube exactly as described in the table below and perform the corresponding algorithm. Pay close attention to where the unoriented yellow stickers are facing before you begin turning.
| Case Name | Visual Description | Starting Setup & Algorithm |
|---|---|---|
| Sune | One corner solved. Front-right corner has yellow on front. | Hold solved corner at front-left: R U R' U R U2 R' |
| Anti-Sune | One corner solved. Front-right corner has yellow on right. | Hold solved corner at back-left: R U2 R' U' R U' R' |
| H Case | No corners solved. Two pairs of headlights facing outwards. | Hold headlights facing front and back: R U2 R2 U' R2 U' R2 U2 R |
| Pi Case | No corners solved. One pair of headlights, two side headlights. | Hold headlights on the left side: R U2 R' U' (R U R' U') (R U R' U') R U' R' |
| T Case | Two corners solved. Two headlights facing front. | Hold headlights on the front face: r U R' U' r' F R F' |
| U Case | Two corners solved. Headlights facing front, solved corners at back. | Hold headlights on the front face: R2 D R' U2 R D' R' U2 R' |
| L Case | Two corners solved in a diagonal pattern. | Hold solved corner at front-left, yellow facing front: F' r U R' U' r' F R |
Pitfalls to Avoid While Memorizing Algorithms
As you begin practicing these 10 algorithms, it is easy to fall into bad habits that can stunt your speed progression. Recognizing these pitfalls early will keep your learning curve smooth and frustrating-free.
Keep these common execution mistakes in mind during your daily practice sessions:
- Over-relying on visual letters: Try to move away from reading the letters on a page as soon as possible. Focus on how your hands feel and how the pieces move dynamically.
- Neglecting your grip: Do not hold the cube too tightly. A rigid grip leads to lockups and prevents you from executing double turns (like
U2) smoothly. - Rotating the whole cube: Instead of rotating the entire cube to align your patterns, use
U,U', orU2moves to bring the yellow pieces into the correct starting positions. - Failing to practice both directions: Make sure you can execute both Sune and Anti-Sune with equal confidence, as they are mirror images of each other.
- Ignoring the rest of the puzzle: Do not get so hyper-focused on OLL that you forget how to transition smoothly from your first two layers.
What Your Solve Times Look Like Post-OLL Mastery
Once you commit these ten algorithms to muscle memory, your solving experience will undergo a massive transformation. You will no longer feel like you are fighting the cube to get the yellow face done. Instead, your fingers will execute the moves automatically the moment your eyes recognize the pattern.
Here are the typical performance upgrades you can expect after a few weeks of consistent practice:
- Drastic time reduction: Your last-layer time will drop from an average of 30 seconds down to a consistent sub-10 second phase.
- Reduced physical strain: Because these algorithms are optimized for speed, you will perform fewer total moves and experience less finger fatigue.
- Better recognition skills: You will develop "look-ahead" capabilities, allowing you to spot your next moves while finishing your first two layers.
- Confidence boost: Having a structured, algorithmic approach removes the panic of scrambling the cube during competitive or timed runs.
Layer-by-Layer vs. 2-Look OLL Execution
To truly appreciate the value of upgrading your speedcubing toolkit, let us compare the physical execution steps of the beginner's method against the streamlined efficiency of 2-Look OLL.
| Feature / Step | Traditional Beginner's Method | Modern 2-Look OLL Method |
|---|---|---|
| Total Move Count | Often exceeds 40+ moves for last layer | Typically between 12 to 24 total moves |
| Corner Orientation Style | Repetitive R' D' R D loops | Single, specialized high-speed algorithms |
| Mental Processing Load | High (must constantly check if bottom is scrambled) | Low (trust the algorithm to keep bottom intact) |
| Average Execution Time | 35 seconds | 6 seconds |
| Scalability to Sub-30 Solves | Extremely difficult to achieve consistently | The standard gateway to sub-20 second solves |
Tracking Your Personal Reconstruction Progress
To ensure you are actually improving, you should measure your before-and-after performance systematically. Do not just rely on your overall solve times, as scrambles can vary in difficulty. Instead, isolate your last-layer practice.
Follow this testing routine to measure your progress over a two-week period:
- Scramble and solve F2L: Solve your first two layers as you normally would, then stop your timer.
- Record your starting OLL time: Start the timer, execute your OLL steps, and stop it the moment the yellow face is completely solid. Record this time.
- Log your algorithm execution: Note down which of the 7 corner cases you encountered and whether you executed it without pausing.
- Calculate your weekly average: Take the average of 10 OLL-only solves at the end of each week to see your progression curve.
- Identify slow cases: If a specific case like the Pi or L-case is consistently taking longer, isolate that algorithm and drill it 20 times in a row.
Transitioning from 2-Look to Full 57 OLL
While 2-Look OLL is incredibly powerful and can easily carry you to sub-20 second solve times, you may eventually want to learn the full 57 OLL set. This transition should not be rushed. Think of 2-Look OLL as the structural framework that prepares your brain for advanced speedcubing.
"Consistency in speedcubing is not about turning your hands as fast as possible; it is about eliminating pauses between your moves and trusting your muscle memory to carry you through the solve."
When you are ready to expand your knowledge, you will find that many of the 57 full OLL algorithms are simply short combinations or slight variations of the 10 beginner algorithms you have already mastered here. This makes expanding your algorithm library feel like a natural evolution rather than a daunting chore.
Executing Algorithms with Speed and Efficiency
To make your algorithms truly fast, you need to learn proper finger tricks. Finger tricks are optimized ways of turning the cube faces using flicks of your fingers rather than rotating your entire wrist. This is what separates casual solvers from competitive speedcubers.
The Power of the Index Flick
The most basic finger trick is the index finger flick for U and U' moves. Instead of gripping the top layer and turning it with your hand, keep your thumbs on the front of the cube and use your left or right index finger to flick the back corners of the top layer forward.
Double Turns and Regrip Minimization
For double turns like U2, practice a double-flick technique using your index finger followed immediately by your middle finger. Additionally, try to execute your algorithms with as few "regrips" (re-positioning your hands on the cube) as possible. Keeping your hands in a neutral home grip allows for seamless transitions between moves.
If you are looking for a complete overview of how these speed techniques fit into a full puzzle-solving journey, our guide on How to Solve a Rubik's Cube for Beginners offers excellent context for structuring your practice routines.
Daily Drills for Muscle Memory Retention
Memorizing ten algorithms can feel overwhelming at first, but with a structured daily routine, you can commit them to permanent muscle memory in less than two weeks. Use this checklist to guide your daily practice sessions:
- Day 1-3: Focus exclusively on the 3 edge orientation algorithms. Drill them until you can identify and solve the yellow cross in under 3 seconds.
- Day 4-7: Introduce the Sune and Anti-Sune corner algorithms. These are the most common corner cases and form the basis of many other algorithms.
- Day 8-10: Learn the remaining 5 corner algorithms (H, Pi, T, U, L). Practice them slowly, focusing on clean turns rather than pure speed.
- Day 11-14: Put everything together. Do 50 timed solves a day, focusing specifically on smooth transitions between the first and second looks of your OLL.
Preparing Your Cube for the Final Permutation
Once you have successfully oriented the yellow face, you have completed the OLL phase! Your cube's top face will be completely yellow, but the side stickers of the top layer will still be scrambled. This brings you to the final step of the CFOP method: PLL (Permutation of the Last Layer).
To complete your journey and master the final step of the puzzle, proceed to our detailed tutorial on Rubik's Cube Last Layer Algorithms for Beginners. Combining your newly acquired OLL skills with efficient PLL algorithms will make you a truly formidable solver, capable of tackling the Rubik's Cube in under 30 seconds with ease. Keep practicing, stay patient with your fingers, and enjoy the speed progression!