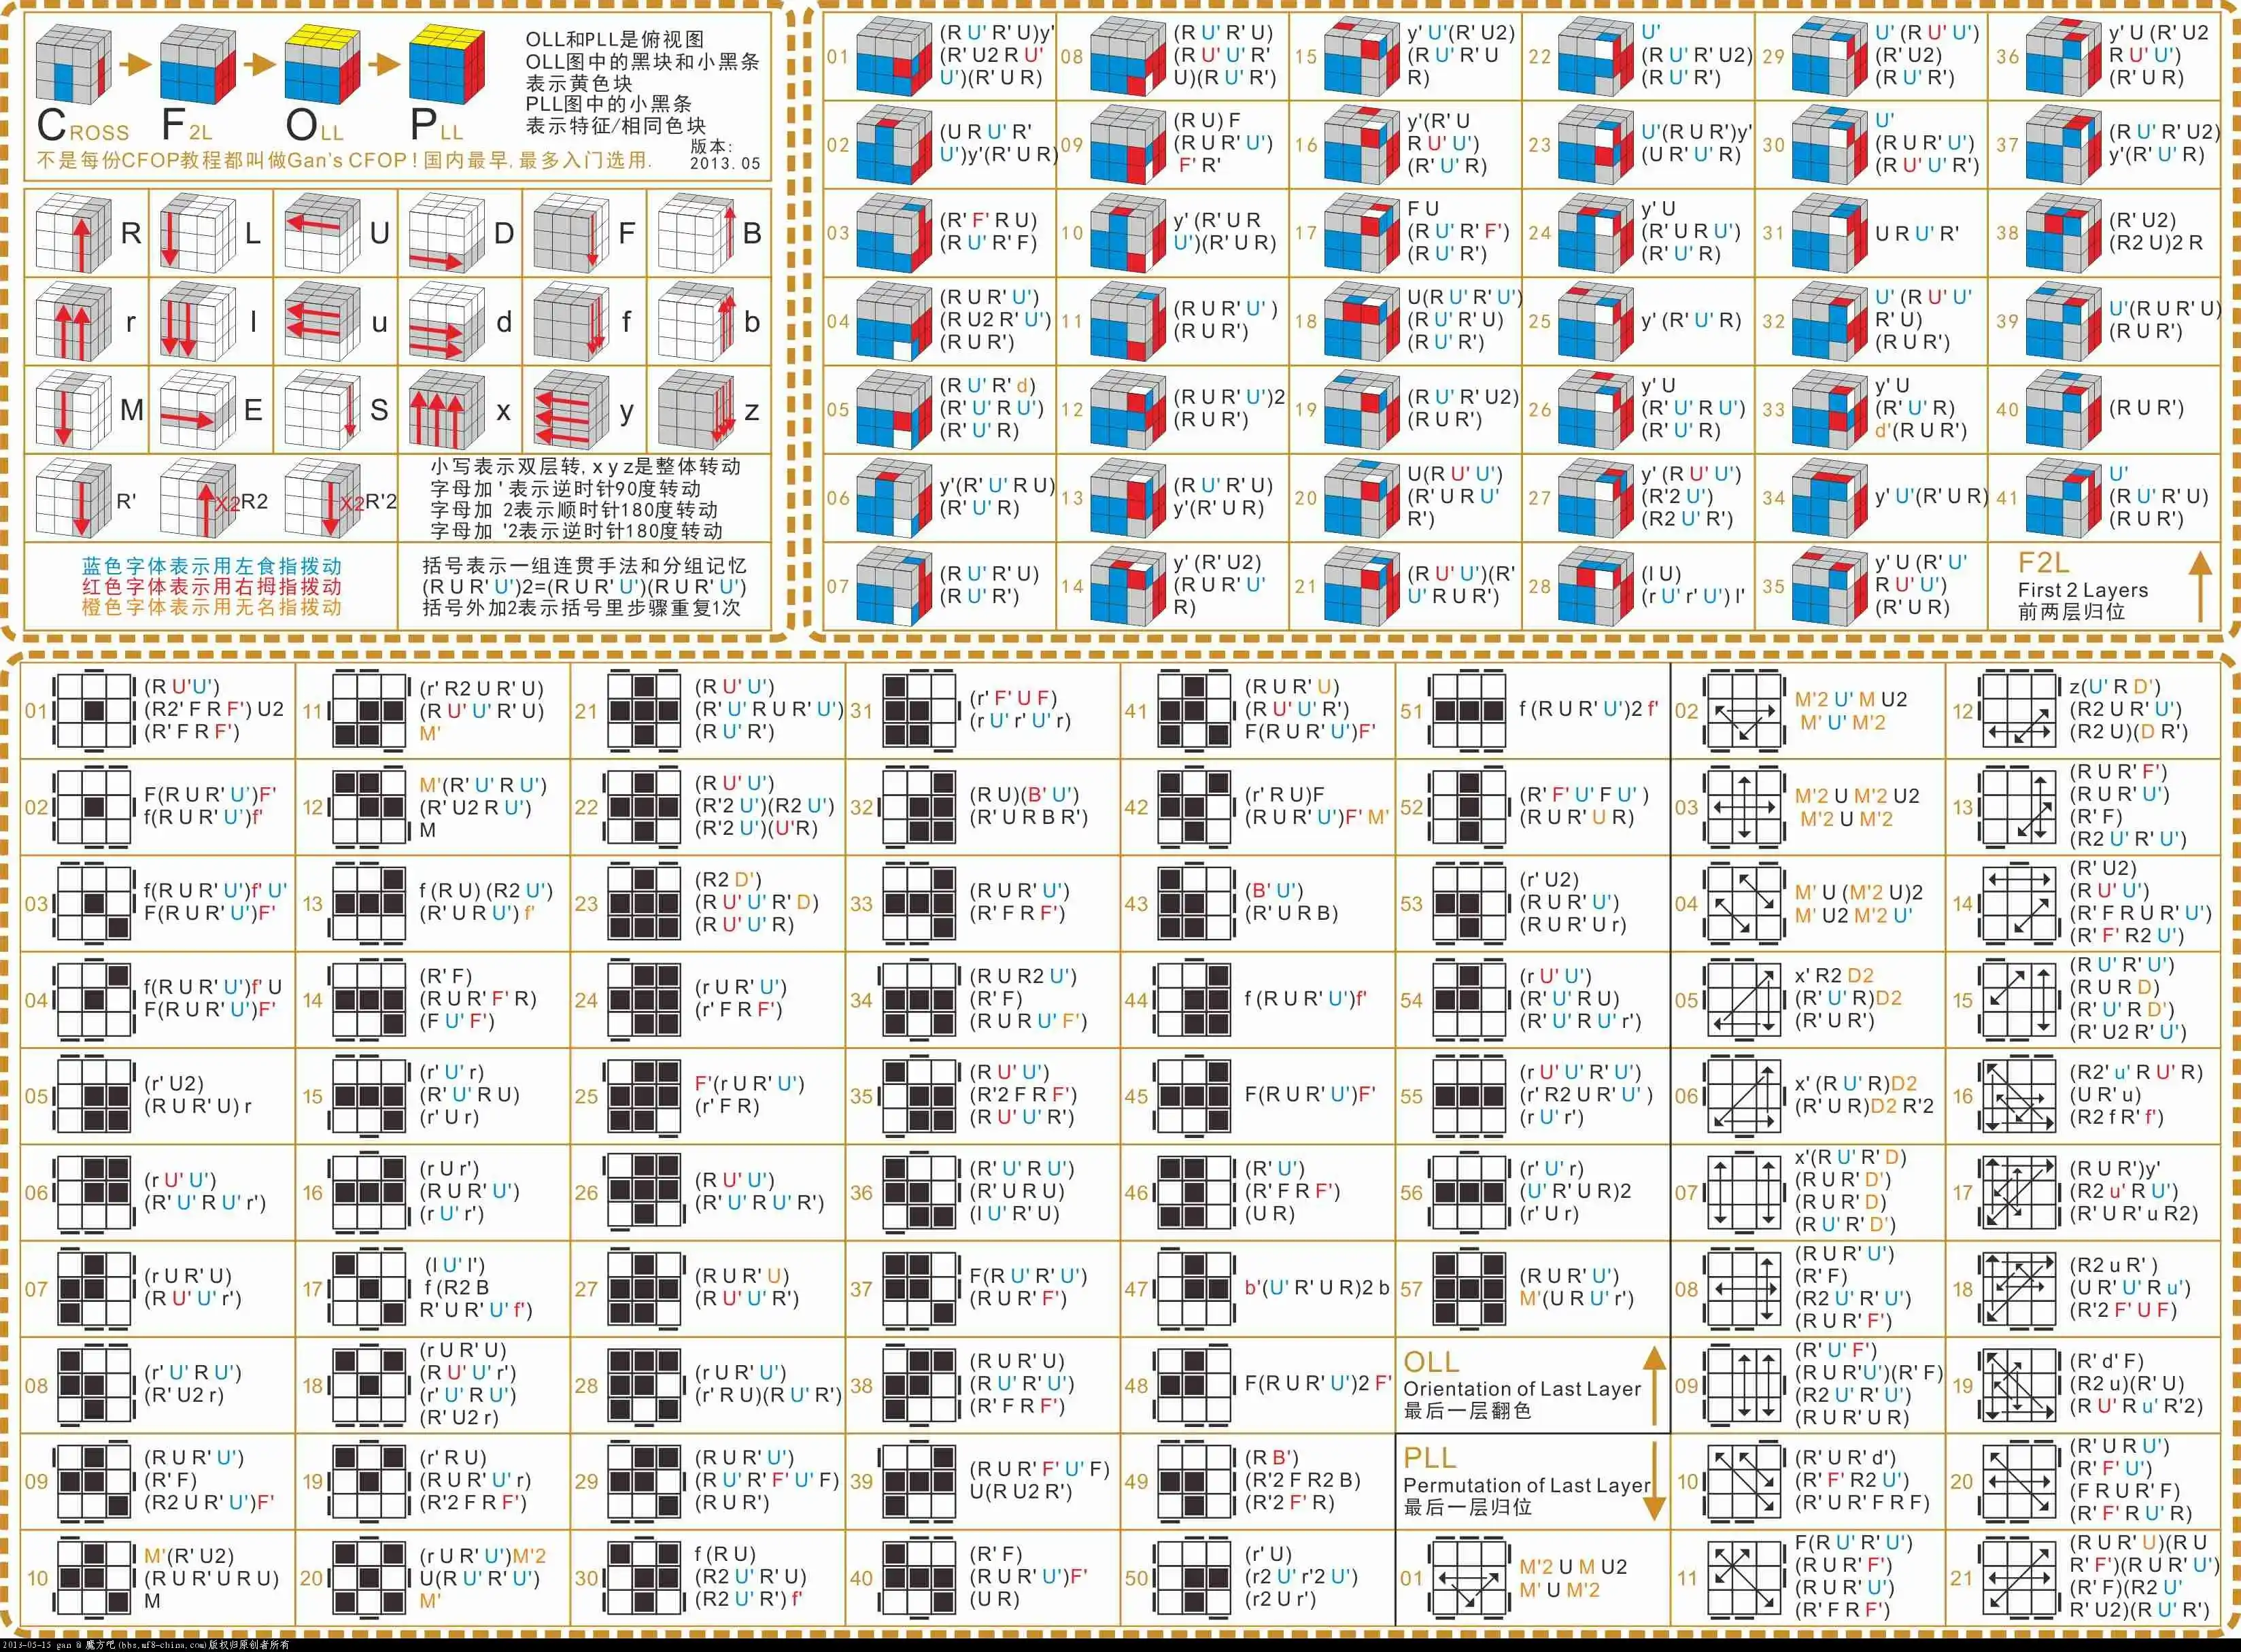
The 3x3 Rubik's Cube CFOP method, also known as the Fridrich method, is the gold standard for speedcubers worldwide. Originating from the collective innovations of various cubers in the 1980s and popularized by Jessica Fridrich, this method is used by almost every world-class speedcuber today to achieve sub-10-second solve times. For beginners transitioning from the basic layer-by-layer method, CFOP represents a massive leap in efficiency, reducing the average move count from over 100 moves to roughly 55 to 60 moves. To master this speedcubing framework, you must first understand its structural anatomy. CFOP divides the puzzle into four distinct components solved in a strict sequential order: Cross, First Two Layers (F2L), Orient Last Layer (OLL), and Permute Last Layer (PLL). By analyzing each phase as an independent mechanical component, you can systematically diagnose your weaknesses, improve your finger tricks, and dramatically lower your times. To understand more about the history of CFOP, you can read about it on Wikipedia.
Deconstructing the CFOP Framework: A Modern Speedcubing Anatomy
Before diving into the algorithmic details, it is vital to visualize how CFOP systematically deconstructs and reconstructs the Rubik's Cube. Unlike beginner methods that solve the puzzle one horizontal slice at a time, CFOP is designed for maximum efficiency and ergonomics. The method operates on a bottom-up philosophy, where the first two-thirds of the puzzle are solved intuitively, and the final layer is solved using highly optimized algorithmic patterns. This hybrid approach of intuition and memorization is what makes the How to Solve a Rubik's Cube for Beginners guide a perfect stepping stone before taking on the advanced CFOP system.
The Cross (C): Laying the Speedcubing Foundation
The Cross is the foundational component of the CFOP method, establishing a structural anchor on the bottom layer of the cube. While simple in concept, mastering the Cross requires transitioning from a visual, step-by-step approach to a highly efficient, spatial-planning mindset.
How the Cross Operates
- You must solve the four edge pieces of your chosen cross color (typically white) relative to their adjacent center pieces.
- You must align the cross edges with the bottom center while simultaneously matching the side colors with their respective face centers.
- You must execute the entire step on the bottom face to keep the rest of the cube visible for subsequent steps.
Common Failure Modes in Cross Execution
- Aligning the cross edges incorrectly relative to each other, resulting in a swapped center alignment that requires backtracking.
- Solving the cross on the top face (the "daisy" method) and then rotating, which wastes critical seconds and ruins look-ahead.
- Using too many moves (more than 8 moves) due to a lack of planning during the inspection phase.
Cross Optimization Tune-Up
- Inspect the scrambled cube for 15 seconds to locate all four cross edges before making your first turn.
- Plan the exact moves required to solve at least three of the cross edges without pausing.
- Practice solving the cross blindfolded to build muscle memory and intuitive spatial awareness of the pieces.
- Transition to solving the cross on the bottom layer (white-cross-down) to free up your vision for the next steps.
First Two Layers (F2L): Merging Corners and Edges Simultaneously
F2L is the most critical and time-consuming component of CFOP. It is responsible for solving the bottom corner pieces and middle-layer edge pieces simultaneously, combining what used to be two separate steps in beginner methods into one seamless phase.
How F2L Operates
- Identify a bottom corner piece and its corresponding middle-layer edge piece on the top layer of the cube.
- Pair the corner and edge pieces together in the top layer using short, intuitive insert sequences.
- Slot the paired corner-edge unit into its correct bottom-middle slot without disturbing already solved slots.
- Repeat this process for all four corner-edge slots around the cube.
Common Failure Modes in F2L Execution
- Rotating the entire cube excessively to find pieces, which breaks your visual flow and adds seconds to your solve.
- Relying entirely on rote algorithm memorization instead of understanding the intuitive spatial relationships of the pieces.
- Accidentally destroying previously solved F2L slots while trying to insert a new pair.
F2L Practice Tune-Up
- Start with slow, untimed practice solves to focus purely on piece tracking and slot awareness.
- Learn to insert pairs into the back slots first to keep empty front slots open for easy tracking.
- Practice the three basic F2L cases until they are completely muscle memory and require zero active thought.
- Eliminate unnecessary cube rotations by utilizing different insertion angles and left-handed moves.
Orient Last Layer (OLL): Making the Top Face One Solid Color
OLL is the third phase of CFOP, where the goal is to orient all the top-layer pieces so that the entire top face displays a single solid color (usually yellow). For beginners, we simplify this process using a method called 2-Look OLL.
The 2-Look OLL Mechanics
Instead of learning all 57 OLL algorithms at once, beginners split this phase into two manageable steps. First, you orient the yellow edges to form a cross, and second, you orient the yellow corners to complete the entire yellow face.
- Edge Orientation: Uses three simple algorithms to convert a dot, an L-shape, or a horizontal line into a yellow cross.
- Corner Orientation: Uses seven basic algorithms (such as Sune and Anti-Sune) to orient the corners based on their sticker patterns.
- Recognition: Requires looking only at the top face and the upper-side stickers to quickly identify the current state.
OLL Optimization Tune-Up
- Memorize the edge orientation algorithms (F R U R' U' F' and variations) to create a top yellow cross instantly.
- Learn the seven corner orientation algorithms to solve the rest of the yellow face in a single step.
- Practice executing these algorithms smoothly with your fingertips rather than using your whole hand.
Permute Last Layer (PLL): Rearranging the Final Yellow Pieces
PLL is the final phase of the CFOP method, where the oriented top-layer pieces are rearranged into their correct positions to fully solve the cube. Like OLL, beginners use a simplified version called 2-Look PLL.
The 2-Look PLL Mechanics
To avoid memorizing all 21 PLL algorithms, 2-Look PLL divides the permutation process into two steps: permuting the four corners first, and then permuting the four edges.
Corner Permutation
Look for "headlights" (two matching corner stickers on the same side). If you have them, align them and perform the T-Perm or A-Perm. If you have no headlights, perform the Y-Perm to swap the corners diagonally.
Edge Permutation
Once the corners are solved, you will have one of four edge patterns: Ua-Perm, Ub-Perm, H-Perm, or Z-Perm. Applying the correct algorithm will swap the remaining edges and complete the puzzle.
- The T-Perm and Y-Perm are the most essential corner algorithms to learn first.
- The H-Perm and Z-Perm are highly symmetrical and easy to memorize due to their repetitive M-slice moves.
PLL Practice Tune-Up
- Master the diagonal and adjacent corner swap algorithms to solve all four corners first.
- Learn the four edge permutation cases to finish the edges and complete the cube.
- Track a single block of color during execution to help build visual recognition of when the algorithm has finished.
The Interactive Mechanics of CFOP Steps
The four components of CFOP do not exist in isolation. Each step directly influences the starting state, piece availability, and execution speed of the next phase. Understanding these interactions is key to mastering look-ahead.
| Step A | Step B | Mechanical Relationship & Impact |
|---|---|---|
| Cross | F2L | The Cross sets up the bottom slots; a poorly executed cross can trap F2L pieces in the bottom layer, forcing extra moves. |
| F2L | OLL | F2L completion determines the starting state of the top layer, directly influencing which OLL case you get. |
| OLL | PLL | OLL orients the top face, leaving the side stickers scrambled; the resulting pattern dictates the final PLL algorithm. |
| Cross | PLL | A stable cross ensures the bottom layers remain locked, preventing misalignment during high-speed PLL execution. |
Assembly Order: A Strategic Study Plan for Beginner Cubers
Learning CFOP can feel overwhelming if you try to memorize everything at once. To avoid burnout, follow this structured assembly order designed to transition you smoothly from a casual solver to a speedcuber.
- Master the basic layer-by-layer method first to build fundamental cube familiarity and spatial awareness. You can check out The Easiest Way to Solve a Rubik's Cube for Beginners for a great starting point.
- Transition to 4-Look Last Layer (2-Look OLL + 2-Look PLL) to handle the last layer efficiently with only 16 algorithms.
- Learn intuitive F2L slowly, practicing without a timer to understand how corner-edge pairs move through the keyhole slots.
- Optimize your Cross solutions by practicing cross-on-bottom and planning moves during the 15-second inspection phase.
- Gradually transition from intuitive F2L to algorithmic F2L for complex cases while learning full PLL.
Essential Notation Prerequisites for CFOP Success
"Before you can successfully memorize CFOP algorithms, you must master standard Rubik's Cube notation. Attempting to learn CFOP without notation is like trying to read music without knowing how to read notes."
Standard notation uses single letters to represent 90-degree clockwise turns of the cube's faces: R (Right), L (Left), U (Up), D (Down), F (Front), and B (Back). An apostrophe (e.g., R') signifies a counter-clockwise turn, while a number 2 (e.g., U2) indicates a 180-degree turn. To ensure you do not get confused by advanced algorithms, read our detailed guide on Rubik's Cube Notation Explained for Beginners: Master the Language of Cubing.
Transitioning from Layer-by-Layer to CFOP: The Psychological Hurdles
When you first begin learning the CFOP method, your solve times will almost certainly slow down. This is a completely normal part of the learning curve. In the beginner's method, your brain relies on simple, repetitive steps that require very little decision-making. CFOP, on the other hand, demands constant active recognition and spatial reasoning, especially during the F2L phase. Do not get discouraged when your average solve time jumps by 10 to 20 seconds; with consistent practice, your muscle memory will take over, and your times will plummet far below your old personal bests.
How to Optimize Your Cross Solutions in Under Eight Moves
An optimized cross should never take more than 8 moves to solve, regardless of how scrambled the cube is. To achieve this level of efficiency, you must learn to look at the relationships between the cross pieces rather than solving them one by one. For example, if you know that the blue edge always sits opposite the green edge, and the red edge sits opposite the orange edge, you can solve them relative to each other and then perform a single D or D' turn to align them all with their correct center pieces at the very end.
- Locate all four cross edges during your 15-second inspection.
- Determine which edge is the easiest to solve and how its movement will affect the other three edges.
- Focus on solving the pieces relative to each other rather than matching them directly to their side centers immediately.
- Execute your planned moves quickly without pausing to look for pieces.
Intuitive F2L vs. Algorithmic F2L: Which Path to Choose First?
There are 41 different cases in F2L, and while there is an algorithm for every single one of them, beginners should strictly avoid memorizing them. Instead, focus on intuitive F2L. Intuitive F2L relies on understanding how the pieces interact in the top layer and how to use empty slots to pair them up. Once you understand the mechanics of "hiding" a corner, lining up the edge, and "unhiding" the corner to form a pair, you will be able to solve almost every F2L case naturally. Algorithmic F2L should only be introduced later to optimize tricky cases, such as when pieces are trapped in the wrong slots or oriented incorrectly.
- Intuitive F2L: Builds deep spatial understanding, requires zero memorization, and makes look-ahead easier.
- Algorithmic F2L: Perfect for optimizing awkward cases, reducing move counts, and eliminating unnecessary rotations.
Simplifying 2-Look OLL for Novice Solvers
To make 2-Look OLL as simple as possible, focus on the shapes formed by the yellow stickers on the top face. When orienting the edges, you will only ever encounter three patterns: a line, an L-shape, or a dot. Each of these has a straightforward trigger algorithm. Once the cross is formed, look at the corners. The seven possible corner patterns are easy to identify by checking where the yellow stickers are facing on the sides of the top layer. By practicing these recognition patterns daily, you will quickly be able to execute the correct algorithm within a fraction of a second.
- The Dot: Solve by executing the line algorithm, followed by the L-shape algorithm.
- Sune: The most famous OLL case, identified by a single oriented yellow corner sticker on top.
Mastering 2-Look PLL with Six Core Algorithms
To finish your solve, you only need to master six core algorithms for 2-Look PLL. For the corner permutation step, you will use either the T-Perm (for adjacent swaps) or the Y-Perm (for diagonal swaps). Once the corners are in place, you will use one of four edge permutation algorithms. The H-Perm swaps opposite edges in an H-pattern, the Z-Perm swaps adjacent edges in a zig-zag pattern, and the U-Perms (Ua and Ub) cycle three edges either clockwise or counter-clockwise. These six algorithms are incredibly versatile and will serve as the foundation for your future transition to full PLL.
- Practice the T-Perm and Y-Perm until you can execute them in under two seconds.
- Learn the H-Perm and Z-Perm, focusing on the double M-slice turns (using your ring and middle fingers on your non-dominant hand).
- Master the Ua and Ub permutations to handle three-edge cycles efficiently.
Hardware Optimization: Choosing the Right Cube for CFOP
As you transition to CFOP, your turning speed will increase dramatically. A standard, non-magnetic plastic cube will quickly become a bottleneck, causing frequent lock-ups, corner-twists, and hand fatigue. To fully utilize the fast fingertricks required for CFOP algorithms, you should invest in a modern magnetic speedcube. Magnetic cubes use small magnets inside the pieces to pull the layers into alignment, preventing overshooting and ensuring smooth, stable turns. To find the perfect cube for your budget and hand size, check out our recommendations in The Best Magnetic Rubik's Cube for Beginners: A Complete Guide.
- Look for cubes with adjustable tension and magnet strength to customize the feel to your turning style.
- Keep your cube clean and lubricated to maintain its performance and extend its lifespan.
- Utilize resources from the World Cube Association to connect with the cubing community and stay updated on the latest hardware trends.