Understanding the Basics of Cube Mechanics
Solving a Rubik's cube might seem like a feat of genius, but it is actually a matter of following a specific, repeatable set of moves. The most important thing to understand before you begin is that the cube is composed of centers, edges, and corners. The center pieces are fixed in place and determine the color of the entire face. This means that a white center will always represent the white face, regardless of how you rotate the other pieces.
When you start, you are not trying to solve the cube layer by layer in a random fashion. Instead, you will follow a systematic process that organizes the pieces into their correct positions. Beginners often feel intimidated by the math-like complexity of speedcubing algorithms, but the easiest way to solve a Rubik's cube involves a simple layer-by-layer approach that requires minimal memorization.
Prerequisites for Your First Success
Before you start twisting your cube, ensure you have a standard 3x3 model. While speed cubes are popular, a basic cube is sufficient for learning the fundamentals. You should also find a quiet space where you can focus on the orientation of the pieces without distraction. It is vital to keep the same face pointing up throughout the initial steps of the process to avoid losing your place.
- Ensure your cube is fully scrambled so you are not starting from a partially solved state.
- Familiarize yourself with the clockwise and counter-clockwise rotations of the faces.
- Keep a cheat sheet of the basic moves nearby, as you will likely need to reference them often.
- Take your time; rushing often leads to simple mistakes that force you to restart the entire sequence.
- Use a well-lit environment so you can clearly distinguish between similar colors like red and orange.
- Maintain a consistent grip so that your thumb remains on the bottom face for stability.
The First Step: Building the Daisy
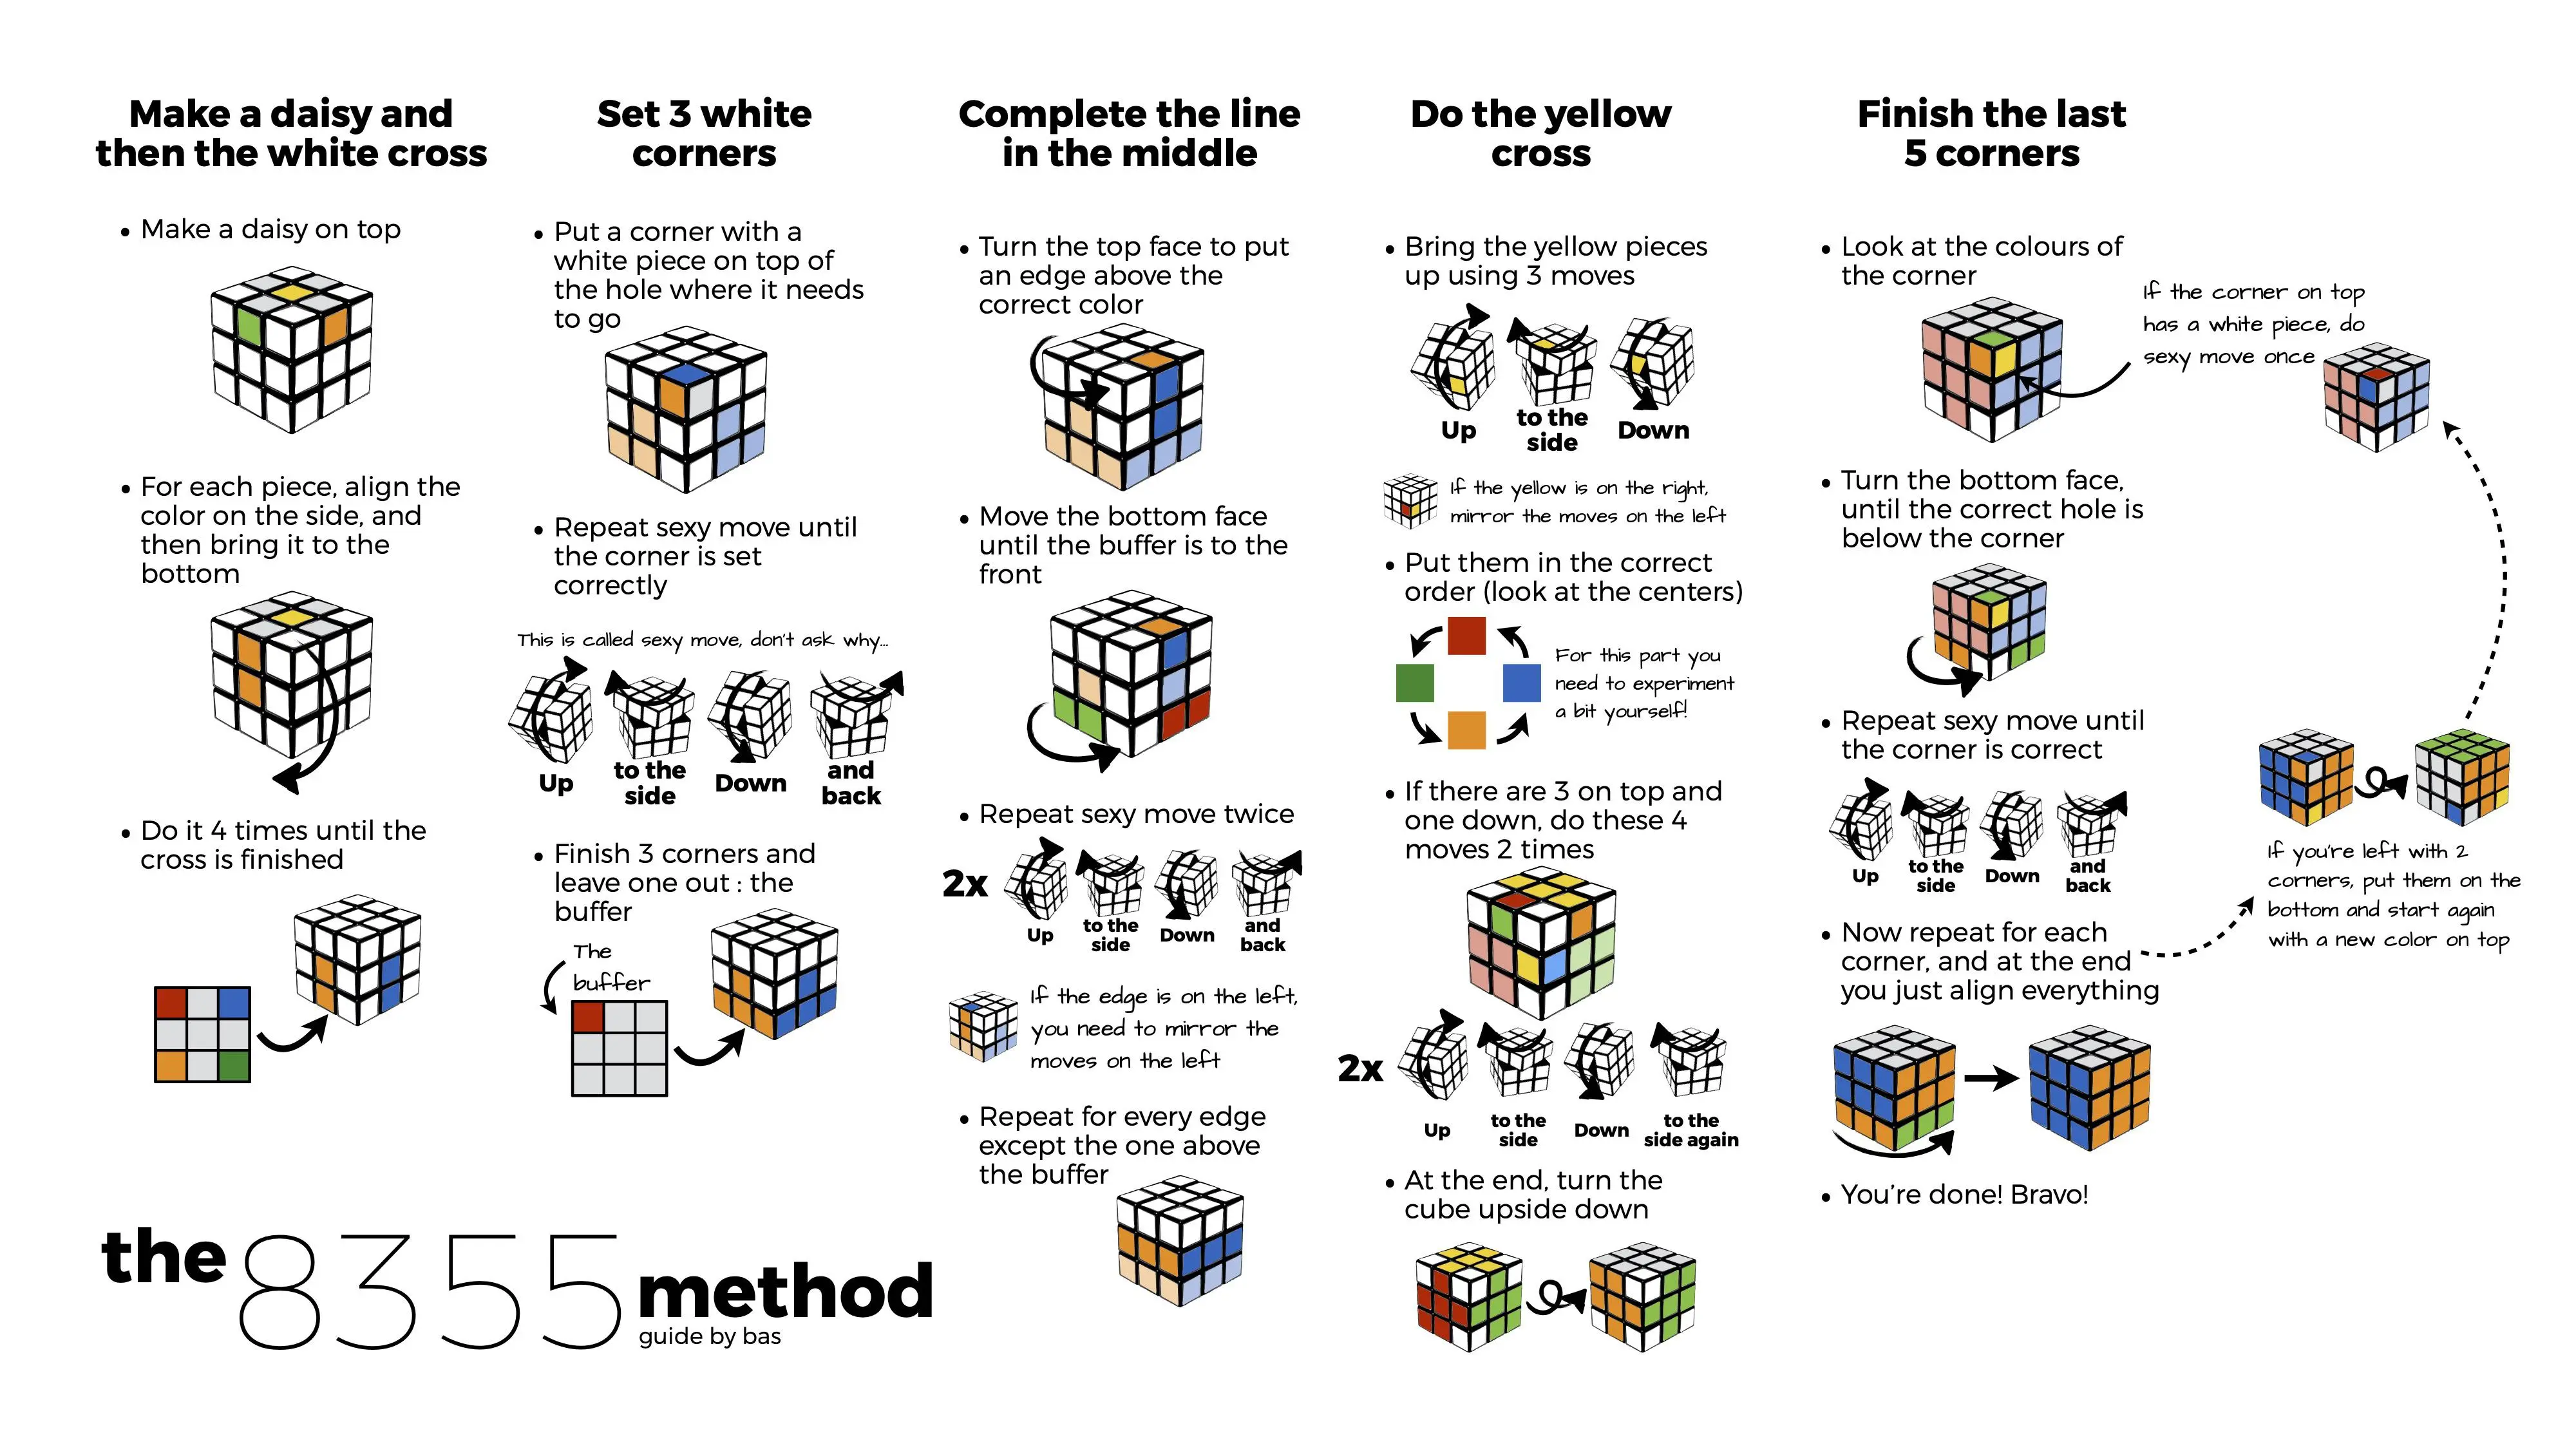
The easiest way to solve a Rubik's cube starts with the 'Daisy' method. This involves placing four white edge pieces around the yellow center piece. Because the yellow center is always opposite the white center, this creates a flower-like pattern. This step is intuitive and does not require any specific algorithms, making it the perfect entry point for absolute beginners.
- Hold the yellow center piece facing up.
- Locate each of the four white edge pieces on the cube.
- Rotate the side faces to bring each white edge piece up to the yellow center.
- Do not worry about the side colors matching at this stage; focus only on the white edges touching the yellow center.
- Once you have all four white edges around the yellow center, you are ready for the next phase of the solve.
Transitioning to the White Cross
Once your daisy is complete, you need to move those white edges to the white center to form a cross. This is done by matching the side color of the white edge piece with its corresponding center piece. Once matched, you rotate that side 180 degrees so the white edge meets the white center. This process is documented in detail in this guide to solving a Rubik's cube for beginners, which provides visual aid for these rotations.
The most common mistake beginners make is trying to solve the entire white face at once. Instead, focus on creating the cross first, as it sets the foundation for every other piece on the cube.
Solving the First Layer Corners
Now that you have a white cross, you must place the four white corner pieces into their correct spots. This will complete the entire first layer of the cube. You will look for corners that contain white, then position them directly underneath where they need to go. By using a repetitive sequence of moves, you can drop the corner into the top layer without disturbing the cross you just built.
You will hold the cube so the white cross is on the bottom. Find a corner piece in the top layer that has a white sticker. Rotate the top layer until that corner is directly above its destination. Perform the 'Righty Algorithm' (Right side up, Top left, Right side down, Top right) until the corner is correctly oriented with the white side facing down.
Must-Have Criteria for Choosing a Beginner Cube
Not all cubes are created equal, and using a high-quality, smooth-turning cube can make the learning process significantly easier. A stiff, low-quality cube can lead to frustration as pieces jam or stick during your rotations. Below is a table highlighting the essential features to look for when selecting your first practice cube.
| Feature | Why It Matters | Recommendation |
|---|---|---|
| Corner Cutting | Allows for slight misalignments | Look for 45-degree capability |
| Adjustable Tension | Customizes the turning feel | Essential for long-term use |
| Magnetic Feel | Keeps layers aligned | Highly recommended for beginners |
| Stickerless Design | Prevents peeling and fading | Best for longevity |
Addressing the Second Layer
After finishing the white layer, you move on to the middle layer. This is where you place the edge pieces that do not contain yellow. You will look for edges in the top layer that match the center color, then move them into the middle slot. If you find this part challenging, you can refer to this 3x3 step-by-step guide to clarify the specific sequence of moves required to insert these edges without disrupting your progress.
The Yellow Cross Strategy
With the first two layers solved, you move to the top face, which is yellow. You will likely see a dot, an 'L' shape, or a horizontal line. You will apply a specific algorithm to transform these shapes until you have a full yellow cross on the top face. Consistency is key here, as one wrong turn can undo the work you put into the bottom two layers.
- If you have a dot, perform the algorithm to get the 'L' shape.
- If you have the 'L' shape, orient it in the top-left corner and apply the algorithm.
- Once you reach the horizontal line, perform the algorithm one last time to form the cross.
- Always keep the yellow center facing up during these steps.
- Double-check your side layers after each algorithm to ensure they haven't shifted.
- If the cross does not form, check that you are holding the cube in the correct orientation.
Aligning the Yellow Cross
Once you have the yellow cross, you need to align the edges of the cross with the side center pieces. This is often the step where people get stuck, as it requires swapping edges until they match the surrounding colors. You will rotate the top layer until at least two edges match their centers, then perform a simple swap algorithm to fix the remaining pieces.
Positioning the Final Corners
Now, you must move the yellow corner pieces to their correct locations, even if they aren't oriented correctly yet. This is about permutation. You will use an algorithm to cycle the corners until each one is in the right spot, even if the yellow side is facing to the side or front instead of the top.
Orienting the Final Corners
This is the final hurdle. You will hold the cube and perform the same right-hand algorithm on each corner until the yellow side faces up. It will look like you are breaking the cube, but as long as you finish the full sequence, the cube will magically solve itself at the last moment. Never stop halfway through the algorithm, or your cube will remain scrambled.
Common Pitfalls to Avoid
Many beginners struggle because they try to learn too many algorithms at once. The key to the easiest way to solve a rubik's cube is to master one small step before moving to the next. Do not attempt to learn advanced speedcubing methods like CFOP until you can consistently solve the cube using the beginner's method. You can learn more about advanced techniques once you are comfortable.
- Avoid turning the cube in your hands while performing algorithms.
- Do not try to force the pieces if the cube feels stuck.
- Remember that the center pieces never move relative to each other.
- Practice the 'Righty Algorithm' until you can do it without looking.
- Keep the orientation of the cube consistent throughout the solve.
- Take breaks if you feel frustrated to avoid making careless mistakes.
Tips for Faster Solving
Once you have mastered the basic steps, you will naturally start to get faster. Speed comes from muscle memory rather than thinking about the moves. Try to solve the cube while watching a show or listening to music to help your hands learn the patterns. As you gain confidence, you might want to look into speedcubing strategies to shave seconds off your time.
Resources for Continued Practice
There are many online communities and websites dedicated to cubing. Websites like The World Cube Association provide official regulations and resources for those interested in competitive cubing. You can also find numerous video tutorials on YouTube that offer visual demonstrations of the algorithms described in this guide. Consistent practice is the only way to improve your speed and accuracy.
Maintenance and Care
To keep your cube performing at its best, consider using a specialized silicone lubricant. A dry cube will create more friction, making it harder to execute moves quickly. Periodically cleaning the internal mechanism of your cube will also prevent dust buildup, which can cause the internal plastic to wear down faster over time. By keeping your gear in top condition, you ensure that your practice sessions remain productive and enjoyable for a longer duration. Investing a few minutes in maintenance every few weeks can significantly extend the lifespan of your puzzle cube, preventing the need for frequent replacements as you advance in your skills.