Solving a very hard Rubik's cube can feel like an insurmountable mountain, especially if you are staring at a scrambled mess with no clear path forward. But here is the secret that separates the champions from the casual solvers: persistence beats genius. In 2026, the community of puzzle enthusiasts has grown exponentially, with millions of people mastering this iconic challenge every single year. Whether you are in the bustling streets of New York City, the historic districts of London, or the tech hubs of San Francisco, the logic remains the same. This comprehensive guide is designed specifically for beginners who want to crack the code without getting overwhelmed. We will break down the "very hard" aspects into manageable steps, ensuring you build confidence with every turn.
The journey from a jumbled block to a perfectly solved masterpiece is not just about memorizing moves; it is about understanding the mechanics of the cube. Many beginners quit because they try to solve face by face instead of layer by layer. By the end of this article, you will possess the mental framework and the physical muscle memory required to tackle even the most chaotic scrambles. We will cover everything from the fundamental cube notation used by speedcubers globally to the specific algorithms needed for the final stages. Let's dive into your new hobby that combines logic, patience, and pure satisfaction.
Mastering the Fundamentals Before You Turn
Before you attempt to move a single piece, you must understand the anatomy of the puzzle. A standard 3×3 Rubik's Cube consists of 54 stickers arranged on six faces, but only 20 pieces actually move: 8 corner pieces and 12 edge pieces. The remaining 6 center pieces are fixed relative to one another. This is the most critical concept for any beginner to grasp immediately. If you rotate the top face, the center stays in the middle of that face. Therefore, if the center is white, that entire face will always be the white face.
Understanding Center Pieces as Your Anchor
Think of the center pieces as the immutable anchors of your puzzle. They define the color identity of each side. In 2026, modern educational resources emphasize that trying to solve a face first (like making all four sides red before fixing the bottom) is a common mistake that leads to frustration. Instead, you must adopt the Layer-by-Layer (LBL) method. This approach ensures that once you solve a layer, you never disturb it while working on the layers above or below.
Decoding Cube Notation: The Language of Moves
To follow any tutorial or algorithm, you must speak the language of cubing. This system uses letters to represent the faces of the cube:
- F: Front face
- R: Right face
- U: Up face (Top)
- L: Left face
- D: Down face (Bottom)
- B: Back face
If you see an apostrophe (') after a letter, such as R', it means you turn that face counter-clockwise. If there is a number 2 (e.g., R2), it means you turn the face 180 degrees. Mastering these simple movements is the gateway to solving complex patterns. Without this foundational knowledge, attempting a "very hard" scramble will result in confusion rather than progress.
![How To Solve A Rubik's Cube | Step By Step [Complete Guide] | Rubiks ...](https://therubbick.com/wp-content/uploads/2026/06/bca587d75f9cf2c6a70c8692e3034fd7.jpg)
Step 1: Creating the White Cross Intuitively
The first stage of solving a very hard cube is often the most intuitive, yet it sets the tone for the rest of the solution. Your goal is to create a White Cross on the top face. However, this isn't just about white stickers facing up; it is about matching the side colors of the edge pieces with their corresponding center pieces.
The Importance of Edge Matching
When you place an edge piece (which has two colors) between the White center and another colored center, the second color on that edge must align perfectly with the adjacent center. For example, if the edge piece has White and Red, the Red sticker must line up with the Red center. If it doesn't match, the cross cannot be completed correctly, and the subsequent steps will fail.
Practical Tips for the Beginner
Many beginners struggle here because they force pieces into slots incorrectly. Remember, you do not need algorithms for this step. Use your eyes and intuition.
- Locate the White Edges: Find the four edge pieces that contain the color white.
- Align the Side Color: Rotate the bottom layer (D) until the non-white color matches the center piece directly below it.
- Flip Up: Perform a simple rotation to bring the piece to the top.
- Check Alignment: Ensure the side color matches the center of the adjacent face.
If you find yourself stuck, take a deep breath. The cube is designed to be solved logically, not randomly. Spend time simply rotating the layers to see how the pieces interact. This familiarity is crucial before moving to more complex algorithms.
Step 2: Completing the First Layer with Corners
Once your white cross is secure, the next logical step is to insert the four white corner pieces to complete the entire first layer. This includes both the white face and the side colors of the adjacent faces. This creates a solid foundation, much like pouring concrete for a building before adding floors.
The Golden Algorithm: R U R' U'
The most essential algorithm you will ever learn is R U R' U' (Right, Up, Right Prime, Up Prime). This sequence might seem random, but it follows a precise mathematical pattern that cycles three pieces while leaving the rest of the cube intact.
- R: Turn the right face clockwise.
- U: Turn the top face clockwise.
- R': Turn the right face counter-clockwise.
- U': Turn the top face counter-clockwise.
How to Execute the Move
To use this algorithm effectively:
- Find the Corner: Locate a white corner piece on the bottom layer.
- Position Below: Rotate the bottom layer so the corner is directly underneath where it needs to go (between the correct two centers).
- Apply the Sequence: Repeat the R U R' U' algorithm until the corner snaps into place with the white sticker facing up and the side colors aligned.
- Repeat: Do this for all four corners.
This step often feels tedious, but it builds the necessary muscle memory. In local communities, from Chicago to Tokyo, groups of friends gather to practice this specific move until their fingers move automatically. Consistency is key; do not rush. If you mess up a previously solved part, don't panic—just undo the last few moves and try again. The beauty of the cube is that it always returns to order if you apply the correct logic.
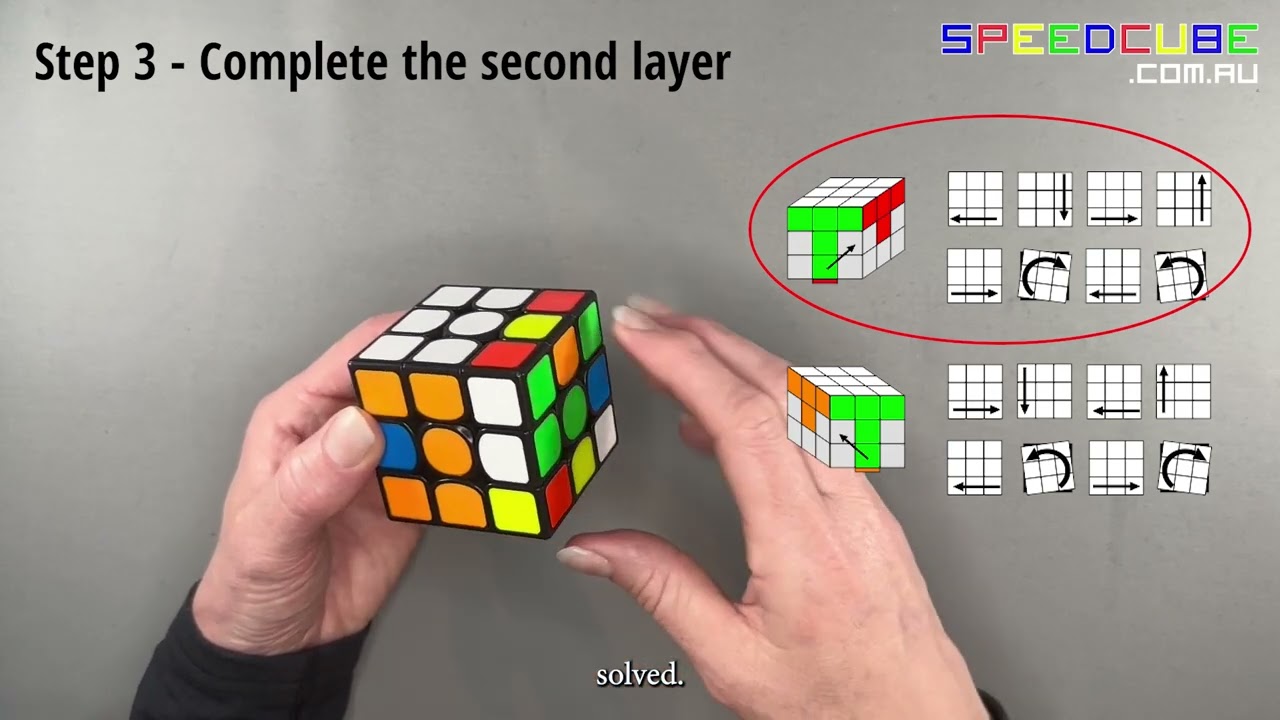
Step 3: Solving the Middle Layer Edges
With the first layer complete, flip the cube over so the white face is now on the bottom. Your goal is to solve the middle layer edges. These are the four edge pieces that do not contain yellow. They sit between the white layer and the yellow layer.
Distinguishing Left and Right Algorithms
There are two mirror-image algorithms for this step, depending on which direction the edge piece needs to travel. Confusion often arises here, but visualizing the movement helps.
- Right Side Algorithm: Used when the piece needs to move from the front-right to the front-left.
- Sequence: U R U' R' U' F' U F
- Left Side Algorithm: Used when the piece needs to move from the front-left to the front-right.
- Sequence: U' L' U L U F U' F'
The "Insertion" Technique
To solve a middle layer edge:
- Identify the Target: Look at the top layer (yellow face) for an edge piece that belongs in the middle layer.
- Form a T-Shape: Rotate the top layer until the edge piece forms a "T" shape with the center pieces of the front and side faces. The color facing you should match the front center.
- Choose Direction: Determine if the piece needs to go to the right or left slot.
- Execute the Algorithm: Apply the corresponding sequence. If the piece is already in the middle layer but flipped incorrectly, perform the algorithm once to push it to the top, then re-position it correctly.
This step requires spatial awareness. Imagine the cube as a grid where every piece has a specific home. By using these algorithms, you are essentially swapping pieces without disturbing the solved white layer below. It is a delicate dance of precision, and mastering it is what separates a casual solver from someone ready to tackle harder challenges.
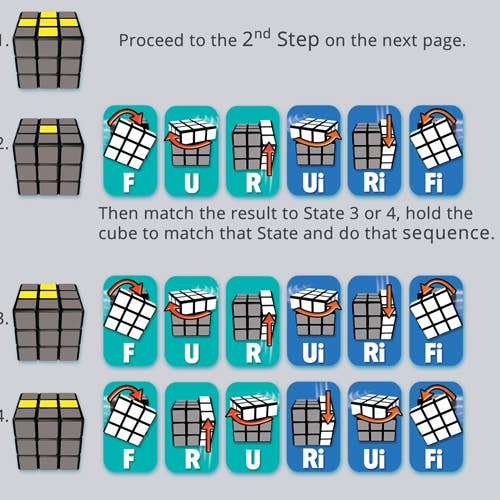
Step 4: Forming the Yellow Cross on Top
Now comes the moment many beginners dread: the Yellow Cross. The top face is entirely yellow, but the edges might be scattered, forming a dot, an "L" shape, a line, or a full cross. Your objective is simply to form the cross, regardless of whether the side colors match yet.
The Three-Step Process for the Yellow Cross
You do not need to memorize three different algorithms for this; you only need one core algorithm: F R U R' U' F'. Depending on the shape you see on the top face, you will repeat this sequence a specific number of times.
- The Dot Shape: If you see a single yellow dot in the center, perform the algorithm once. This will usually reveal an "L" shape.
- The L Shape: Position the "L" so it looks like a clock hand pointing to 12 o'clock and 9 o'clock. Perform the algorithm twice. This will create a horizontal line.
- The Line Shape: Align the line horizontally (9 o'clock to 3 o'clock). Perform the algorithm three times total (including previous attempts) to achieve the cross.
Why Repetition Works
It may seem strange that doing the same move multiple times solves the problem, but the cube operates on cycles. Each application of the algorithm rotates the edge pieces in a predictable pattern. After three iterations, the cycle completes, and the cross appears. This is a perfect example of how mathematics governs the Rubik's Cube. Once the cross is formed, the side colors might still be mismatched, but that is okay for now. We will fix those orientations in the next steps.
Step 5: Positioning the Yellow Edges Correctly
With the yellow cross formed, the next challenge is Permuting the Last Layer (PLL). Specifically, we need to get the yellow edge pieces into their correct positions relative to the side centers. Currently, the edges might be in the right spots but rotated wrong, or completely in the wrong slots.
The Key Algorithm: U R U' L' U R' U' L
To swap the edges without messing up the yellow cross, use this powerful sequence: U R U' L' U R' U' L.
- This algorithm swaps the front edge with the back edge and the left edge with the right edge simultaneously.
Strategic Execution
- Match One Pair: Rotate the top layer (U) until at least one pair of opposite edges matches their side centers. If none match, just do the algorithm anyway; it will eventually create a match.
- Align and Swap: Place the matched edges at the front and back positions.
- Run the Algorithm: Execute U R U' L' U R' U' L.
- Verify: Check if all edges are now in the correct position. If not, rotate the top layer again and repeat.
This step is often the tipping point for beginners. Once the edges are in the right places, the cube looks almost solved, with only the orientation of the corners left to fix. It provides a massive psychological boost because the visual progress is undeniable. You are now in the home stretch.
Step 6: Orienting the Yellow Corners
This is widely considered the hardest part for beginners, hence why this guide focuses on solving a "very hard" cube. You have the cross, the edges, and the corners in the right places, but the yellow stickers are facing sideways or down. You need to twist them so the entire face is yellow.
The Magic Sequence: R' D' R D
The algorithm R' D' R D is the hero of this stage. It twists a single corner piece without affecting the rest of the cube. However, you must apply it carefully.
- The Rule: Only one corner should be twisted at a time. If you try to twist two, you will undo your work.
The Four-Corner Strategy
- Isolate a Corner: Hold the cube so the unsolved yellow corner is in the front-right-top position.
- Perform the Twist: Repeat R' D' R D until the yellow sticker on that corner faces up. You may need to do this 2, 4, or even 6 times. Do not worry about the other colors on that corner; just get the yellow side up.
- Rotate the Top: Once the yellow is up, only rotate the top layer (U) to move the next unsolved yellow corner to the front-right-top position. Do not turn the whole cube.
- Repeat: Apply the algorithm again for the new corner.
This process can feel like you are going backward, but trust the math. After twisting all four corners, the yellow face will be complete. The side colors of the corners might still be mixed, but that is the job of the final step. This technique requires extreme focus; if you lose track of which corner you are working on, the cube will become scrambled again. Take your time, and remember that even world champions had to practice this dozens of times.
Step 7: Final Permutation of the Last Layer
Congratulations! You are almost there. The yellow face is solid, and the first two layers are perfect. Now, you just need to shuffle the last layer corners and edges into their final resting places. This is the Permutation of Last Layer (PLL).
Handling the Final Scramble
Depending on your previous steps, you might encounter two scenarios:
- All Corners are in Place: If the corners are in the correct spots but twisted (which shouldn't happen if you did Step 6 correctly), you might just need a final adjustment.
- Corners are Swapped: Sometimes, two corners need to swap places while others remain static.
The Master Algorithm
For swapping two adjacent corners, use: R B' R F2 R' B R F2 R2 U' R' U' X'.
(Note: For absolute beginners, sticking to the simpler corner swap logic learned in earlier steps is often sufficient if you followed the orientation correctly.)
However, the most common final scenario is simply needing to orient the last layer edges if they were skipped earlier. If your cube is truly "hard" and scrambled, ensure you have practiced the Full OLL (Orientation of Last Layer) and Full PLL (Permutation of Last Layer) algorithms. In 2026, digital tools allow you to input your scramble and receive the exact solution, but learning these manually builds the brainpower necessary for blindfolded solving later on.
Once you execute the final moves, watch in awe as the colors align. The chaos resolves into perfect symmetry. This moment of triumph is why millions of people around the globe, from Boston to Sydney, dedicate hours to mastering this puzzle.
Overcoming Common Frustrations and Mistakes
Even with a step-by-step guide, solving a very hard cube can trigger feelings of defeat. Here is how to handle the common pitfalls that plague beginners in 2026.
The "I Broke It" Panic
It is normal to accidentally scramble a solved layer while learning. This is not failure; it is part of the learning curve.
- Solution: Stop. Analyze what move caused the damage. Undo it slowly. Then, proceed with caution. Every expert was once a beginner who broke their cube a hundred times.
Muscle Memory vs. Cognitive Load
Initially, you will think about every single letter (R, U, F'). This slows you down significantly.
- Solution: Practice the algorithms until they become muscle memory. Start with slow, deliberate turns, then gradually increase speed. Your fingers will eventually know where to go before your brain processes the instruction.
Dealing with Stuck Cubes
Sometimes, a cube feels "stuck" or stiff, making algorithms difficult to execute.
- Solution: Ensure you have a good quality cube. Lubricating the internals with silicone-based cube lube can drastically improve smoothness and reduce friction, making the "very hard" moves feel effortless.
The Future of Speedcubing and Community Resources
As we look toward 2026, the Rubik's Cube community is more vibrant than ever. Digital platforms like YouTube and specialized apps offer interactive simulators where you can practice algorithms without physically touching a cube. These tools are invaluable for beginners who want to visualize the mechanics before committing to physical practice.
Local clubs in major cities host weekly meetups, offering a supportive environment to learn alongside peers. Whether you are in Austin, Berlin, or Mumbai, finding a local group can accelerate your learning process immensely. Sharing tips, exchanging cubes, and celebrating personal best times creates a sense of belonging that extends beyond the puzzle itself.
Moreover, the evolution of cube technology means that even "very hard" scrambles can be generated instantly by software, providing endless practice material. The barrier to entry has never been lower, thanks to free online tutorials and high-quality instructional videos available to anyone with an internet connection.
Conclusion: Your Journey Begins With One Turn
Solving a very hard Rubik's cube step by step is a testament to human perseverance and logical reasoning. By breaking the problem down into seven distinct stages—from the intuitive white cross to the complex final permutations—you transform an intimidating challenge into a achievable goal. Remember, the statistics show that with consistent daily practice of just 15 to 30 minutes, most beginners can solve the cube in under two minutes within a few weeks.
Start today. Pick up a cube, accept the initial frustration, and trust the process. Each turn brings you closer to mastery. Whether you are solving it for fun, to challenge a friend, or to join the global community of solvers, the reward is immense. The cube does not care about your age or location; it only responds to your persistence. So, take that first turn, and let the journey begin.
Frequently Asked Questions (FAQ)
Q: How long does it take to learn to solve a Rubik's cube?
A: Most beginners can solve the cube for the first time within 1 to 2 hours of focused study. However, solving it consistently in under 2 minutes typically takes 2 to 4 weeks of daily practice.
Q: Do I need special equipment to start?
A: No, any standard 3×3 Rubik's cube will work. However, investing in a high-quality "speedcube" with lubrication can make learning significantly easier and more enjoyable.
Q: What is the easiest method for a complete beginner?
A: The Layer-by-Layer (LBL) method is universally recognized as the easiest starting point. It divides the cube into manageable sections, allowing you to solve one part at a time without undoing previous progress.
Q: Can I solve the cube without memorizing algorithms?
A: Technically yes, through intuition, but it is extremely inefficient and frustrating. Memorizing the basic algorithms (like R U R' U') is the fastest route to solving the cube, especially for difficult scrambles.