Welcome to the definitive guide on how to solve a Rubik's Cube in 2026. If you are holding a scrambled 3×3 puzzle and feeling overwhelmed, take a deep breath. You are not alone. Every speedcuber in Los Angeles, from the bustling streets of Santa Monica to the quiet corners of Pasadena, started exactly where you are now. Solving the cube is not an act of magic; it is a logical process of layering knowledge, one move at a time. This solve rubix cube step by step easy beginner tutorial is designed specifically for the modern learner who wants clarity, speed, and confidence without the confusion of complex jargon.
In this comprehensive guide, we will dismantle the myth that cubing requires a genius-level IQ. Instead, we will focus on the Beginner's Method, the gold standard used by millions worldwide. Whether you are a student in downtown LA looking for a brain break or a parent wanting to bond with your child through a tangible skill, this article provides the roadmap. We will cover everything from understanding the fixed center pieces to mastering the algorithms that unlock the final layer. By the end of this read, you won't just know how to solve it; you will understand why it works.
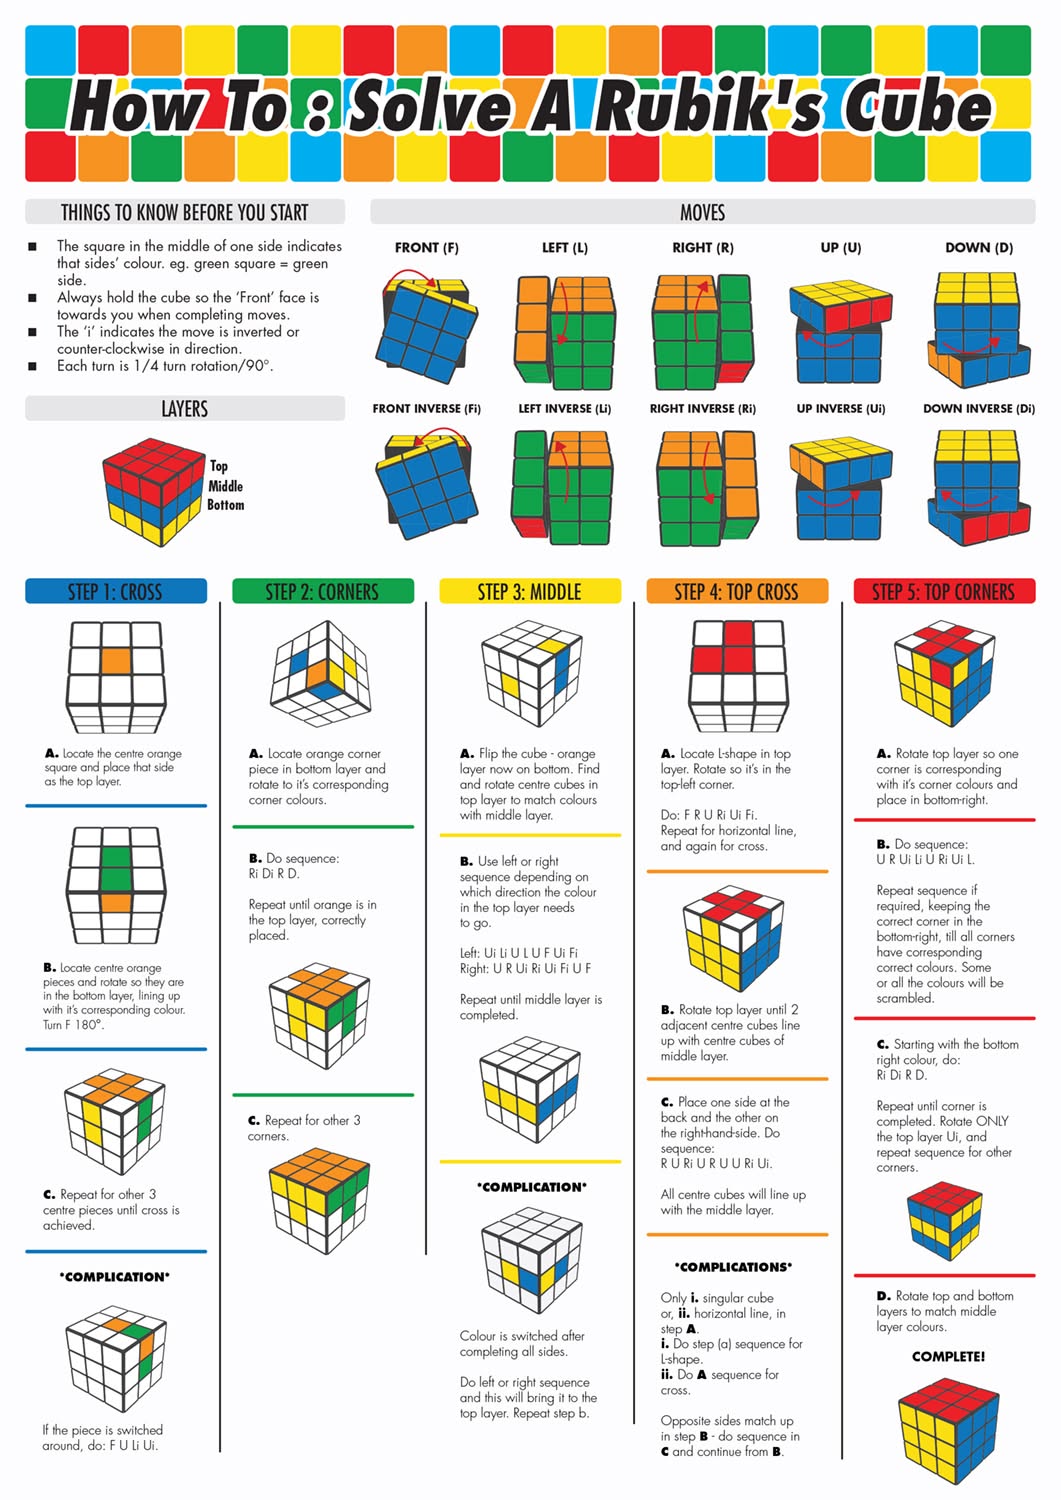
Mastering the Fundamentals Before You Turn
Before you make your first twist, you must understand the anatomy of the puzzle. Many beginners fail because they try to solve the cube face-by-face, which leads to chaos. The secret to success lies in the layer-by-layer approach. This method breaks the massive problem into three manageable sections: the bottom layer, the middle layer, and the top layer.
Understanding the Fixed Center Pieces
The most critical concept in 2026 cubing is remembering that the center pieces never move. On a standard 3×3 cube, there are six centers (White, Yellow, Red, Orange, Blue, Green). These pieces define the color of their respective faces. If the center is white, that entire face must eventually be white. Think of the centers as the anchors of your puzzle. They provide the reference points you need throughout the entire solving process. Without them, you would have no idea which color belongs where.
Decoding Cube Notation: Your New Language
To follow any algorithm, you must speak the language of cubing. This is known as Rubik's Cube Notation. It uses letters to represent the faces of the cube and symbols to indicate the direction of the turn.
- F: Front face
- R: Right face
- U: Up face
- L: Left face
- D: Down face
- B: Back face
The direction matters immensely. A letter by itself (like R) means turn that face clockwise 90 degrees. An apostrophe after the letter (like R') means turn it counter-clockwise. A number 2 (like R2) means turn it 180 degrees. Mastering this notation is the first step toward fluency. You don't need to memorize everything today, but having this cheat sheet handy while you practice is essential for following our instructions accurately.
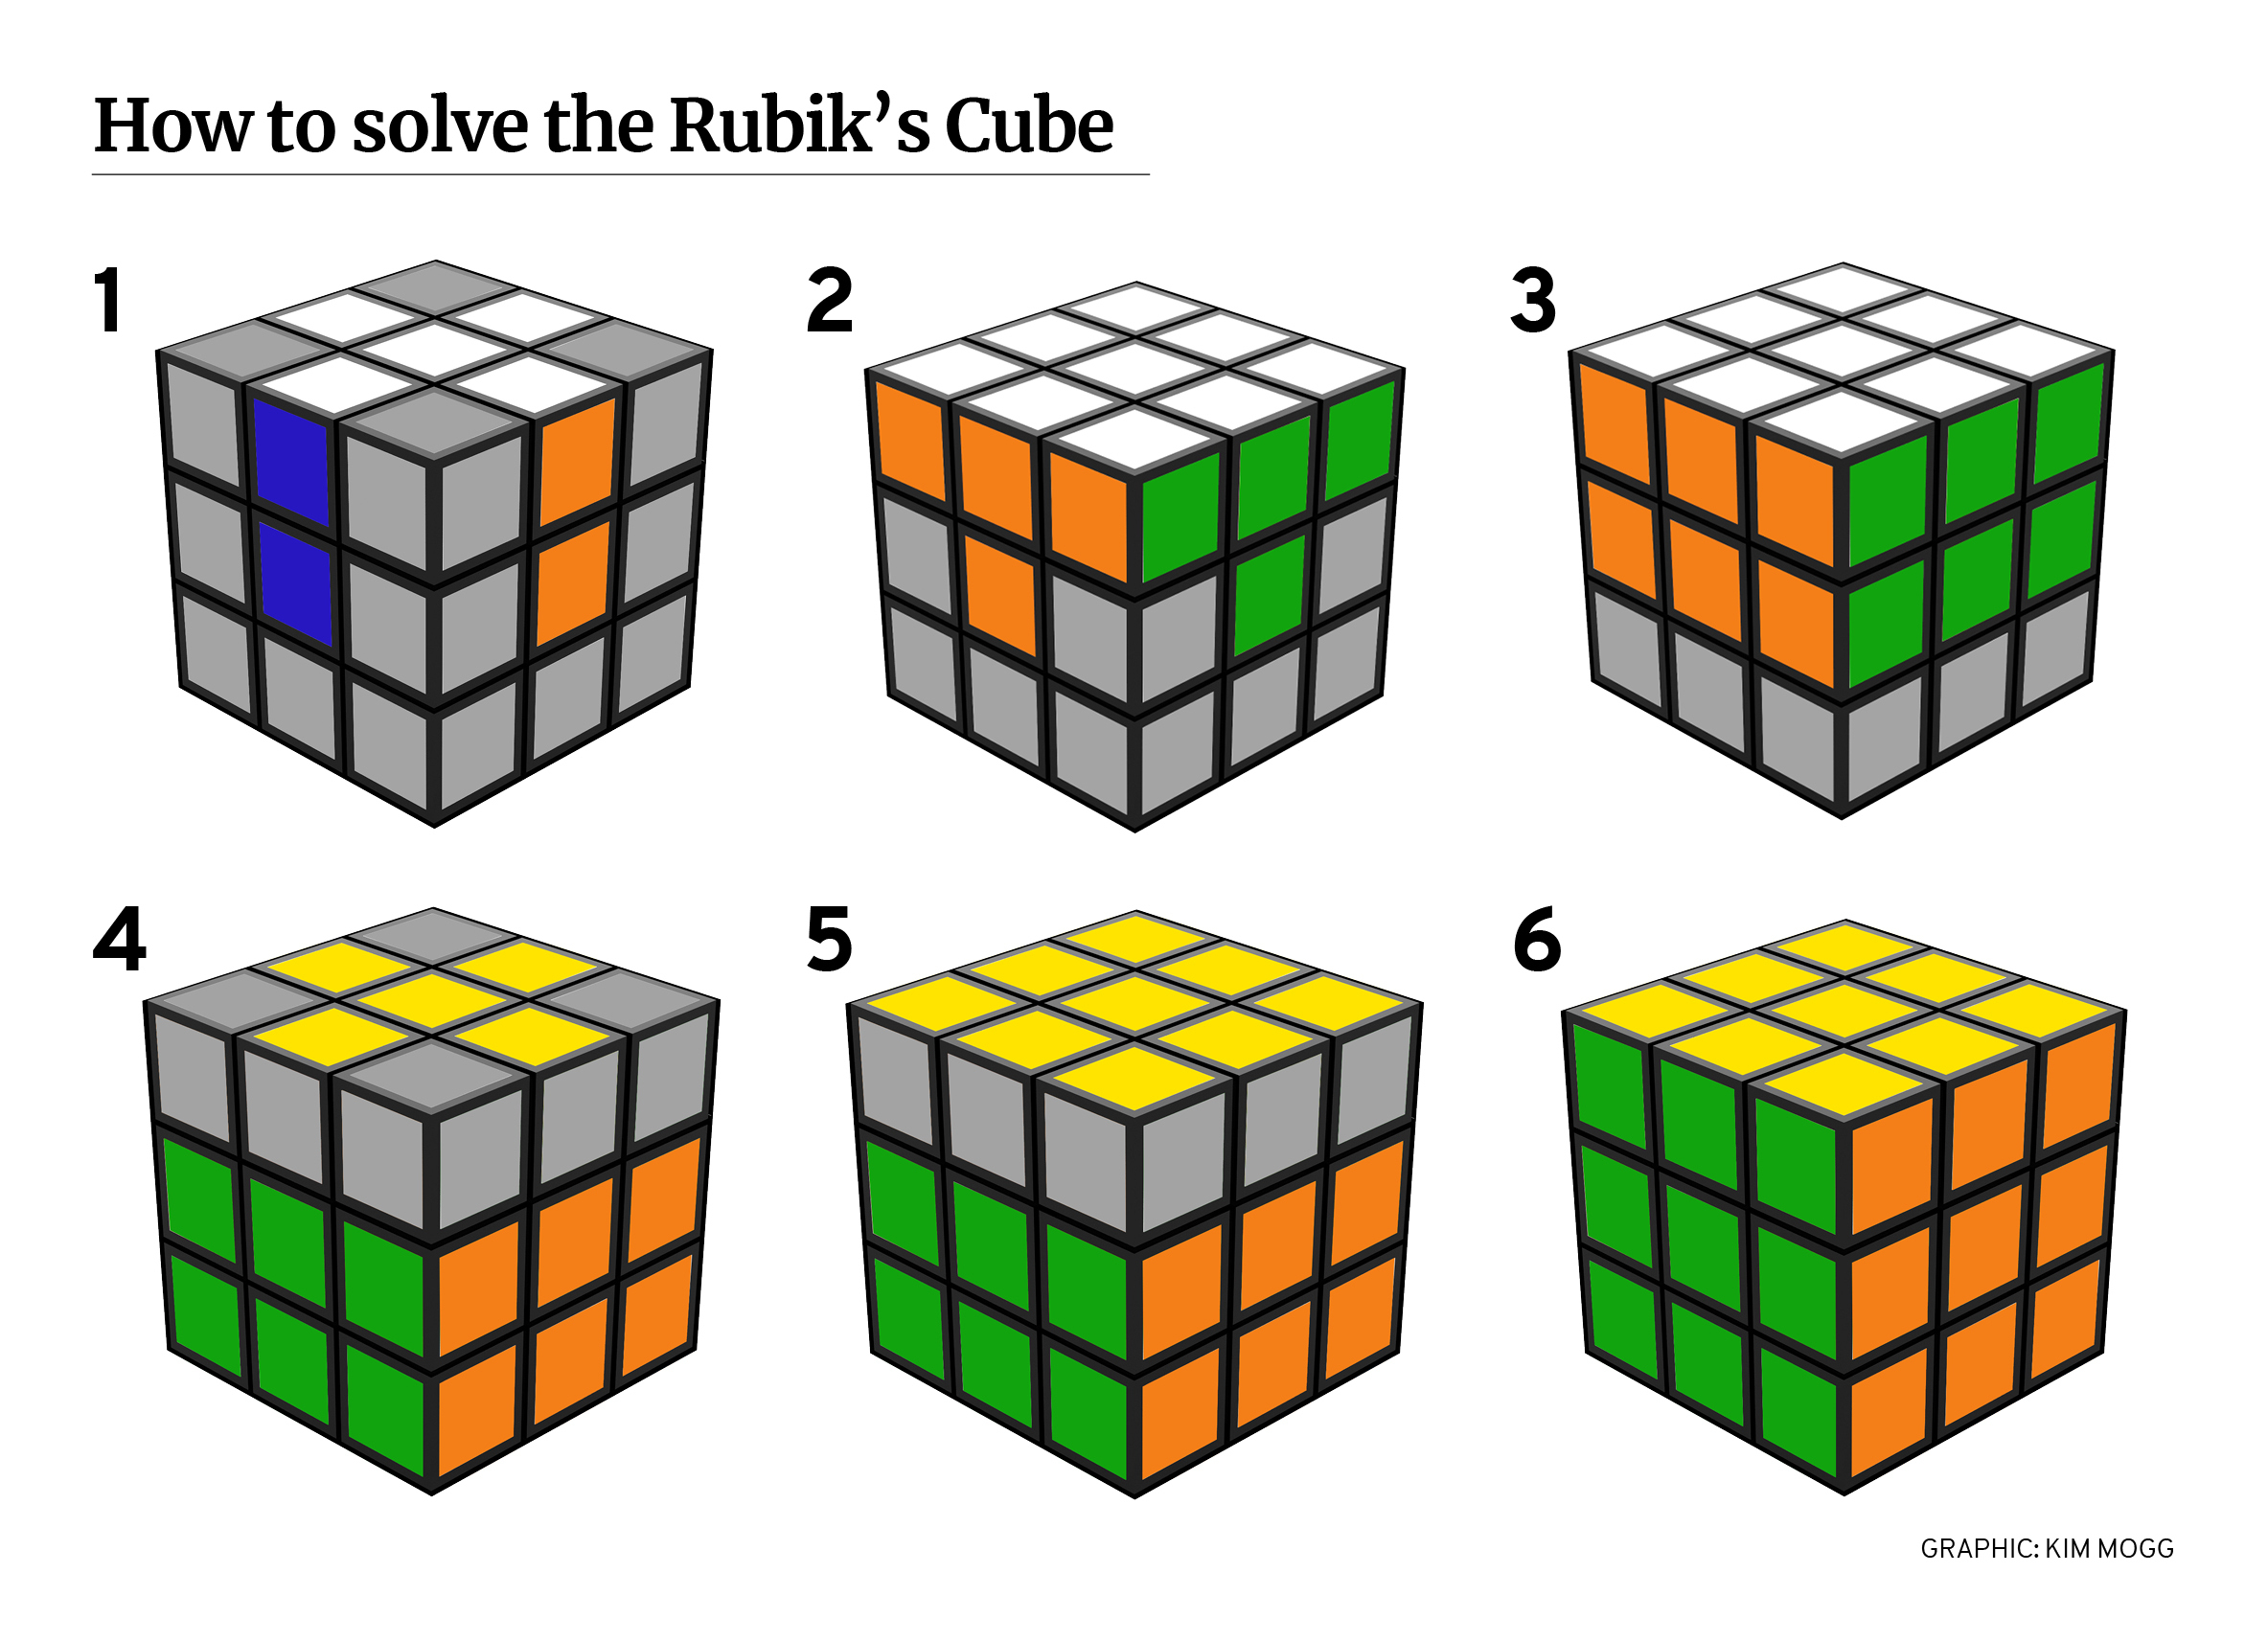
Step 1: Creating the White Cross on the Bottom
Your journey begins with the white face. In the world of cubing, white is almost universally chosen as the starting color because its high contrast makes errors immediately visible. However, the goal here isn't just a white square; it is a White Cross.
The Goal of the White Cross
You need to form a cross shape using the four edge pieces (pieces with two colors) on the white face. Crucially, the side colors of these edge pieces must match the center piece of the adjacent face. For example, if the edge piece has white and red, the red sticker must align perfectly with the red center.
Intuitive Movement
This is the only step in the entire tutorial where you generally do not need to use specific algorithms. It relies on intuition and observation. Look at the bottom layer and find an edge piece with white on it. Rotate the bottom layer (D) until the side color matches the center below it. Once aligned, simply rotate the bottom layer again to bring the white sticker up to the top. Repeat this for all four edges.
If an edge piece is already in the correct position but flipped the wrong way (white facing sideways), you can easily fix this by moving it to the bottom layer, rotating the bottom until it is under its correct spot, and bringing it back up correctly. Take your time here. This stage is about familiarizing yourself with how the pieces interact. Don't rush; build a strong foundation.
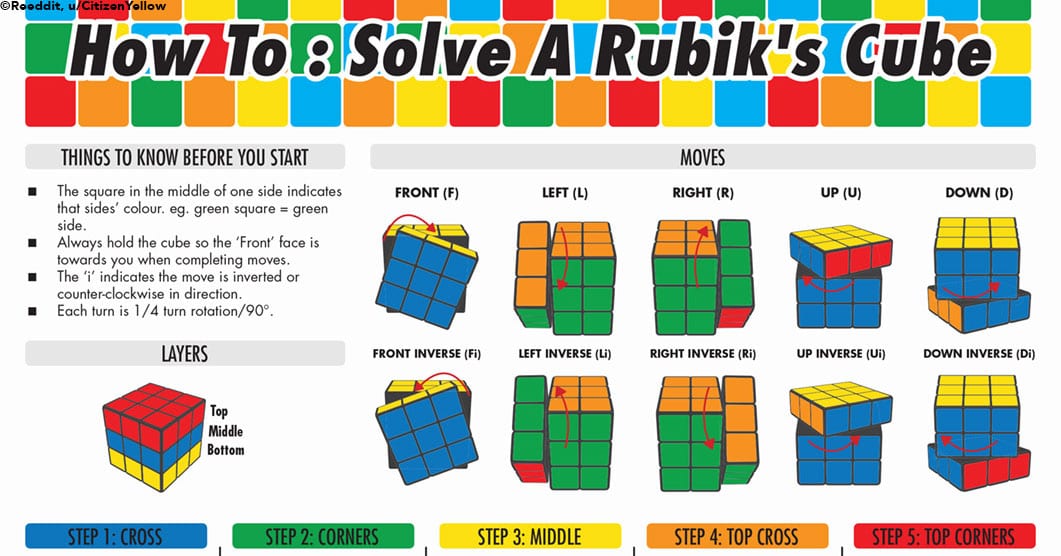
Step 2: Inserting the White Corners to Complete the First Layer
Now that you have a solid white cross, the next challenge is to complete the entire first layer. This involves placing the four corner pieces (pieces with three colors) that contain white.
Finding the Right Corner
Look at the top layer (the yellow side) and find a corner piece that contains white. Rotate the top layer (U) until this corner is positioned directly above where it needs to go—in the space between the two matching center colors.
The Magic Algorithm: R U R' U'
Once the corner is in position above its slot, you execute a specific sequence of moves known as an algorithm. For beginners, this is the most important formula to memorize: R U R' U'.
- R: Turn the right face clockwise.
- U: Turn the top face clockwise.
- R': Turn the right face counter-clockwise.
- U': Turn the top face counter-clockwise.
Repeat this sequence until the white corner snaps perfectly into place, completing the white face and the first layer sides. You might need to do this two or three times for a single corner. If the corner is already in the bottom layer but in the wrong spot or orientation, move it out to the top layer first using simple turns, then apply the algorithm.
By the end of this step, you will have a completely solved white face on the bottom, with the side colors of the first layer matching the center pieces of the middle layer. This creates a "flower" pattern on the bottom, but more importantly, it sets up the perfect platform for the next phase.
Step 3: Solving the Middle Layer Edges
With the first layer complete, flip the cube over so the white face is now on the bottom. Your goal now is to solve the middle layer. There are four edge pieces left to place in this layer.
Identifying Target Pieces
Look at the top layer (yellow side) for an edge piece that does not have yellow on it. This piece belongs in the middle layer. Rotate the top layer (U) until the side color of this edge piece matches the center piece of the face it is currently facing.
The Two Algorithms for the Middle Layer
Depending on which direction the edge piece needs to go, you will use one of two algorithms. Both rely on the same logic: move the piece out of the way, rotate the layer, and put it back in the correct spot.
- Moving Right (Right Hand Algorithm): If the piece needs to move to the right, use: U R U' R' U' F' U F.
- Moving Left (Left Hand Algorithm): If the piece needs to move to the left, use: U' L' U L U F U' F'.
Notice the symmetry? These algorithms are mirror images of each other. Practice both until they feel natural in your fingers. This technique is often called Finger Tricks, a skill emphasized in modern tutorials to increase solving speed. Instead of turning the whole cube, you use your thumb and index finger to flick the layers quickly.
If an edge piece is already in the middle layer but in the wrong position, simply use one of the algorithms to push it up to the top layer. Then, re-orient the top layer to place it correctly in the middle. After repeating this process four times, your entire cube should have the first two layers solved, leaving only the top yellow face scrambled.
Step 4: Forming the Yellow Cross on the Top Face
Now comes the moment many beginners fear: the top layer. Do not panic. We are going to ignore the corners for a moment and focus solely on creating a Yellow Cross on the top face. You will see different patterns emerge as you work: a single dot, an "L" shape, a line, or the cross itself.
Analyzing Your Pattern
Start with the cube held so the yellow center is on top. Observe the arrangement of the yellow edge pieces.
- Dot: No yellow edges are aligned correctly.
- L Shape: Two adjacent edges form an "L".
- Line: Two opposite edges form a line.
- Cross: You have successfully formed the cross!
Executing the Yellow Cross Algorithm
Regardless of which pattern you start with, you will use the same algorithm to progress toward the cross: F R U R' U' F'.
- If you have a dot, perform the algorithm once to get an "L".
- Rotate the cube so the "L" is in the top-left position (like a clock hand pointing to 10 and 12) and perform the algorithm again to get a line.
- Rotate the cube so the line is horizontal (pointing to 9 and 3) and perform the algorithm one last time to reveal the Yellow Cross.
This step is purely visual and repetitive. It builds muscle memory. Remember, you are not solving the cube yet; you are just setting up the geometry for the final layer. Once the cross is formed, ensure the side colors of the yellow edges match the center pieces of the middle layer. This alignment is crucial for the next steps.
Step 5: Positioning the Yellow Corners Correctly
With the yellow cross established, the next objective is to get the yellow corners into their correct positions. At this stage, the corners might be in the right place but twisted incorrectly, or they might be in completely wrong spots. We are focusing on Permutation (position) before Orientation (twisting).
The Positioning Algorithm
Look for corners that are already in the correct location relative to the side centers (even if they are twisted wrong). If you find none, just start anywhere. Hold the cube so a correctly positioned corner is in the front-right-up position.
Execute this algorithm repeatedly until all four corners are in their correct spots: R U R' U R U2 R' U2.
This sequence cycles the three corners around the top layer without disturbing the solved middle layer or the yellow cross below. You may need to do this multiple times. Keep an eye out: sometimes a corner will snap into place after one cycle, while others require two or three rotations. Patience is key here. Once every yellow corner is sitting in the correct "slot" relative to the side colors, you are ready for the final twist.
Step 6: Orienting the Final Yellow Corners
This is the grand finale. All your hard work is leading to this moment. The yellow corners are in the right places, but the yellow stickers are likely facing sideways or down. You need to rotate them so the entire top face becomes solid yellow.
The Orientation Algorithm
Find a corner that is still twisted incorrectly. Hold the cube so this corner is in the front-right-up position. Perform the following algorithm repeatedly until that specific corner is oriented correctly (yellow facing up): R' D' R D.
- Note: You will notice that during this process, the rest of the cube gets scrambled. That is normal! The algorithm temporarily messes up the bottom layers, but it fixes the top corner.
- After applying R' D' R D, rotate only the top layer (U) to bring the next misoriented corner to the front-right-up position.
- Apply the algorithm again.
Repeat this cycle for all four corners. It might seem like you are undoing your progress, but you are systematically fixing each piece. Once you have applied the algorithm enough times for all corners, the yellow face will finally resolve into a solid block of color.
The Final Check
At this point, if you have followed every step precisely, the cube should be solved. The white face is complete, the middle layer is locked in, and the yellow face is uniform. However, double-check the side colors. Sometimes, due to a mistake earlier, the side colors of the top layer might not match the centers. If this happens, simply hold the cube so the mismatched face is on the front and repeat the R U R' U R U2 R' algorithm to permute the corners again until the colors align perfectly.
Overcoming Common Beginner Mistakes and Stagnation
Even with a perfect tutorial, many solvers hit a wall. Here is how to troubleshoot common issues based on data from top cubing communities in 2026.
The "Stuck" Syndrome
Many beginners get stuck after the first layer. This usually happens because they try to force a piece into place rather than moving it out first. Remember the golden rule: Always move pieces out of the way before trying to insert them. If a piece is blocking you, lift it to the top layer, solve it there, and drop it back in later.
Finger Fatigue vs. Muscle Memory
Solving the cube requires dexterity. If your hands cramp, you are likely using your whole arm instead of your fingers. Modern tutorials emphasize finger tricks—using the thumb to initiate turns and the index/middle fingers to complete them. Practice the algorithms slowly without rushing. Speed is a byproduct of consistency, not the goal initially. Spend 15 minutes a day practicing just the R U R' U' algorithm until it feels automatic.
The Importance of Practice
Statistics show that consistent, short practice sessions yield better results than sporadic long ones. Aim for daily micro-practices. Even five minutes of focused repetition can significantly reduce your solve time over a week. The neural pathways in your brain adapt quickly to these spatial puzzles.
Advanced Tips for the Aspiring Speedcuber
Once you have mastered the basic method, you might wonder what's next. The beginner method typically solves a cube in 60–90 seconds. With slight refinements, you can drop this time significantly.
Improving Your Rotation Speed
One of the biggest factors in solving speed is how fast you can rotate the cube. Learn to orient the cube in your hands rather than twisting your wrists. This reduces friction and increases fluidity. In Los Angeles cubing clubs, you will often see enthusiasts rotating the entire cube while their fingers execute the algorithms—a skill called cube rotation.
Memorizing Fewer Algorithms
The beginner method uses about 7 algorithms. As you advance, you will learn methods like CFOP (Cross, F2L, OLL, PLL) which use hundreds of algorithms but allow for sub-20-second solves. However, stick to the beginner method until you can consistently solve under 2 minutes. Mastery of the basics is the prerequisite for advanced techniques.
Utilizing Digital Tools
In 2026, technology aids learning more than ever. Use online simulators like those found on Cubzor or Ruwix to practice moves without needing a physical cube. These tools allow you to visualize algorithms in 3D, helping you understand the mechanics of the moves before you attempt them physically. Additionally, timer apps can track your progress, providing the motivation needed to keep improving.
The Psychology of Pattern Recognition and Spatial Awareness
Beyond the mechanical execution of algorithms, solving the Rubik's Cube is deeply rooted in cognitive development and spatial reasoning. When you first pick up a scrambled cube, your brain perceives chaos. However, as you progress through the steps outlined above, you begin to train your brain to recognize patterns. This shift from random manipulation to pattern recognition is what separates a novice from an intermediate solver. You start to see not just individual stickers, but clusters of color, potential paths for pieces, and the logical flow of moves required to restore order.
In the context of modern learning, understanding why an algorithm works is just as important as knowing how to perform it. For instance, when you practice the R U R' U' sequence repeatedly, you are essentially training your muscle memory to execute a specific permutation cycle. Over time, your fingers will "know" where to go before your eyes even finish processing the instruction. This phenomenon, known as procedural memory, allows solvers to solve the cube almost on autopilot during competitions or casual play. It frees up mental bandwidth to focus on visualization and lookahead—the ability to see the next few moves while executing the current one.
Spatial awareness also plays a pivotal role in troubleshooting. If you find yourself stuck, it often means you have lost track of where a specific piece originated. Developing the habit of mentally tracking pieces as they move can prevent this. Try to visualize the journey of a corner piece: "I picked this up from the top right, moved it to the bottom left, now I need to bring it back to the top." This mental mapping creates a narrative for the puzzle, making the abstract movements feel concrete and logical. In Los Angeles, where innovation meets tradition, this blend of analytical thinking and creative problem-solving is highly valued, mirroring the city's dynamic culture of tech and art.

Building a Sustainable Practice Routine
Consistency is the bridge between confusion and competence. Many beginners abandon the cube after a few failed attempts because they expect instant mastery. However, the path to proficiency is linear and cumulative. To maximize your learning curve, consider adopting a structured practice routine that balances repetition with variety.
The 15-Minute Daily Drill
Instead of attempting long, frustrating sessions once a week, commit to fifteen minutes of focused practice every day. During these sessions, do not worry about beating your previous record. Instead, focus on flow. Spend five minutes solely on the White Cross, five minutes on the First Layer Corners, and five minutes on the Middle Layer algorithms. By isolating specific skills, you build a strong foundation in each area before integrating them into a full solve. This methodical approach ensures that weak links in your chain are addressed immediately, preventing bad habits from forming.
Tracking Progress with Data
In 2026, data-driven learning is accessible to everyone. Utilize simple tools to track your solves. Whether it's a physical timer app on your phone or a dedicated cubing website like Speedsolving.com, recording your times provides objective feedback. Look for trends rather than single outliers. Did you solve faster today because you were more relaxed? Or did you make fewer mistakes because you took extra time to align the centers? Analyzing these variables helps you refine your technique continuously. Over months, these small increments add up to dramatic improvements, turning a 90-second solve into a 45-second feat.
Joining the Community
No one solves a cube in isolation. The global cubing community, vibrant in cities like Los Angeles, offers support, resources, and camaraderie. Local clubs often host weekly meetups where enthusiasts share tips, trade cubes, and compete in friendly events. Even if you cannot attend in person, online forums and Discord servers provide a wealth of knowledge. Here, you can ask specific questions about difficult algorithms, share videos of your solves for critique, and discover new variations of the beginner method. Engaging with others keeps motivation high and exposes you to diverse solving styles that might inspire your own evolution.

Troubleshooting Advanced Scenarios
As you advance beyond the basic beginner method, you will encounter scenarios that seem impossible at first glance. These are not errors; they are natural parts of the puzzle's complexity. Understanding how to handle these situations will deepen your appreciation for the cube's mechanics.
Parity Errors in Higher Layers
While rare in the standard beginner method for a 3×3 cube, parity issues can occur if you accidentally misplace a piece early on. This manifests as two edges needing to swap positions without affecting the rest of the cube, which seems mathematically impossible with standard moves. The solution lies in recognizing that the cube has been "scrambled" internally by your earlier moves. The fix usually involves re-scrambling a specific section and re-applying the algorithm with corrected orientation. Patience and a willingness to restart a section are often the best remedies. Remember, even world champions make mistakes; the difference is their ability to recover quickly.
Dealing with Stuck Mechanisms
Physical cubes can sometimes stick due to tension issues or dirt accumulation. If your cube feels resistant or refuses to turn smoothly, it may be affecting your solving rhythm. Modern lubricants and tension adjusters are readily available and can transform a sluggish cube into a fluid tool. Learning to maintain your cube is part of the hobby. A well-maintained cube responds instantly to your finger tricks, allowing for smoother transitions between algorithms. Regular cleaning and occasional lubrication ensure that your mechanical performance matches your cognitive skill.
The Transition to Speedcubing Methods
Once you consistently solve the cube in under two minutes using the beginner method, you may feel ready to explore advanced techniques. The most popular progression is to CFOP (Cross, F2L, OLL, PLL). This method optimizes the first two layers by pairing edge and corner pieces before inserting them, drastically reducing the number of moves required. While CFOP requires memorizing over 70 algorithms, the efficiency gains are substantial. Many solvers use the beginner method as a stepping stone to CFOP, ensuring they understand the underlying logic before tackling the increased complexity. This gradual ascent prevents overwhelm and builds confidence.
Frequently Asked Questions (FAQ)
Q: How long does it typically take to learn to solve a Rubik's Cube?
A: With consistent daily practice of 15–20 minutes, most beginners can solve the cube for the first time within one to two weeks. Mastery, defined as solving under two minutes, usually takes one to three months of dedicated effort. Everyone learns at their own pace, so don't compare your progress to others.
Q: Do I need special equipment to start solving?
A: No, any standard 3×3 Rubik's Cube will work. However, investing in a high-quality "speed cube" designed for smooth turning and adjustable tension can significantly improve your experience and speed once you are ready to compete or solve rapidly. These are widely available in toy stores and online retailers across Los Angeles and globally.
Q: What should I do if I forget an algorithm mid-solve?
A: This is completely normal. If you forget a specific sequence, pause and look at the cube. Often, you can intuitively figure out the necessary moves based on the position of the pieces. Alternatively, keep a cheat sheet nearby while practicing. Over time, the algorithms become second nature, and you won't need to recall them consciously.
Q: Can I solve the cube without looking at it?
A: Yes, this is called "blindfolded solving," but it is an advanced technique reserved for experienced cubers who have memorized the positions and orientations of all pieces. As a beginner, focus on visual solving first. Blindfolded solving requires years of practice and specific memory techniques, so it is best tackled only after mastering the standard method.
Conclusion: Your Journey Starts Now
Solving the Rubik's Cube is more than just a party trick or a way to pass the time; it is a testament to human perseverance and logical ingenuity. From the bustling hubs of Los Angeles to quiet living rooms everywhere, the cube serves as a universal language of problem-solving. By following this step-by-step guide, you have equipped yourself with the knowledge and tools to conquer one of the world's most iconic puzzles.
Remember, the journey is just as valuable as the destination. Every twist, every scramble, and every moment of frustration is a lesson in patience and resilience. You are not just moving plastic squares; you are exercising your brain, building neural pathways, and discovering the satisfaction of creating order from chaos. The fact that you started reading this tutorial means you already possess the most important ingredient: the desire to learn.
As you pick up that cube again, keep these principles in mind: understand the fundamentals, respect the process, and celebrate every small victory. Whether you aim to solve it in ten minutes or ten seconds, the reward is the same—a sense of accomplishment that transcends the puzzle itself. So, grab your cube, take a deep breath, and let the adventure begin. The world of cubing awaits, and with every solve, you become a little bit more of a master.
The ultimate goal is not just to complete the puzzle, but to enjoy the process of becoming better at it. Embrace the challenge, learn from your mistakes, and never stop exploring the infinite possibilities within those 26 smaller cubes. Your story of mastery starts with this very first turn. Good luck, and happy cubing!