Welcome to the definitive guide for anyone looking to conquer the world's most famous puzzle. Whether you found a dusty cube in an attic, received one as a gift, or simply want to impress your friends with a new skill, mastering the steps of solving a Rubik's cube is entirely achievable in 2026. The Rubik's Cube has evolved from a simple fidget toy into a global phenomenon, with speedcubing communities thriving in cities from Tokyo to New York. However, the journey begins not with complex algorithms, but with a solid understanding of the beginner-friendly method.
In this comprehensive guide, we will break down the 7-stage layer-by-layer method, the gold standard for beginners worldwide. By the end of this article, you will possess the knowledge to solve your first cube, understand the core concepts that have held up for decades, and be ready to explore advanced techniques. Let's dive into the mechanics of turning chaos into order.
Understanding the Core Mechanics Before You Start
Before attempting to twist and turn, you must understand the anatomy of the puzzle. Confusion often arises because beginners try to solve face by face, which leads to frustration. The secret lies in the layer-by-layer approach. This method divides the cube into three distinct horizontal layers: the bottom (usually white), the middle, and the top (usually yellow).
The Fixed Nature of Center Pieces
The most critical concept to grasp immediately is that center pieces never move. In a standard 3×3 Rubik's Cube, there are six center pieces, one on each face. These centers define the color of their respective faces. If the center piece is white, that entire face must eventually become white. No matter how much you scramble the cube, the white center will always remain opposite the yellow center, and red will always be opposite orange. Treat these centers as your reference points throughout the entire solving process.
The Three Types of Cubies
To solve the cube logically, you must categorize the moving parts. There are only two types of movable pieces besides the fixed centers:
- Edge Pieces: There are 12 of these. They have exactly two colored stickers. They sit between two centers.
- Corner Pieces: There are 8 of these. They have three colored stickers and sit at the intersections of three faces.
Understanding that you are only manipulating these 20 movable pieces (12 edges + 8 corners) rather than all 54 stickers reduces the cognitive load significantly. Every scrambled state can be reversed; there is no such thing as an unsolvable cube if you haven't taken it apart incorrectly.
Decoding Cube Notation
To follow any algorithm, you must speak the language of cubing. This is known as cube notation. It uses single letters to represent the faces of the cube:
- F: Front face
- R: Right face
- U: Up face (Top)
- L: Left face
- D: Down face (Bottom)
- B: Back face
The direction of the turn is indicated by symbols:
- A letter alone (e.g., R) means turn that face clockwise 90 degrees.
- A letter followed by an apostrophe (e.g., R') means turn that face counter-clockwise 90 degrees.
- A letter followed by a 2 (e.g., R2) means turn that face 180 degrees.
Mastering this notation is the first step toward fluency in the steps of solving a rubiks cube beginner friendly guide. Without it, memorizing algorithms is nearly impossible.
Step 1: Creating the White Cross (Intuitive First Layer)
The first stage of solving is creating the White Cross. This is the only step in the beginner method that generally requires no algorithms. It relies on intuition and logic. Your goal is to form a plus sign (+) on the white face where the side colors of the edge pieces match the center pieces of the adjacent faces.
The Process
Start by holding the cube with the white center on top. Look for the four white edge pieces scattered across the cube. An edge piece contains both white and another color (e.g., white and red). You need to move these pieces so that they form a cross on the top face, and the non-white color aligns perfectly with the corresponding center below it.
For example, if you have a white-red edge piece, it must sit between the white center and the red center. Do not worry about the corner pieces yet. Focus solely on the edges. If an edge piece is in the correct position but flipped the wrong way, you must remove it and try again. This is part of the learning curve.
Why Start with White?
Most tutorials choose white because it is high-contrast and easy to see. More importantly, consistency is key. Always start with the same color on top. This builds muscle memory. When you reach the final steps later in the process, you will need to know exactly which face is "up" relative to your previous progress. Starting with green or blue might seem fun initially, but it will confuse you when you reach the last layer.
Common Mistakes to Avoid
Beginners often rush this step and try to force pieces into place without checking the side colors. Remember, the White Cross is not just about having white on top; it is about having the correct edge alignment. If your cross looks like a mess on the sides, you cannot proceed to Step 2. Take your time here. This stage usually takes less than five minutes for a first-timer once the logic clicks.
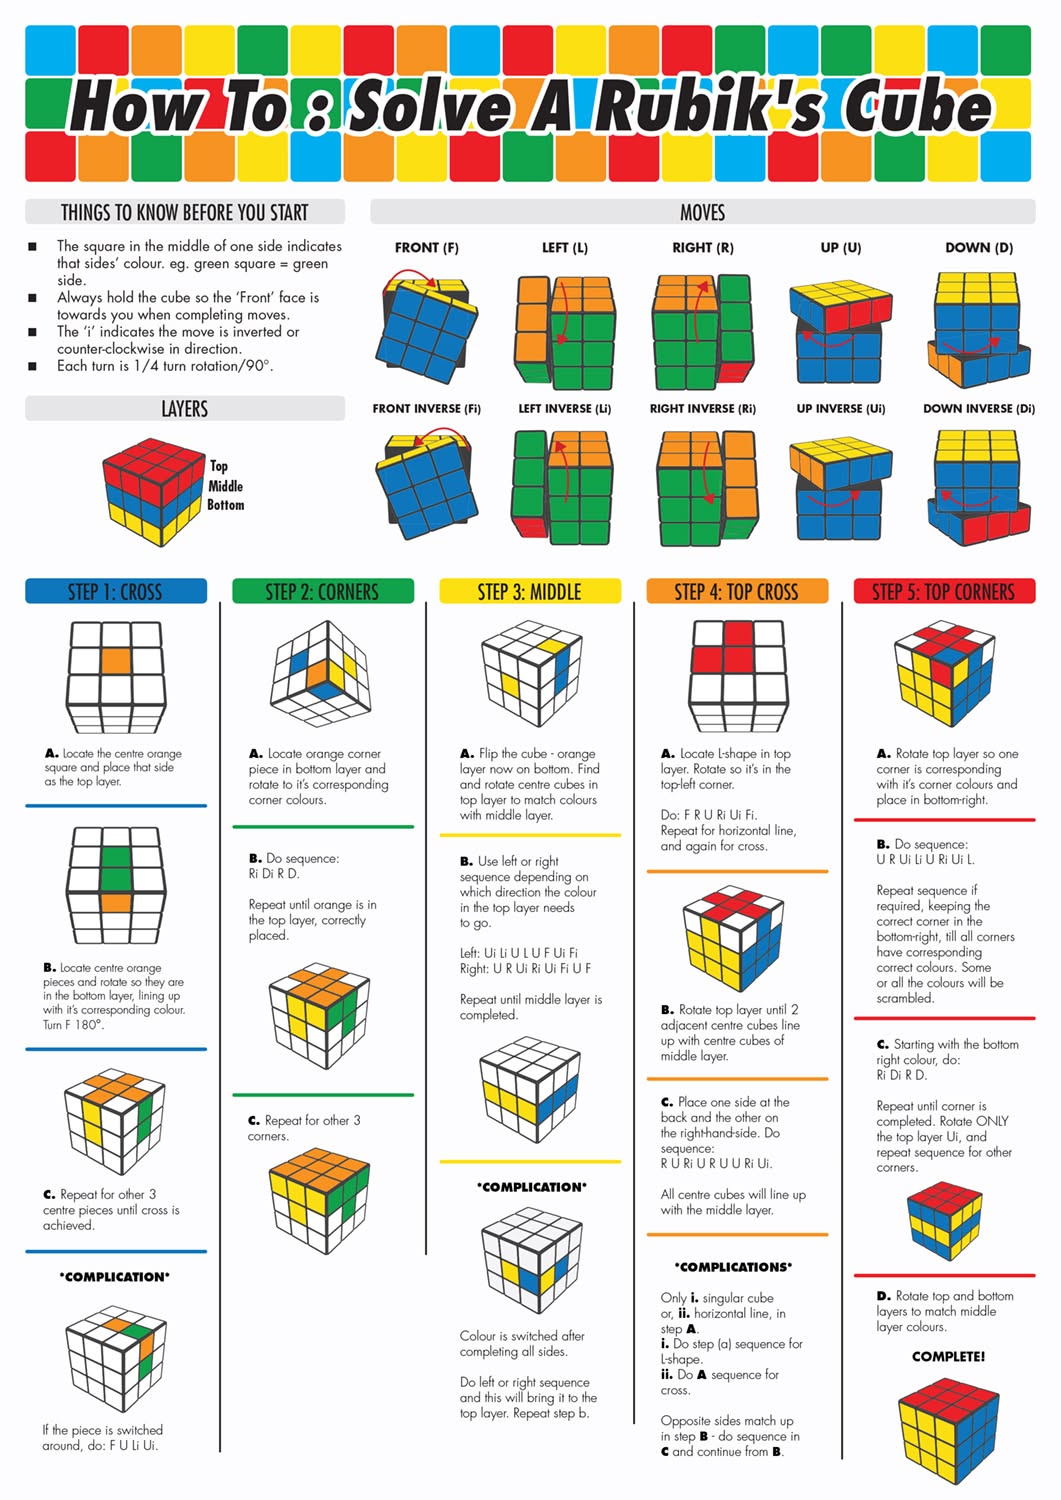
Step 2: Solving the White Corners (Completing the First Layer)
Once the white cross is formed, the next logical progression is to insert the four white corner pieces. A corner piece has three colors: white, and two others (e.g., white-blue-red). Your goal is to complete the entire first layer, meaning the white face is solid white, and the side strips of the first layer also match their respective centers.
The Algorithm: R U R' U'
This is arguably the most important algorithm in the beginner method. You will use this sequence repeatedly.
- R: Right face clockwise
- U: Up face clockwise
- R': Right face counter-clockwise
- U': Up face counter-clockwise
How to Execute
- Locate a white corner piece on the bottom layer (the D face).
- Rotate the bottom layer until the corner is directly below where it needs to go (between the two matching centers).
- Perform the algorithm R U R' U' repeatedly.
- Watch closely. Each time you perform the move, the corner will cycle through positions. Eventually, it will pop up into the top layer, oriented correctly with the white sticker facing up and the side colors matching the centers.
You may need to do this algorithm 2, 3, or even 5 times for a single corner before it settles into place. Do not panic if the rest of the cube gets scrambled; this is normal. The beauty of this algorithm is that it inserts the corner without disturbing the white cross you just built. Repeat this process for all four corners until the entire bottom layer is solved.
Visualizing the Move
Imagine the corner piece is stuck in the bottom-right-front slot. You want to move it to the top-right-front slot. The sequence R U R' U' essentially lifts the corner out, rotates it into the correct orientation, and drops it back in, all while preserving the integrity of the cross above. Mastering the rhythm of this move will save you significant time later.
Step 3: Solving the Middle Layer Edges
With the first layer complete, you now flip the cube over so the white face is on the bottom. Your focus shifts entirely to the middle layer. There are four edge pieces remaining that belong in the middle layer (they do not contain yellow).
Two Essential Algorithms
You need two mirror-image algorithms to solve the middle layer depending on which direction the piece needs to travel.
Right-Side Algorithm (Moving Right):
If an edge piece needs to move to the right side of the cube:
U R U' R' U' F' U F
Left-Side Algorithm (Moving Left):
If an edge piece needs to move to the left side of the cube:
U' L' U L U F U' F'
Execution Strategy
- Scan the top layer (yellow face) for an edge piece that does not have yellow on it.
- Rotate the top layer (U) so that the color on the side of this edge piece matches the center of the face directly in front of it. This creates a "T" shape on the front face.
- Determine if the piece needs to go to the right or the left.
- Apply the corresponding algorithm.
- If the piece goes to the right, use the Right-Side Algorithm.
- If the piece goes to the left, use the Left-Side Algorithm.
Dealing with Parity Errors
Sometimes, you might find an edge piece already in the middle layer but in the wrong position or flipped. In the beginner method, this is rare but possible. If you encounter a situation where you cannot insert an edge without breaking the layer, simply take the piece out, put it back on the top layer in a different orientation, and try the algorithm again. The layer-by-layer method is forgiving; if you make a mistake, you can almost always backtrack.
By the end of this step, you should have the first two layers (F2L) completely solved. The bottom two layers will be solid colors, and the top layer will still be scrambled, mostly yellow.
 (Note: Visual representation of the completed first two layers)
Step 4: Forming the Yellow Cross
Now that the bottom two layers are secure, it is time to tackle the last layer (LL). Specifically, Step 4 focuses on creating a Yellow Cross on the top face. At this stage, we care about the orientation of the edges, not their position relative to the side centers. We just want to see a yellow plus sign (+).
The Single Algorithm
There is only one algorithm needed for this entire step:
F R U R' U' F'
Interpreting the Patterns
Depending on how the yellow stickers are arranged on the top face, you will perform this algorithm a specific number of times. There are three common scenarios:
- The Dot: No yellow line is visible. Perform the algorithm once.
- The L-Shape: Two yellow stickers form an "L" shape in the top-left corner (relative to your view). Perform the algorithm twice.
- The Line: Two yellow stickers form a horizontal line across the top. Perform the algorithm three times.
After performing the algorithm the required number of times, you should see a perfect yellow cross. Note that the side colors of these edge pieces might not match the center colors yet; that is okay. We fix that in the next step.
Why This Works
This algorithm manipulates the edge pieces of the top layer in a cycle that eventually aligns them into a cross pattern. It is designed specifically to build upon the solved layers below, ensuring you don't undo your hard work. Consistency is vital here; practice the finger motions until the sequence feels natural.
Step 5: Positioning the Yellow Edges
With the yellow cross formed, the next challenge is Permuting the Last Layer Edges (PLL). We need to rotate the edge pieces around the top layer so that their side colors match the center pieces of the middle layer. Currently, the edges are in the correct shape (a cross) but in the wrong locations.
The Algorithm
Use this specific sequence to swap the edges:
R U R' U R U2 R'
Execution Tips
- Look at the top layer. Is there any side where the edge colors already match the centers?
- If yes, hold that matched side at the back of the cube.
- If no side matches, perform the algorithm anyway; eventually, a match will appear.
- Execute
R U R' U R U2 R'. - Check the result. You should now have one or two sides fully matched.
- Hold the matched side at the back and repeat the algorithm until all four edge pieces match their corresponding centers.
This step completes the orientation of the edges. Once finished, the top layer will look like a scrambled mess of yellow and the correct side colors, but every edge is in its correct slot.
Step 6: Positioning the Yellow Corners
Now we move to the trickiest part for many beginners: getting the corners in the right place. In Step 6, we ignore the orientation (which way the yellow sticker faces) and focus purely on position. We want each corner to be between the three correct center colors.
The Algorithm
U R U' L' U R' U' L
The Strategy
- Scan the top layer for any corner that is already in the correct position (even if it is twisted wrongly).
- If none exist, just perform the algorithm; one will eventually land in the right spot.
- Hold the correctly positioned corner at the front-right position.
- Perform the algorithm. This will cycle the other three corners.
- Check if the other corners are now in the correct spots.
- Repeat the process, always holding a correct corner at the front-right, until all four corners are in their correct locations.
Remember, the yellow stickers might still be pointing sideways. That is fine. We fix the orientation in the final step. This algorithm effectively cycles the corners without messing up the edges you just solved.
Step 7: Orienting the Yellow Corners (Final Solution)
The final stage is Orienting the Last Layer Corners. Now that every corner is in the correct spot, we just need to twist them so the yellow stickers face upward. This will solve the cube!
The Algorithm
R' D' R D
The Process
- Hold a misoriented corner at the front-right-top position.
- Perform the algorithm R' D' R D.
- Watch the yellow sticker. It might move away from the top face temporarily. This is normal. Keep repeating the algorithm on the same corner until the yellow sticker is facing up.
- Once that corner is solved, do not rotate the whole cube. Instead, rotate only the top layer (U) to bring the next misoriented corner to the front-right-top position.
- Repeat R' D' R D on the new corner.
- Continue this cycle for all four corners.
Completion
As soon as the fourth corner is twisted yellow-side-up, the entire cube will snap into a solved state. You will see solid colors on every face. Congratulations! You have successfully mastered the steps of solving a rubiks cube beginner friendly guide.
Practice Routines and Speed Improvement Tips
Solving the cube once is an achievement; solving it quickly is a skill. To transition from a beginner to an intermediate solver, consider these tips for 2026:
- Finger Tricks: Instead of using your whole arm to rotate faces, learn to flick the faces with your fingers. For example, use your thumb to push the R face and your index finger to pull the U face. This increases speed exponentially.
- Look Ahead: Don't wait until you finish one step to plan the next. While solving the last corner, your eyes should already be scanning for the next edge. This fluidity reduces total solve time.
- Daily Practice: Consistency beats intensity. Practicing for 15–30 minutes daily yields better results than one hour once a week. Muscle memory develops through repetition.
- Use Tools: Utilize online solvers and timers. Apps like Cube Solver can show you the shortest path if you get stuck, helping you visualize complex patterns.
Troubleshooting Common Beginner Hurdles
Even with a clear roadmap, many beginners encounter specific roadblocks that can halt progress. Understanding these common pitfalls and how to resolve them is just as important as learning the algorithms themselves. One of the most frequent issues is the "flipped edge" scenario during the White Cross formation. If you find yourself unable to align an edge piece without disrupting the cross you've already built, it often means the piece was inserted incorrectly from the start. The solution is simple: remove the piece, re-evaluate its orientation relative to the centers, and try again. Patience here saves frustration later.
Another recurring challenge occurs in Step 6 when no corner appears to be in the correct position. Beginners sometimes panic, thinking they have made a mistake or that the cube is unsolvable. In reality, this is a normal state in the algorithmic cycle. Simply perform the positioning algorithm anyway; it will rotate the corners until one lands in the correct slot. Trust the process. The mathematics of the cube guarantees that a solution exists, and the algorithms are designed to guide you there step by step.
Additionally, some solvers struggle with the "last layer flip" where the yellow stickers form a pattern that doesn't match any of the standard cases (dot, L-shape, line). This usually happens if the cube was scrambled too aggressively or if a move was miscounted. If you encounter a strange pattern, double-check your previous steps. Often, a single extra rotation of the top layer can reset the situation to a known case. If the problem persists, ensure you are holding the cube correctly; rotating the entire cube changes your perspective and can make patterns appear different than they actually are.
Advanced Concepts for the Curious Solver
Once you have mastered the seven steps outlined above, you may find yourself wondering what comes next. The beginner method is efficient, but it is not the fastest way to solve the cube. Speedcubers utilize methods like CFOP (Cross, F2L, OLL, PLL) or Roux, which combine steps and optimize algorithms for speed. However, before diving into these complex systems, it is beneficial to understand the underlying theory that makes them work.
Commutators and Conjugates
At the heart of advanced cubing lies the concept of commutators. A commutator is a sequence of moves structured as [A, B] = A B A' B'. This structure allows you to make a small change to a specific part of the cube while leaving the rest largely untouched. Think of it as a surgical tool compared to the sledgehammer approach of the beginner algorithms. Learning to construct simple commutators allows you to create your own algorithms for specific situations, giving you infinite flexibility.
Conjugates take this a step further. They follow the pattern X Y X', where Y is a simple algorithm you already know, and X is a setup move. By using conjugates, you can apply a known algorithm to a different location on the cube without memorizing a new sequence. For example, if you know an algorithm to swap two edges on the top layer, a conjugate allows you to swap two edges on the middle layer using the same core logic. Mastering these concepts transforms solving from rote memorization into logical problem-solving.
Efficiency and Ergonomics
As you progress, the physical act of turning the cube becomes just as important as the mental calculation. Ergonomics refers to how comfortably and efficiently you can manipulate the cube. High-level solvers develop unique finger styles that allow them to execute multiple moves in rapid succession with minimal hand movement. This reduces fatigue and increases speed. Techniques like finger tricks involve using specific fingers to initiate turns while others support the cube, creating a fluid motion that feels almost automatic.
Furthermore, cube maintenance plays a crucial role in advanced play. A cube that is too tight will slow you down and cause wear on your fingers, while one that is too loose may pop pieces out during fast turns. Many enthusiasts invest in high-quality lubricants and tension-adjustable cubes to fine-tune their experience. In 2026, the market offers a wide variety of magnetic cubes that provide tactile feedback, helping solvers feel exactly when a turn is complete, which aids in precision.
Frequently Asked Questions (FAQ)
Q: Can I solve the Rubik's Cube without memorizing any algorithms?
A: Technically, yes, but it would be extremely inefficient and time-consuming. The beginner method relies on four short algorithms to handle the majority of scenarios. While pure intuition works for very simple scrambles, the complexity of a random scramble requires systematic approaches to guarantee a solution within a reasonable timeframe. Memorizing these algorithms is the fastest path to proficiency.
Q: My cube keeps falling apart while I solve it. What should I do?
A: This is usually due to a lack of tension or worn-out internal springs. Check the screws on the center caps; tightening them slightly can increase tension. If the cube is old, the plastic may have become brittle. You can also try applying a tiny amount of silicone grease to the internal mechanism to smooth out the movement. Ensure you are not forcing the cube; gentle, controlled turns prevent damage.
Q: How long does it typically take to learn the first layer?
A: For most people, understanding the logic of the White Cross takes about 15 to 30 minutes of focused practice. Completing the first two layers might take another hour or so of trial and error. By the end of the first day of dedicated practice, most beginners can solve the first two layers consistently. The key is not rushing; take your time to understand why each move works.
Q: Is it possible to solve the cube if I only remember half the algorithms?
A: You can solve the cube, but you will likely get stuck at specific stages, particularly when positioning the last layer corners or edges. The beginner method is designed so that each step has a clear condition and a corresponding algorithm. Skipping steps or guessing often leads to dead ends. It is highly recommended to memorize all four core algorithms before attempting to solve repeatedly.
Q: Why does my yellow cross look weird after doing the algorithm?
A: This is a common misconception. The algorithm F R U R' U' F' is designed to create a cross based on the orientation of the stickers, not their final position. It is normal for the side colors of the cross pieces to not match the center colors yet. Do not try to fix the side colors at this stage; simply repeat the algorithm until the shape is a perfect plus sign (+). The side colors will be fixed in Step 5.
Conclusion: Your Journey Has Just Begun
Congratulations on reaching the end of this comprehensive guide. You now possess the knowledge, tools, and confidence to tackle the Rubik's Cube. The journey from a scrambled mess to a solved puzzle is a rewarding exercise in patience, logic, and spatial reasoning. Whether you solve it in thirty minutes or thirty seconds, the satisfaction of conquering the cube is unparalleled.
Remember that mastery is a marathon, not a sprint. Every expert solver started exactly where you are now, fumbling with algorithms and feeling frustrated by misplaced pieces. Embrace the struggle; it is the essence of learning. As you continue to practice, you will notice patterns emerging, your muscle memory strengthening, and your solves becoming smoother. The community of cubers is vast and welcoming, ready to share tips, compete in events, and celebrate achievements.
In 2026 and beyond, the Rubik's Cube remains more than just a toy; it is a testament to human ingenuity and a timeless challenge that transcends generations. By mastering these steps of solving a rubiks cube beginner friendly guide, you have unlocked a skill that will serve you well, sharpening your mind and providing endless entertainment. So, grab your cube, scramble it up, and let the adventure begin. The world of speedcubing awaits your entry.

Keep practicing, stay curious, and never stop turning. Happy Cubing!